defgo = define and go
defgo is a survey system for collecting and analysing information online. defgo is ease to use, and will cover all your needs for collecting, processing and analysing data.
defgo is an ASP løsning, because everything takes at the internet. Access defgo by your browser at www.defgo.com – without any installation of software, take use of defgo right away.
Any knowledge beforehand is not needed to use defgo – the system is built up by wizards, guiding the user gradually through different phases of an analysis process.
defgo is a tool often used for analyses such as employee satisfaction surveys, customer satisfaction surveys, web-site evaluations, course evaluations etc..
In order to achieve a sufficient result from an analysis, the user should have acquired basic analytical skills and knowledge about the system.
defgo should be used with one of the following browsers Edge, Chrome, Firefox or Safari (in one of the last three released versions). We recommend that you use a desktop computer (not tablet or mobile) to get the best user experience and the full functionality. In addition, the computer must be equipped with the Microsoft Office program (in one of the last three released versions) to make use of e.g. report features, but this is not a requirement.
defgo includes these types of licenses:
defgo Modules
Only pay for what you need with defgo modules.
Choose between the following modules:
- Language-module
- Data Input ModuleType data for phone interviews (CATI) and type Paper Questionnaires.
- Dataexport-moduleExtraction of raw data for SPSS, Excel and SAS.
- Advanced security-moduleEncryption of login and reports and encryption of questionnaires.
- User management-moduleCreate new users, grant them access and editor rights.
- Paper survey-moduleCreate your own Paper Questionnaires, for respondents to answer without computer access.
- Via Paper InstructionCreate login/password for groups (eg. course participants), to secure anonymity for all.
- Backgrounddata-moduleInclude pre-filled informations in the Questionnaire.
- Forms-moduleCreate elektronic forms for e.g. for bookings and registrations via your website.
- Advanced report-moduleCreate various filtering terms for reports.
- Data weighting-moduleCreate weighing of answers from a survey.
- Advanced panel-moduleRegistrations and opt-outs to your panels via your website.
- Personal start pageOrder with logo and colours matching your company website.
- Telefoninterview (CATI)-modulImplement surveys via phone interview.
Start with defgo
defgo is a survey tool built up by modules, allowing you to composite your solution, in accordance to the needs of your organization for online surveys.
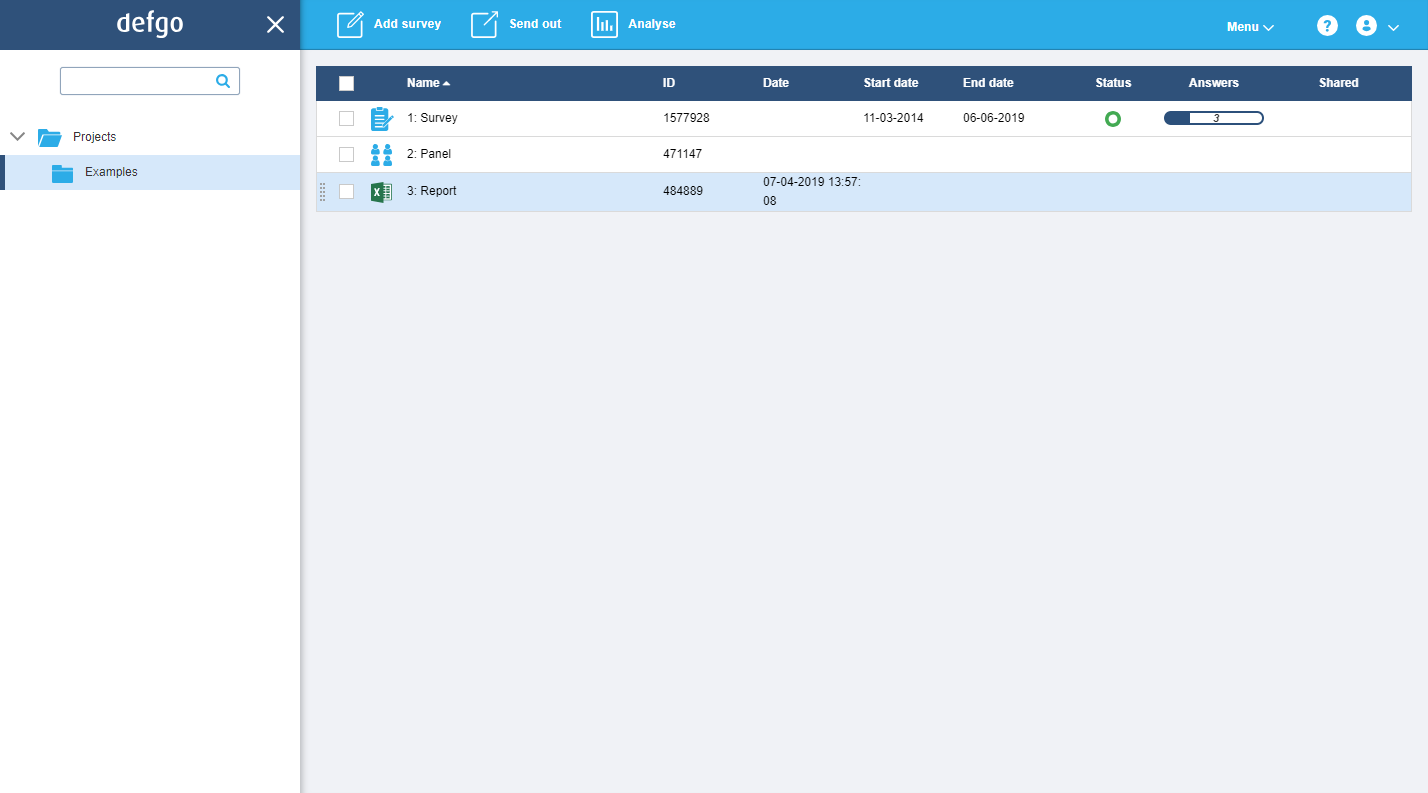
Sign in to defgo, go to the Overview page by clicking Get started. Here you are granted access to various function.
- Projects -Here you create questionnaires and panels, and this is the place questionnaires are sent out to the respondents. After the questionnaire have been created, this is also where answer reports are published.
- Create Survey Spørgeskema - Create your Survey
- Send out - Send out your Survey to your respondents
- Analyse - Analyse your answers, create reports and much more.
- Menu - Use different settings for your Survey
- Help - contact information, providing e-mail and phone support.
- User menu - Create new users and edit your own or others accounts.
F.A.Q.
-
Go to Sign in with defgo and type your username and password and press OK.
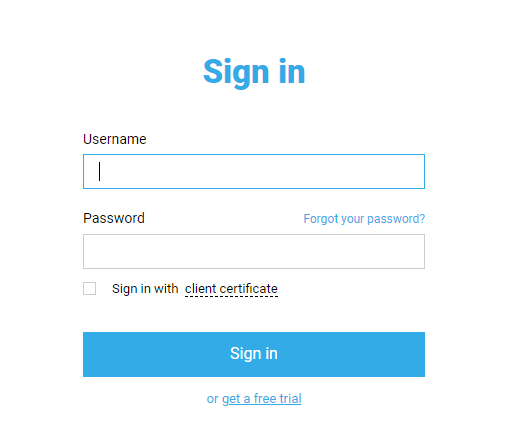

Notice: This online help prerequisites you having an account created in defgo. If this is not the case, you can go to Log on and click on New user. Then you can create a test account. Beware that a test account is not granted all rights and access such as a payment account.
A secure password:
- consists of a combination of big and small letters, numbers and special characters
- is at least eight characters long
- is personal and should be kept secret
- is not written but being memorized by heart
- should be changed at least once a month
An insecure password includes:
- your username or parts of it
- your own full name or parts of it
- words from an encyclopedia
- names or numbers that can be put in connection with yourself. E.g. phonenumbers or birthday dates
- logical typing combinations, e.g. qwerty, which are six keyboard letters subsequently listed horizontallly
-
Sign in with client certificate
A client certificate is a digital identity certificate that you can use to sign in to your account without a password, using the certificate installed in your browser.
defgo uses NEM IDs digital signatur (OCES). This includes two types of signatures, both applicable in defgo.
Digital signature with NEM ID for private persons - read more about this at: NEM ID for public websites
Digital signature with NEM ID for employees - read more about this at: NEM ID for employees
Note: Before using the function Sign in with client certificate, the client certificate should be connected to your user name. Se section assign Client certificate at User management, or contact your defgo administrator.
Click on Sign in with client certificate in the bottom part of the sign in form.
Sign in with client certificate – users with more than one account
Sign in to an ordinary account
If you assigned more than one user account to your client certificate, e.g. to an user account and an administrator account, then Sign in with client certificate will sign you in to you ordinary account.
Sign in to administrator account
If you want to sign in to an administrator account, then click on Sign in and insert the username for the administrator account, and check the field Sign in with client certificate.
Sign in to another users account as an administrator
As an administrator you can sign in to all accounts within a group. To do this, click on Sign in and insert the user name for the given account, and check the field Sign in with client certificate.
-
When you have create a new defgo account, and signed in as a user, a project folder is already created . In the folder, defgo also created examples for a survey, a panel and an analysisreport.
Create surveys, reports or dataexport files in the folder.
Right click on the folder Projects to create a new folder, and select Create folder.
Then name the folder.
Create a new Project folder by clicking on Menu. Then click on Project folder.
Functions after the folder is created
When the folder is created, it is listed in the left side menu. Create several folders in Projects. Use the folders to organize your surveys.
You can also upload files from your computer to the folders.
Click on your folder to see settings such as:
- Create folder
- Run tasks
- Rename
- Move
- Delete
-
Surveys can be moved from one folder to another, or from one account to another, within the same group or within the same account.
Go to the Overview and point the curser to the left of the element, until the marker is visible
 .
.Drag and drop the element.
You can also check more elements in your movement. Repeat drag and drop with all the checked elements.
-
It is possible to upload a file from your computer to defgo. The file can be a published report, with a custom layout, which you would like to keep together with the survey. When you click Add file, a Wizard appears. Click Browse to select the file from your computer.
Click OK.
Then you can open, rename, delete, move or publish the file.
It can take some time to transfer larger files to defgo.
-
Click on your survey and select Answer.
If you want to delete answers individually, select Delete answers individually (from summary), or select Delete all answers to delete all answers at once.
You can delete answers by filtering from these settings
- Delete all answers filtered by user ID
- Delete all answers filtered by internal ID
- Delete all answers filtered by user question
Make you choice and click Next.
Select the answers to be deleted. Use the ’Ctrl’-key to select more than one. Click Next and Finish to complete the deletion.
Delete all answersWhen you have selected Delete all answers you can regret your choice by clicking Cancel. Click on Finish to delete all the answers.
This function is useful for deleting an answer, while the survey is being implemented. In this case, if you delete an answer, then the survey link will return to be actived, and the respondent can take the survey once again.
-
Surveys, Reports, Forms and other items can be moved from one folder to another. Click on the item set to be moved and select Move.
Select user for movement
Select the user targeted for your movement.You can search for the user.
The users own account is selected by default. If the survey is to be moved to another folder within the same account, then no changes are needed.
Select folder for movement
Select which folder, an item should be moved to. You can search for a folder and select overview type: folder list or folder tree.Click on Move.
-
Click on your survey and select Answers.
Then you can see Export answers
-
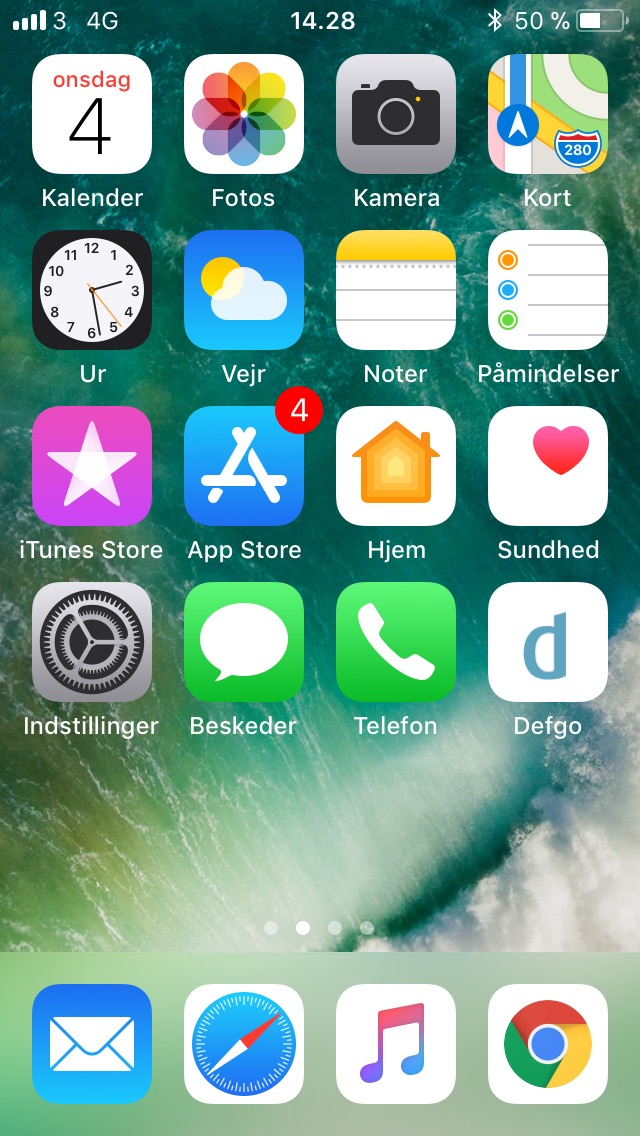
iOS
Click on your Analysis report from the overview and select Share.
Share the report via e-mail and open the defgo report link on your phone.
If you have an iOS operating system, please click on this icon
 i navigationsværktøjslinien.
Then click Add to homescreen

Name it "defgo" and click Add.
Now you have access to defgo as a web app, and access to data anytime!
If you have an Android operating system, please click on the menu icon ⋮ in the navigation toolbar.
Then click Add to home screen.
Name it "defgo" and click Add - In Firefox / Samsung naming the reportlink is not possible.
-
The column Status presents the status of the survey implementation within these three options:

Survey, draft. Yellow light. The survey has not yet been implemented. There are no answers, and no panels have been assigned the survey.

Survey, active. Green light. The survey is active and answers are being made. A panel has been assigned to the survey, or some answers have been made. The end date has not yet been passed, and the start date is in the past.

Survey, not active. Red light. The survey is closed, becaused the end date has passed, or the start date has not yet been reached.
The column Answers presents the status of the survey answers in percent.
Hover the statusicon and you will see the total number of answers and which answers are being collected via panel.

Answer percent for the survey: If the survey has a panel assigned, the answer percent is presented (sessions/invitations).
-
Sending out reminders to respondents of a survey can often raise the answering percent significantly. If you sent out the survey Via panel then there is automatically sent a reminder to the respondents of your survey, who after a period of time still haven't answered the survey.
See the step-to-step guide sending out a survey via panel.
-
For only one anwer and matrix questions, the satisfaction scale (Very satisfied – Very unsatisfied) with smilies. Just replace the written scale in Settings with HTML-codes for the different smiley gif-files.
See How do I add smilies to my Matrix question?.
Step 1: Create survey
After launching defgo, and you've signed in to your account, create a folder for the survey and open it.
Then click Add survey in the top menu.
Enter title for the survey.
Either select a template, or create a new survey without a template.
Click on Template to view a list of templates including short descriptions of each template.
- Select Template and click OK.
Important: Remember to save your work regularly during survey editing, by clicking Save.
Click Import in the top menu and select from survey .
You can import questions from other surveys, or from another users survey.
Click Import, select the user that the survey should be retrieved from and click Next.
Then select your survey folder, and click on the survey that the questions should be imported from. Select questions individually and click Finish.
Click Import in the top menu and select from text editor.
In the pop-up window, insert whole questions (question texts and answer alternatives) at once - e.g. copying from a Word document.
Insert questions on separate lines with question text and answer alternatives. Create a blank (empty) line between each question and click OK.
When you click OK questions and answer alternatives are copied to the survey.
Click on the icon in the top menu to regret an action. You can repeat the action by clicking the icon
When ever possible to cancel an action, it is also possible to repeat the action. These actions can be used inifinitely for:
- survey title text, questions, answer alternatives, scale steps
- add/remove question
- copy question
- drag and drop question
- change question type
- change layout for question (radio button – checkbox)
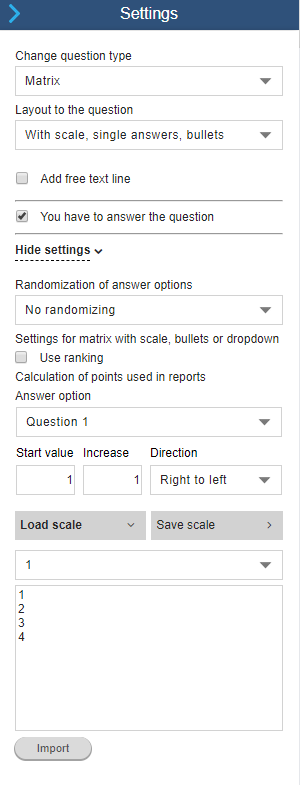
- retrieve scales in Matrix questions
Cancel/repeat also works for leaps. If you remove a question including a leap, and cancel this action, the leap will be saved for the question.
Question types
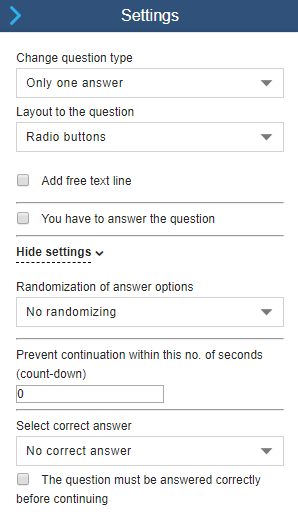
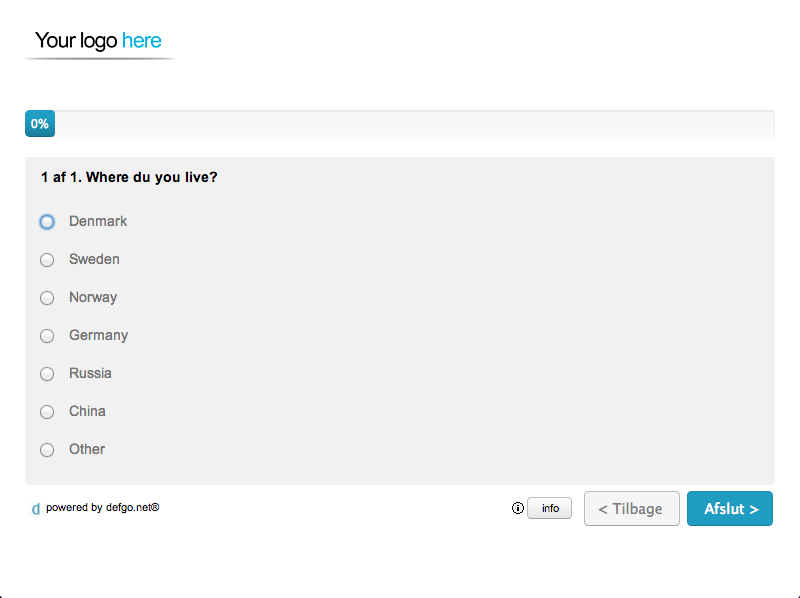
Only one answer is a question with answer alternatives, for which the respondent can choose only one answer alternative.
- Layout: Select layout for answer alternatives listed or in a drop down box.
- Check the field You have to answer the question if the respondent has to answer the question, before continuing to next question.
- Prevent continuation within this no. of seconds (count-down): Insert seconds for count-down, in order to prevent the respondent answering the question too fast.
- Extra answer alternative: Add free text line creates a new text field at the end of the list of answer alternatives. The text Other can be modified.
- Randomization of answer options: – choose between No randomizing or Random order or Random order except last option. If you choose Random order, disable the back-button from the survey.
- Choose the correct answer alternative with Select correct answer and check the field The question must be answered correctly before continuing if the respondent has to answer correctly before continuing to next question.
Settings for only one answer
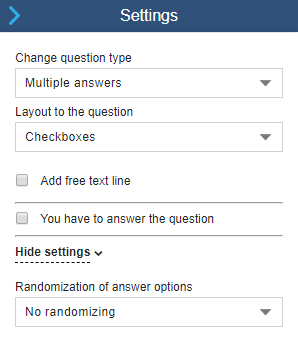
Insert multiple answer alternatives if the respondents should answer one or multiple times. Select Checkboxes or a List, which indicates the respondent should answer multiple times.
Min. value indicates the amount of answer alternatives that should be answered. If you select 1, the question should be answered. Max. value are used for questions of the type Choose the 3 greatest..
Question layout: Choose between checkboxes (shown in the example), or a list. The system automatically notifies the respondent to press down the ’Ctrl’-key nede, when more answer alternatives are to be selected.
Settings for multiple answers
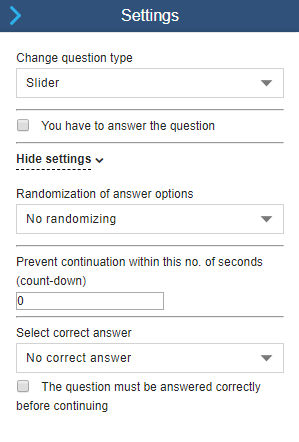
Insert a slider, and the respondents will drag their answers to the answer alternatives.
- Check the field You have to answer the question if the respondent has to answer the question, before continuing to next question.
- Prevent continuation within this no. of seconds (count-down): Insert seconds for count-down, in order to prevent the respondent answering the question too fast.
- Randomization of answer options: – choose between No randomizing or Random order or Random order except last option. If you choose Random order, disable the back-button from the survey.
- Choose the correct answer alternative with Select correct answer and check the field The question must be answered correctly before continuing if the respondent has to answer correctly before continuing to next question.
It is not possible to add a text field with this question type.
Settings for slider question
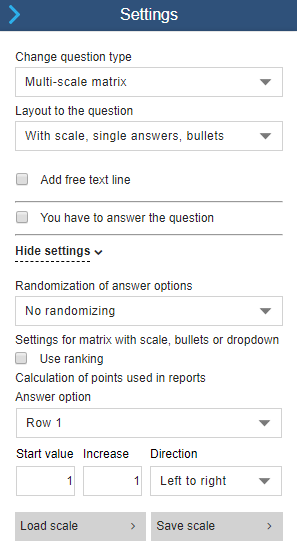
A Matrix is a list of questions for each includes a scale with answer alternatives.
Start by adding a list of questions to a new Matrix:
Write a question in a the questiontext field and click on Settings to type the scale used for all the questions (all questions in a Matrix use the same scale):
Choose between five different layouts for the scale:
- With scale, single answers, bullets
- With scale, single answers, dropwdown
Useful for giving the respondent the opportunity to choose from at list (e.g.. double or triple scales) opposed to only one answer as individual answer alternatives. - With scale, slider. Inserts a slider for which the respondents can drag their answers to the answer alternatives.
- With scale, numeric. Indicate the interval in Settings
- With scale, multiple answers Choose between multiple answers in the scale. Type answer alternatives and scale like in With scale, single answers, bullets. The difference is you can choose more answers for each line.
- Randomization of answer alternatives: When activated, answer alternatives appears in randomized order.
- Extra answer alternative: Add a free text field, e.g. for commments. The text ”Other” can be changed in settings.
Matrix settings
Free text answer are used for open questions, when the respondenten can describe or explain various conditions or situations.
The respondent has a limited number of characters available, and the system will count down gradually, letting the respondents dispose of their words in the text. Select up to 16.000 character and require answers by checking You have to answer the question.
Description is used for text describing the survey, introductions or endings or for headlines or subtitles for new sections. Insert layout text or images as well. Click on Settings to open a text editor and start with your layout.
In "text" type your text which replaces a normal answer alternative.
Use HTML-codes such as < b > for bold, < i > for italic, < p > for a new paragraph, etc. Insert link to images with < img >.
A numeric question makes sure that only numbers are typed in the field. Please notice that it is not possible to cross tabulate number variables. The values (respondent answers) are outputted as numbers which can be processed outside of defgo.
Set a min. and max. value – both values included. This means that the respondent will be notified each time he/she types a value outside of the interval.
There can be added up to 6 decimals. Decimal numbers are useful for prices and weight values. Consider whether you can use a closed question instead of a numerical question. This will make post-processing easier for you, to report directly on typed answers, and not code (rubricizing) answers firstly.
The question type attach file is without answer alternatives and allows the respondents to attach files to their answers. You can upload files of different types - image, document, video etc. Please note that max. filesize is 10 MB.
In Settings you can define the answer as mandatory or not, and number of files to be uploaded as well as max. filesize.
The question type Form is used for ved data entries. Type name, answering date, email, date, time, weeknumber, and numbers.
It is possible to validate the users information. Check the datatype or insert backgrounddata from a panel by defining column-id from paneldata (only use numbers without parenthesis).
Backgrounddata- and form-modules are required to use the "Pre-fill with backgrounddata" function.
- Create the question type ”Only one answer” and define correct answer alternative in settings.
- Check the field The question must be answered correctly before continuing.
- Check Randomization of answer options if you want a random order of answer alternatives, and define count down for each question, at Prevent continuation within this no. of seconds (count-down)
- After you've create all you answer alternatives, go to Settings for the survey, click Next and check the field Show answers after completion.
- After the completion of the survey, the respondent will see the number of correct answers (green icon) and incorrect answers (red icon).
- The total error percent is shown at the top of the survey.
- Read more about exporting answers from a knowledge test.
Settings for only one answer
Settings for question types
Select a question and click the icon Settings ![]()
For question types:
- Only one answer,
- Multiple answers,
- Slider,
- Matrix and
- Multi-scale Matrix
The text ”Other” can be changed of your own choosing.
Avoid bias answers by making the order of answer alternatives random. Select from the list Randomization of answer options in question settings.
If You choose Random order except last option the last answer option will always be at the end of the list. If You choose to add Extra answer option, the last and the extra answer option will be excerpted the random order and positioned at the end of the list.
The setting Random order is applicable for three question types: Only on answer, Multiple answers and Matrix.
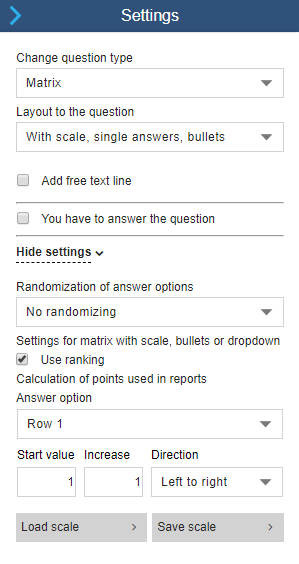
Ranking can only be used for two types of Matrix questions: with scale, single answers, bullets, and with scale, single answers dropdown.
Ranking lets the respondent evaluate and prioritize answer options based on which answers options they prefer or like the most.
It is not possible to rank two answer options equally.
Ranking is not applicable for open questions, multiple answers, extra answer option and calculation of points.
Settings for matrix with scale, bullets or dropdown
In defgo there are different types of Matrix questions with scale.
With scale, single answers, bullets.
With scale, single answers, dropdown. The respondent can choose answer options from a list (also with double or triple scales) instead of using single answers as bullets.
With scale, slider. Inserts a slider, from which the respondent can drag his/her answer to the answer option.
With scale, numeric. Insert numbers in a Matrix.
With scale, multiple answers. Respondents can choose multiple answers from the scale.
Insert smilies instead of an answer alternative text in Matrix questions with html code.

<img src=https://www.defgo.com/surveys/smileys/3/1.png border='0' height='30' width='30'><span style="display:none">Very Unhappy</span>

<img src=https://www.defgo.com/surveys/smileys/3/2.png border='0' height='30' width='30'><span style="display:none">Unhappy</span>

<img src=https://www.defgo.com/surveys/smileys/3/3.png border='0' height='30' width='30'><span style="display:none">Neither/Nor</span>

<img src=https://www.defgo.com/surveys/smileys/3/4.png border='0' height='30' width='30'><span style="display:none">Happy</span>

<img src=https://www.defgo.com/surveys/smileys/3/5.png border='0' height='30' width='30'><span style="display:none">Very happy</span>

<img src=https://www.defgo.com/surveys/smileys/3/6.png border='0' height='30' width='30'><span style="display:none">Don't know</span>
Create a NPS question with the question type Matrix.
In the question should be 1 answer option with precisely 11 answer options in a scale from 0 - 10.
The question text should be "How likely is it that you would recommend our company/product/service to a friend or colleague?"
NPS is calculated by subtracting the percantage number of "Critics" from the percantage number of "Ambassadors". NPS can be a number between – 100 (in case of 0% Ambassadors, 0% Indifferent og 100% Critics) and 100 (in case of 100% Ambassadors, 0% Indifferent og 0% Critics).
Client answers can be rubricated like this:
"Ambassadors" (9-10),
"Indifferent" (7-8),
"Critics" (0-6).
Navigation with keyboard includes three sets of keys.
Up and Down keys.
Enter.
Tab and Shift-tab.
DOWN-arrow shifts to next element and activates the text editor, UP-arrow shift to previous element and activates the text editor.
ENTER-tab saves the current text and shifts to the next element and actives the text editor.
TAB-key shift to setting tools such as text editing, settings, minimize, copy, dele, for the row you have selected. When the last element for the current question is selected, the first element of the next quesiton is activated. Shift-TAB navigates in the opposite direction. Keys DOWN-arrow, ENTER or TAB opens editing functions for the actual quesiton, if none of the fields are being edited.
Step 2: Layout
Go to Layout Wizard at Settings.
Select layout-template from the dropdown
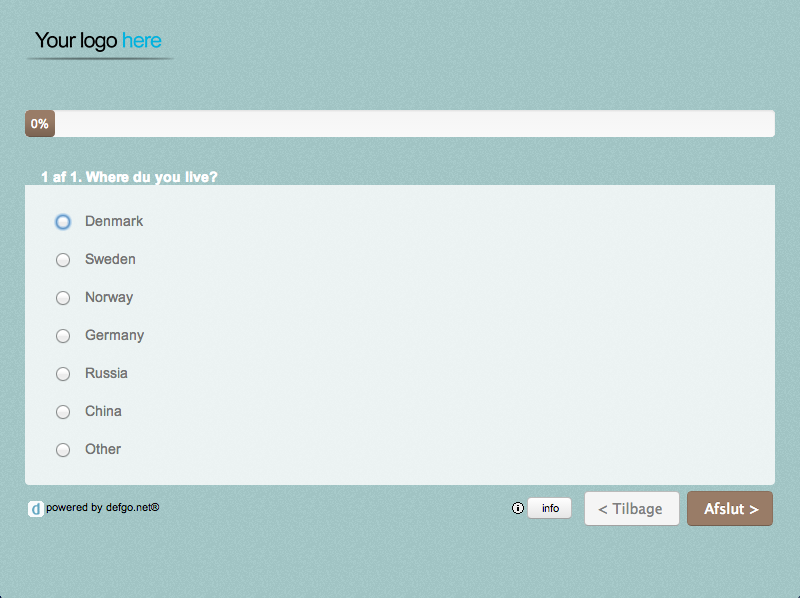
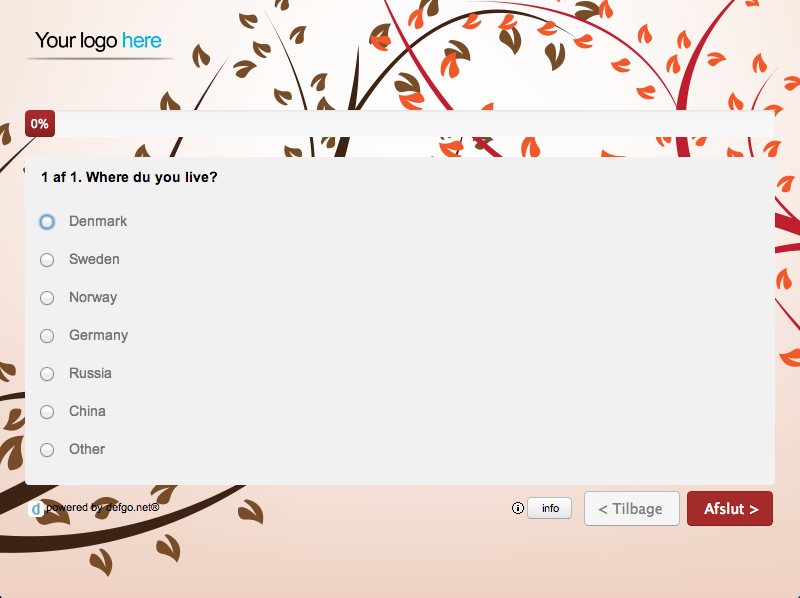
Choose between 14 different templates of different design and layout. View examples.
Neutral
Standard
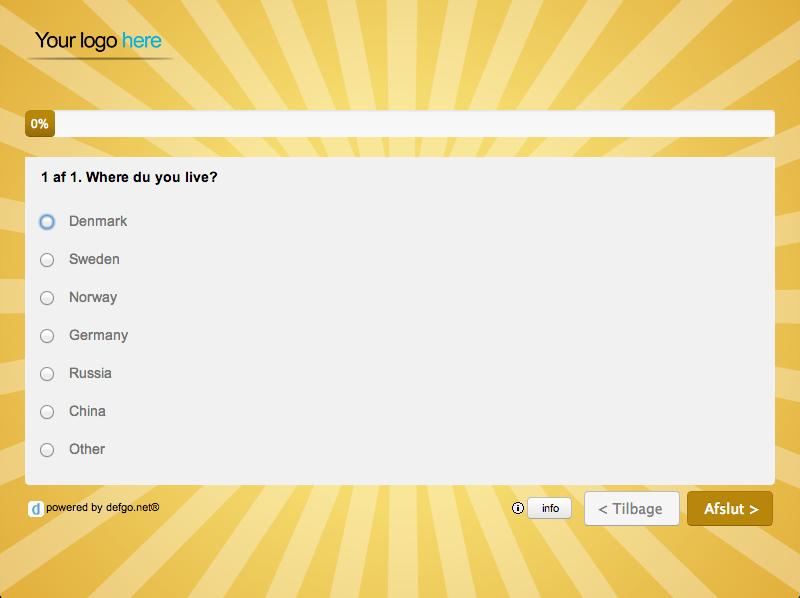
Sunrise
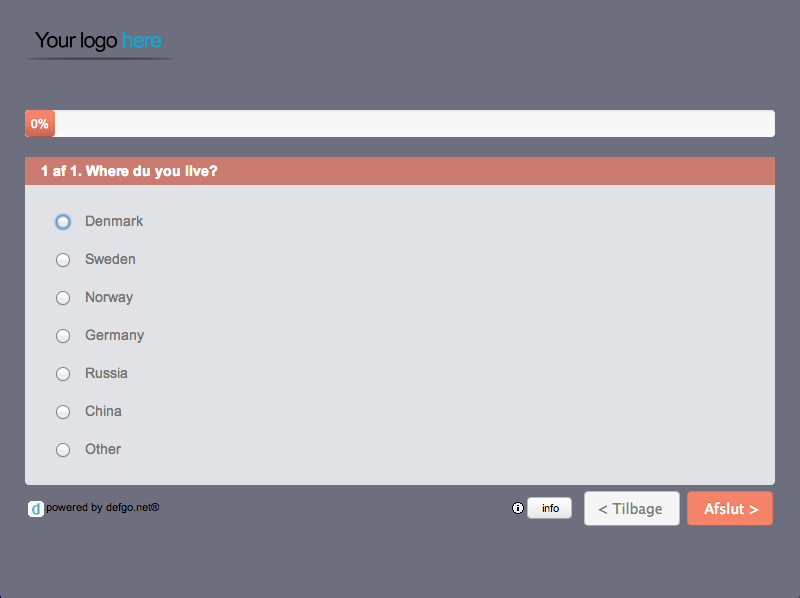
Moon
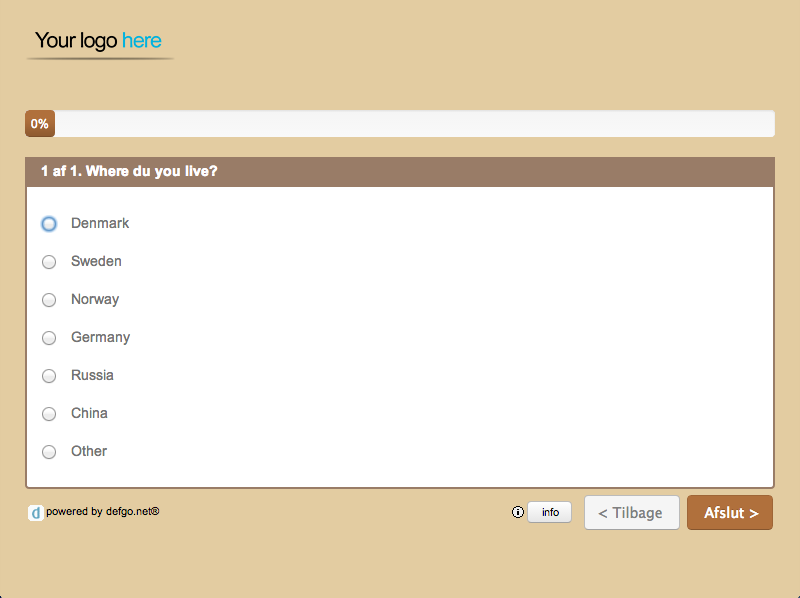
Autumn
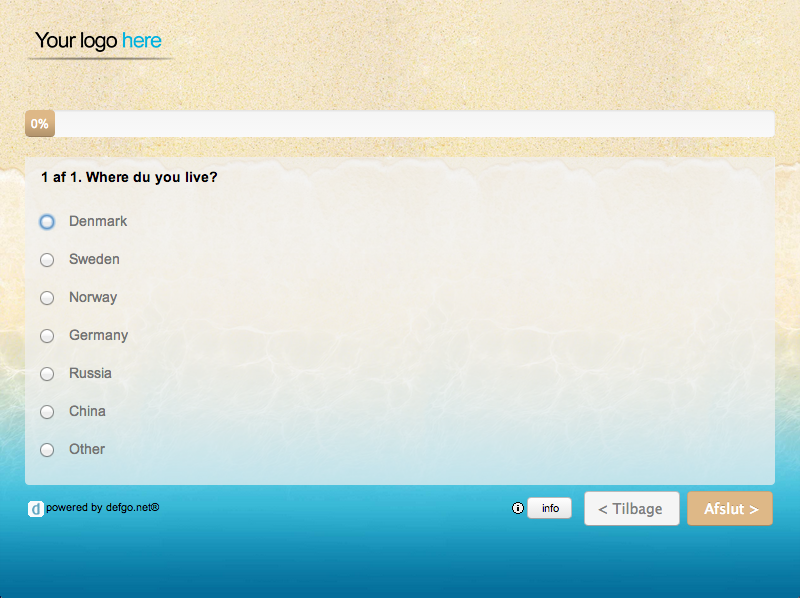
Beach
Earth
Spring
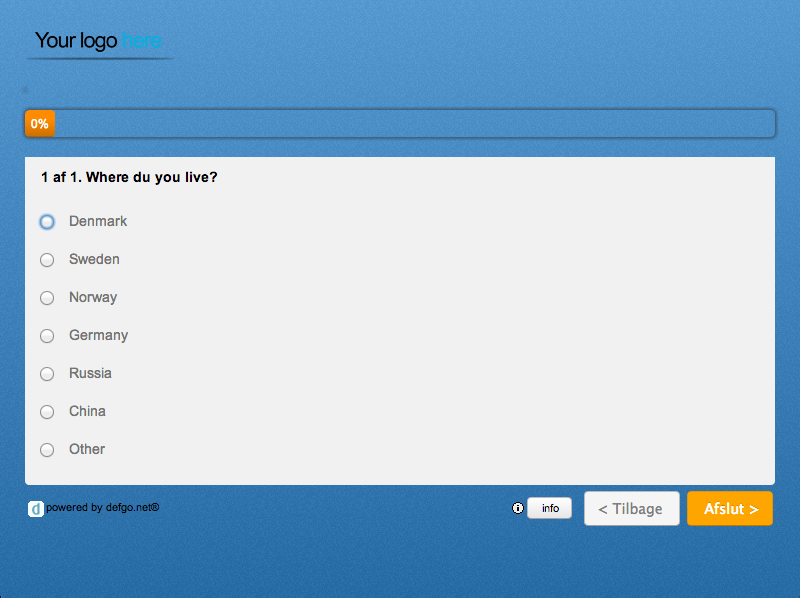
Blue & Orange
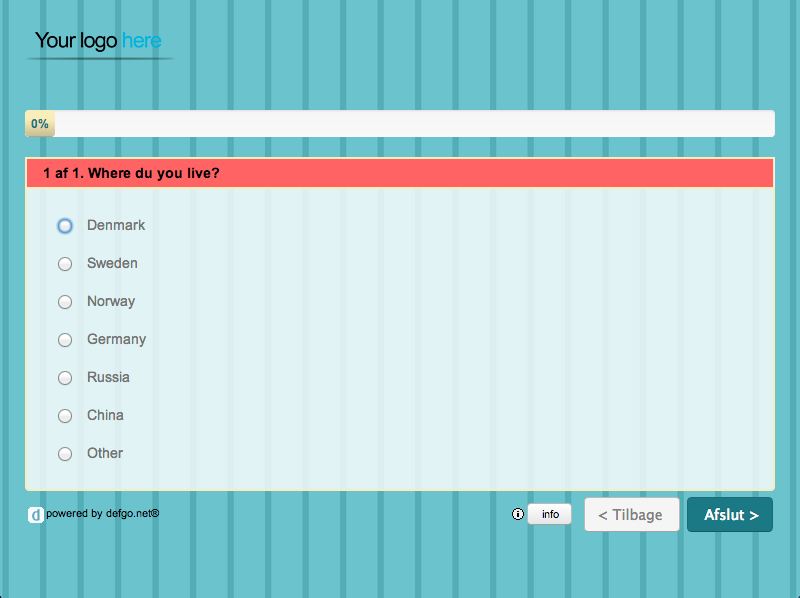
Groovy

World
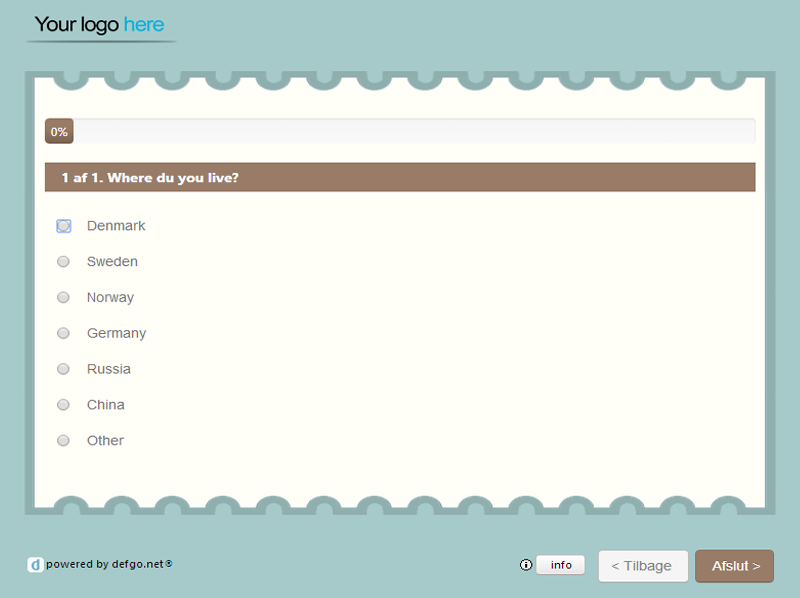
Registration
Replace the standard logo with your own. Go to Layout Wizard at Settings.
Option 1: Insert url for your logo: http://www.yourcompany.com/logo.jpg. You can insert one or multiple logos (URL) separated by semicolon.
Option 2: Insert your logo after you've uploaded an image file to your folder. Go to Overview and clickAdd file to the project folder. Then select the logo from dropdown in the Layout Wizard.
Go to Layout Wizard at Settings.
Insert the path to your CSS file in the Wizard.
defgo
offers custom design and layout in accordance to your company design policy.
Contact defgo support for more information
Step 3: Advanced settings
When you have created your survey, you can apply advanced settings to it. Click on your survey and select Settings.
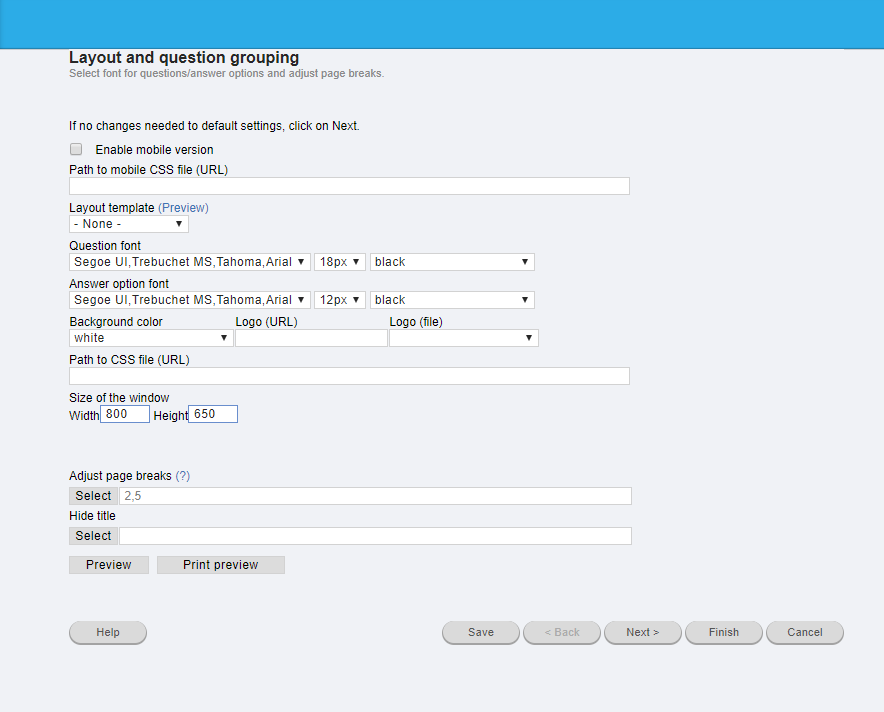
Settings are divided up into 3 sections. The first one is Layout and questions grouping, click on Next, and you will go to Extended settings, and one more time click on Next, you will see Question labels.
The advanced settings can be completed separately, ie. on each wizard with the advanced settings there is an Finish button.
Here you can edit:
- Layout and colouring
- Settings for fonts and fontsize for questions and answers
- Logo
- Path to CSS layout file
- Window size
- Pagebreaks after questions
- Questiontexts
While editing settings, preview the survey with Preview and Print preview.
Buttons
- Back-button
- Print answers button
- Show answers button
- Go to question drop-down list (the respondenten can jump back and forth for any answered question).
Program Texts
- Show question number
- Show statusbar
- Show help texts for each question
- Show total number of questions
Misc
- Mark questions that must be answered
- Allow Hotkeys
- Anonymize answer data
- Allow user-ID generation
- Resume answering of survey sent out via generic link
- Lock answers after completion
- Do not save answers of incomplete survey
- Select template for the survey
- Allow reports for all users
- Show answers after completion
- Show all free texts after completion
- Validation of user IDs
- Select country for the implementation of the survey
- Select language
- Write the survey description

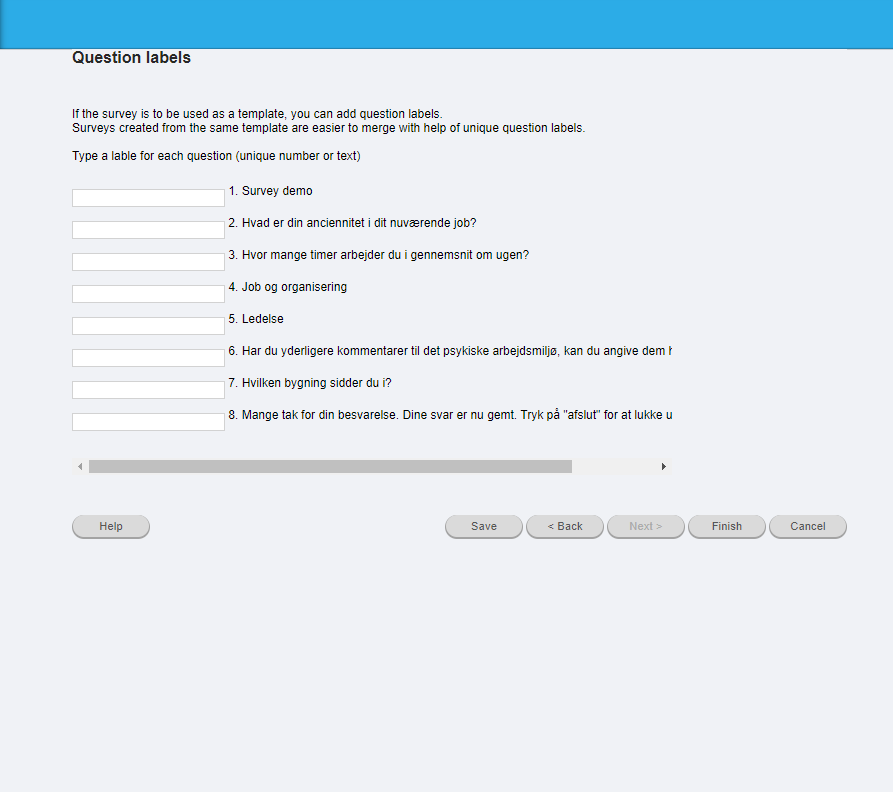
If the survey is to be used as a template, you can add question labels. Surveys created from the same template are easier to merge with help of unique question labels. Type a lable for each question (unique number or text) Read more Type Question labels
Question labels should be 100% identical.
Question labels can be created after the survey end date.
Step 4: Leaps, Test and Data Security (GDPR)
After you've created your questions, you can test the survey as a respondent. Go to the overview, click on your survey, and select Test.
Then you view the questions as a respondent, but your answers will not be saved. Tests are important, especially questions including Leaps, to ensure a correct leapsetting.
Survey deletion and reminder after survey end date
To secure user data in compliance with the GDPR regulation, defgo assists with a number of functions to secure user data.
As an owner of a created survey, after six months you'll receive a reminder for the ending of the survey implementation.
To comply with EU GDPR regulation, we encourage you to delete the survey after six months, if the answers contain personal informations from the respondents.
Exclude personal informations in answer export
If you created a panel while creating your survey, you can exclude the first two columns from the panel, e-mail, personal-id, phone-number (first column kolonne) and name (second column), for your export of answers.
This function is activated by default. To include the first two columns, de-enable the function by clicking the check-box.
To view settings for answer export, click on your survey and select Answers, and Export answers and then export format. Click on Next and Settings.
Leaps automatically ensures that you only asks the respondent relevant questions. Leaps creates a path throughout the survey, asking different segments different questions. For each question and each answer option, a leap forward can be created.
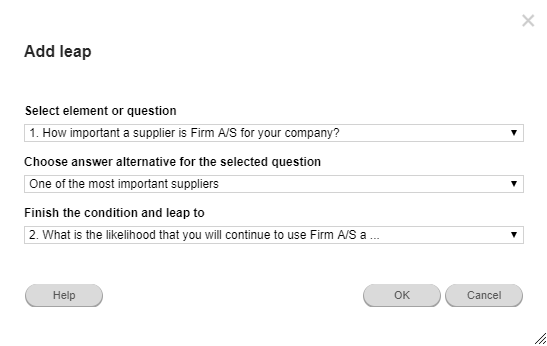
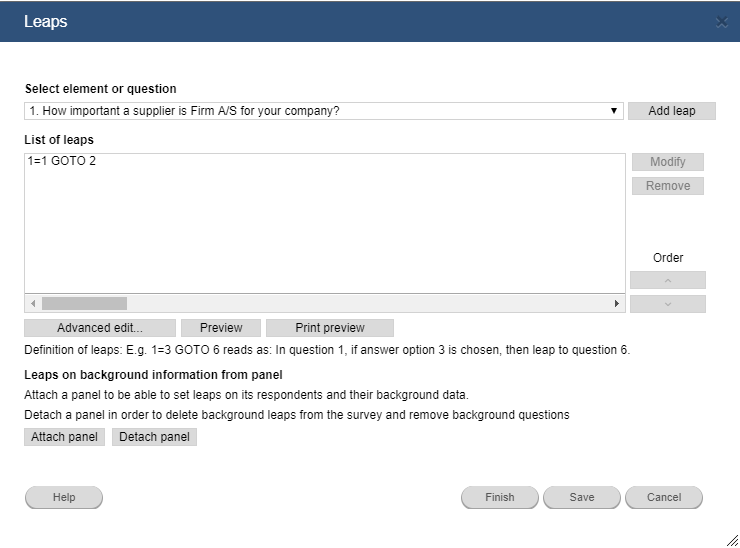
Click on the survey and select Leaps. Select the question in the dropdown list, from which a leap can be made and click Add leap
The leap is now visible on the list of leaps.
It is a good idea to activate the You have to answer function for all questions with leaps. If the respondent doesn't answer a question with leap, he/she will continue to the next question and the leap will be ignored.
Remember, if you change the order and add or delete questions after creating a leap. The leap will still be in function.
We recommend that leaps are configured last in your questionnaire setup to avoid ending up with incorrect leaps.
There are 5 core principles for leaps:
- Leaps are executed greedily from the top of the list and downward.
- A maximum of 1 leap is executed.
- If none of the leap conditions are met, the respondent proceeds to the next page.
- Leaps must be inserted on the question from which you want to leap.
- If you use the page-break function (i.e., multiple questions on the same page): Leaps must be placed at the bottom of a page (on the last question), and the leap must go to the top of a page (the first question). We recommend that if the page-break function is used, you complete the entire questionnaire and insert page breaks where desired before configuring leaps. This ensures the system only allows leaps from the bottom of pages to the top of pages.
Use AND or OR Conditions to create leaps when multiple answer options leaps to same question in this example.
Example:
In question 6 all respondents answering Below my expectations or Deeply under my expecations leads to an open question.
Click to leaps and select question 6 in the overview and click Add leap.
Choose the answer option Below my expectations and click OK.
In the list of leaps: click on the leap (the leap should be highlightedt) and then click Modify .
Choose the answer option Deeply below my expectations and OR definition, and click OK. The leap has been created and respondentens answering Below my expectations or Deeply under my expectations are lead to question 10.
Regardless of reply is used to lead all answer options to the same question. E.g. in combination with a free text question.
In this example all respondents answering question x, leaps to question y
Select your question x in the overview and click Add leap.
Choose Regardless of reply and the question respondents will leap to and click OK.
The leap has been created and respondents answering question x leaps forward to question y.
In the overview a code has been created: X=* GOTO Y
In free text questions Regardless of reply is the only leap option.
In the list of leaps, the leap to the first expression rules.
The list is evaluated from top down:
- (6=1 or 6=2) GOTO 11
- 6=3 GOTO 12
- (6=4 or 6=5) GOTO 10
OR binds stronger than AND, hence the expression
”1=1 AND 1=2 OR 1=3 OR 1=4 AND 1=5 GOTO 3” is interpreted as ”1=1 AND (1=2 OR 1=3 OR 1=4)
AND 1=5 GOTO 3”
![]() The evaluation order for leaps can be used
for leaps in multiple answers questions.
The evaluation order for leaps can be used
for leaps in multiple answers questions.
Create a Multiscale Matrix question with two or more scales and insert leaps in List of leaps.
Then select Choose answer alternative for the selected question, Choose scale and then Choose scale alternative for the selected question.
Leaps in Multiscale Matrix questions looks like this in the List of leaps field:
6=1_2/5 GOTO 8
The leaps is read:
"6" = question number;
"1" = answer option,
"2" = scale choose
and "5" = answer option
for the selected scale:
If the respondent answers 1 to question number 6 on scale number 2, and selects answer option 5 on the selected scale, leaps the respondent to question 8.
Go to List of leaps. Click Attach panel. Choose between any panel from any folder. Click OK. The survey then will be attached a single panel.
Select a question or [background] information in the dropdown-menu and click OK.
Then click Add leap to define leaps for background information.
The Wizard contains your settings and you can add AND or OR operators according to your condition by selecting the leap and clicking Modify. Also, you can Remove leaps or move them up or down on the list.
E.g.: [Background] Name=Navn Navnesen GOTO 24 In this example all included in the panel Navn Navnesen will go to the question 24.It is not possible to edit the panel or leaps after sending out the survey.
SEND OUT
Click Send out in the top menu to view all your surveys created in your folder.
defgo Electronic surveys can be implemented in various methods:
via your e-mail-system, as a pop-up in a website or in an intranet, via defgo
panel-system, via papersurvey or via phoneinterview (CATI).
Click on your survey in your folder and select Send out.
Then choose between:
- Define/change implementation dates
- Choose mode of conduct
- Close survey
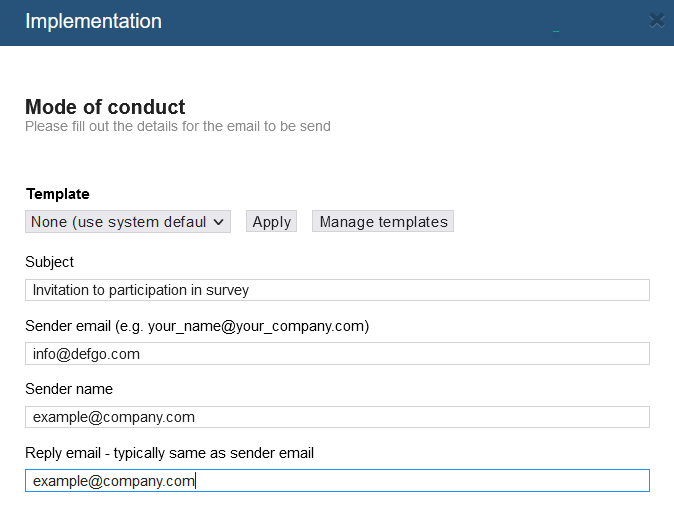
Go to Settings for Implementation.
Insert your e-mail, and you'll be notified by e-mail the day before the survey closed(based on a max. number of respondents).
Mail content :
Dear defgo user,
Please notice that the survey [SurveyTitle] (id:[SurveyId]) is about to be closed for answering.
Latest time for answering is: [EndDate]
You can choose to postpone the deadline by clicking on the survey and choose Send out.
Best regards,
defgo
Click on your survey and select Send out and chooseg Close survey and click next to select the survey end date.
Click Finish.
The survey end date is changed to the time of your action. Please notice that respondents who are taking your survey at the same moment, can finish their reply after this given moment.
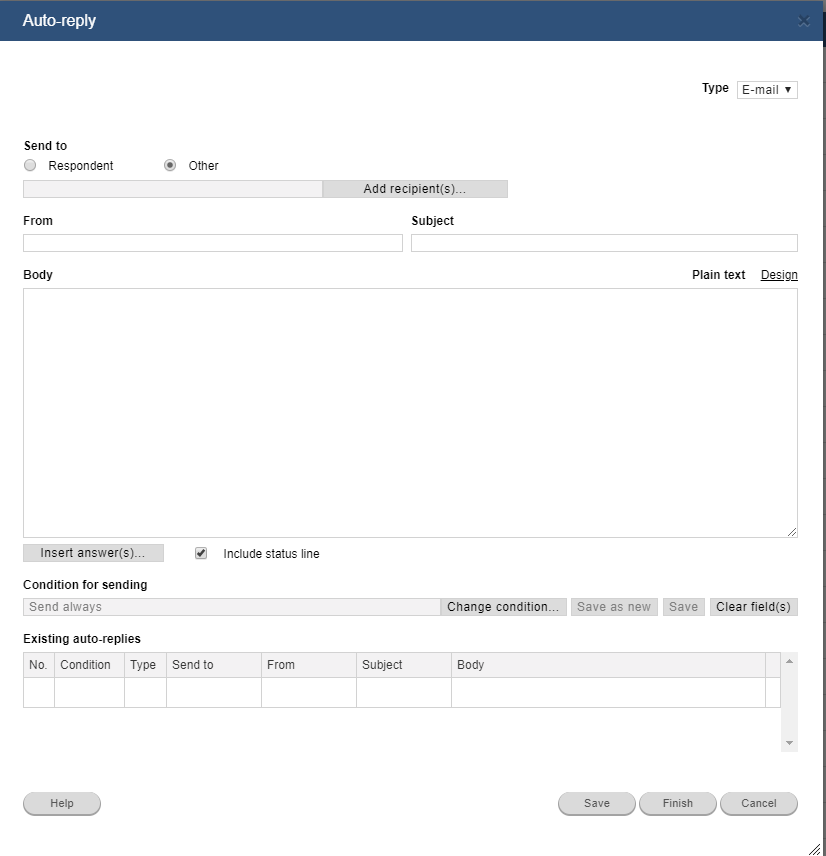
Click on your survey and select Auto-reply.
Auto-reply facilitates rapid feedback from respondents immediately after finishing a survey.
Messages is sent by email or phonetexts. You decide which questions to be included in the email. Auto-reply is sent directly to respondents as well as other recipients.
In auto-reply you can define conditions based on answers, similar to the leap function.
Create auto-reply based on these five steps:
- Choose type of Auto-reply: Email or SMS.
- Choose recipient(s) for your messages and choose between respondents or other recipients.
- Combine the text for the message.
- Choose the questions for which respondents answers are inserted by the system
- Define conditions for shipment (such as Leaps).
You can't use auto-reply if the survey is implemented anonymously.
1) Choose type of Auto-reply: Email or SMS
In order to send auto-replies to respondents, they have to type their phone numbers (as form questions of the texttype, as free text questions, or as a background variable of the freetexttype).
Adding a statusline (user-ID, survey-ID, session-ID) is deactived by default for SMS-recipients.
Remember that at ovenstående funktion kræver tilkøb af SMS-modul !
2) Choose the message recipient(s)
Choose between two different types of recipients:
- Recipient address retrieved from respondent answers or from backgrounddata
- Fixed e-mail address(es) Type the recipients valid email address. The email will be visible in the field just below. If multiple email addresses, separate these by semicolon.
3) Compose the text to be sent out
Choose the letter format. For example Text or html.
a. Press Insert answer(s), and select questions for which answers are to be inserted.
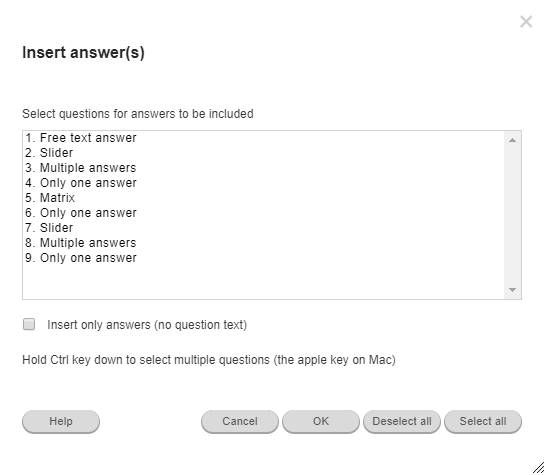
b. Compose lettertext.
Insert the mail headline. You can insert a formula from the panel background data in From and To fields.
Values [xxx] are being exchange with actual data from the panel backgrounddata.
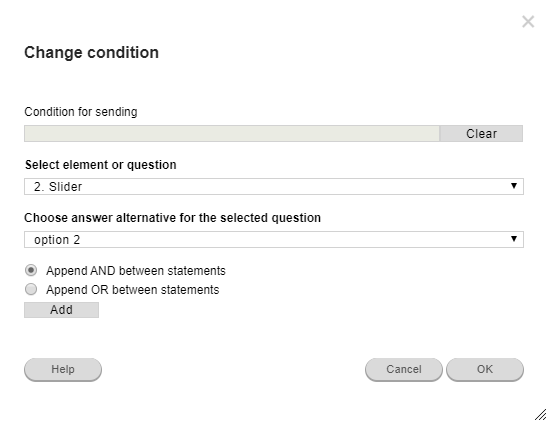
4) Set conditions for shipment betingelser for sending the message
Click Change condition. A new wizard opens. Select question and answer options for the selected question.
Click Add to define the conditions. A new message will be sent, if the condition set is true.
Click Save. Click Save as new, if you want the condition to be a new auto-reply: It will be listed at Existing auto-replies.
Press Finish to close the wizard.
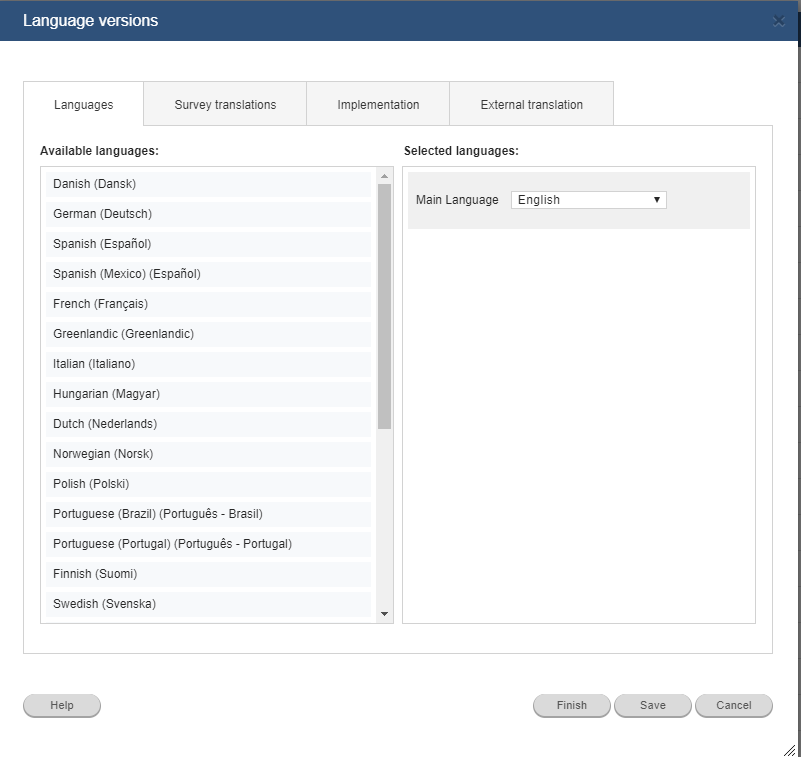
Click on your survey and select Language versions.
Go throught the list of available language versions, and select the new language by clicking the green arrow.
The list of selected languages has now changed included with your choice.
Select main language in the list of Main language. The survey is by default using the main language. If the respondent should choose between multiple languages, then click here for more information.
Shift between languages by clicking the Up and Down arrows. Remove languages from the list of Selected languages back to the list of available languages by clicking the Delete icon.
Click on your survey and select Language versions. Click the tab Implementation which presents three options:
- Only use the main language. Select this option, for use of main language only. Other languages are not available.
- Let the respondent select which survey language to use. Respondents kan choose the survey language on first Select language page.
- Select the survey language automatically from panel.
In the panel you can add a background variable named: language
The values are e.g.: ita or fre
Click Save to save changes.
In the background data for the panel, there should be a variable for the column Language. The values should be similar to eng, da, rus, etc., all depending on the user data.
If the survey is sent out via panel, and missing a background variable for language, then the respondent automatically will be asked to choose language before answering the survey.
Language versions
The function Language versions makes it possible to work together in translations. In the defgo system as well via an extern link.
Click your survey and select Language versions. Click the tab Extern translation.
Check the field next to the visible language and click Save. Hover the field with your mouse and a link is created. Insert the link in your browser and translation from the new page.
Translators without access to a defgo account can translate the survey by clicking the link, or inserting the link in a browser. Translate questions and answer options and click Save to save any changes in the translation.
Dialogboxes for Language versions
To improve coordination of the work with translations, we added new dialog boxes for Language versions.
When a link for external translation is opened, and the defgo user opens Language versions, the user will see a text in the bottom of the screen;
"NOTICE!
External translations for languages ('languages'), ('language') are opened now."
If the defgo user edits any texts and clicks Save in Language versions, the translator working simultaneously via an external link will see a dialogbox:
Translation of all languages is updated.
Press "Update" to load new translation or "Cancel" if you are working in external translation to keep all your changes saved and continue.
NOTICE!
If you press ”Update” in external translation, all your changes will be lost.
If the external translator edits texts via link and clicks Save, the defgo-user will see this dialog box:
Translation of language "Language" is updated.
Press "Update" to load new translation or "Cancel" if you are working in external translation
to keep all your changes saved and continue.
NOTICE!
If you press "Update" in external translation, all your changes will be lost..
In any case the defgo user doesn't accept texts from the external translator and leaves Language versions –
the translation from the external link will be lost and without any possibility of being re-created.
If you want to send surveys from your own email address (example@company.com),
you might experience blocking of your email based on your internet domain (company.com)
which stops or prevents sending out emails from third party systems.
These problems can be solved:
Options
- Send out from your own mailserver
defgo can use your SMTP-mailserver to send out emails – contact our support to enable this functionYou need these informations:
SMTP mailservers address and port
Login
Password
Informations which You can retrieve from your IT-department.
If your mailserver has access control by IP-filtration (whitelisting), the IT-department should allow access from defgos IP: 213.174.66.68.
defgo sends out with approx. 50 emails per minute for each broadcast. If you use several simultaneous broadcasts (distributed over one or more users), this number can be multiplied (50 emails per minute per broadcast).
Your mail server must therefore not block mails sent faster than this by, for example, having restrictions on "message rate limiting" / "message throttling" (or at least having the values for these so high that they exceed your needs). - Approve defgo as sender to your domain via a SPF-record, DKIM and DMARC
Ask your IT-department to set up your domain (company.com) with the correct SPF records
In this way the defgo mailserver is white-listed and can be approved as sender.
- Send from info@defgo.com - which does not involve any action from your IT-department
Insert info@defgo.com as Email-address for sender and then insert your own email (e.g. example@company.dk) as Name for sender and as Email-address for recipient address.
In this way the survey is in fact being sent from info@defgo.com but will appear as being sent from example@company.com
To send email with example@company.com as sender, You must
add:
include:spf.defgo.com to your SPF-record.
If your SPF record looks something similiar to this:
v=spf1 include:spf.protection.outlook.com -allThen after the addition to the record, the record should look like this:
v=spf1 include:spf.protection.outlook.com include:spf.defgo.com -all
Alternatively, (to avoid DNS-calls) write the list in full, only for IP-addresses:
ip4:185.163.189.13 ip4:185.163.189.17
Type your domain to look up whether your SPF record includes the defgo SPF record.
Domain:
You can test the SPF-setup for your domain with various online tools, e.g. MXToolBox.
DKIM
If you need to set up DKIM for defgo on your domain, contact defgo support at support@defgo.com to recieve a DKIM record that your IT department can place in your domain's DNS setup.
DMARC
In addition, it is always a good idea to have a DMARC record for your domain, and from major mail recipients such as Gmail and Yahoo this is a requirement.
If you do not have a DMARC record already, you can add one as a TXT record, for example: _dmarc.company.com (replace company.com with your domain)
v=DMARC1; p=none; sp=none; adkim=r; aspf=r; rua=mailto:info@company.com; ruf=mailto:info@company.com; fo=0; pct=100; ri=86400You can test the DMARC-setup for your domain with various online tools, e.g. fx MXToolBox.
Anti-spoofing
Please note. If your IT administrator has set a reception-block (anti-spoof) for mails sent from an extern mailserver, and the sender address is similar to your own domain (e.g. example@company.com). Then, the IT manager must whitelist the defgo mailservers: 185.163.189.13, 185.163.189.17
Block any sending of survey invitations to the same recipients with identical informations.
In this case the respondent, for which data randomly was repeated in the panel, will not receive the invitation letter once again, within the time period of survey implementation.
To enable the function set the time period for number of days more than 0, in the Implementation pop-up for survey start- and enddate
Prevent invitations to same recipient within this number of days (0 = no limit).
IMPLEMENTATION METHODS
If you send out your survey via pop-up, a new window with the survey will automatically open. The pop-up survey can be places on a website, and appear when the visitor entries the website, or leaves the website. Pop-up surveys are among other thins used for website evaluations.
The pop-up function can also be activated by certain actions at the website, e.g. when a visitior clicks a menu item.
Contact defgo support for free support and placing your survey on a website with the pop-up function.
Email without respondent number is useful whenever respondent information is not needed.
The survey can include questions identifying the respondent by name, address etc.
This mode of conduct do not limit the number of answers each respondent can finish the survey – see more at Send out via panel if you want a limit.
After you've chosen mode of conduct, start and enddate for the survey. Copy the survey link in the next window to your browser url. The survey opens in a standard survey page.
We also offer the service of a custom startpage, designed to fit your needs.
defgo also services our clients with design of the survey layout CSS.
Contact defgo support for more information.
![]() Remember that automatic reminder procedure is unavailable if the survey is send out without respondent numbers.
Remember that automatic reminder procedure is unavailable if the survey is send out without respondent numbers.
Instead deside to send out Via panel.
Send out your survey to an existing panel. Create an email, with your own emailtext, and with an automatic link recipients can click to open the survey.
Every panel recipient receives an email with a survey invitation. Subsequently, send a reminder to recipients who didn't answer.
First time you send out the survey, you can send to all respondents, or send to one or multiple respondents based on filter (panel background information).
In repeating actions for sending out your survey, the above points of action are not possible.
- Send to all respondents
- Send to one or multiple respondenter based on filter (panel background information)
- Send to respondents not yet having answered the survey
- Send to respondents based on their answers (advanced reminder)
- Send to edited/new respondents (based on email-address changes in the panel)
- Send to one or multiple respondents (of your own choosing)
You can also add a file with all email invitations, and send out reminders to the respondents to fill out the survey
For a comprehensive introduction, read more about Send out via panel.
Make your choise and click Next and finish the Wizard.
After sending out the survey via panel, you'll shortly after receive a status email with information on sent emails, respondents unique user-ids and their email addresses.
Send out via paper survey gives you the option to print out all the paper surveys you need, via a file on your computer. Insert name and address for the recipients of the survey, if these informations are saved into a panel.
Answers can be typed in via the data entry module.
Paper surveys in defgo are generated as PDF-files, opened in Adobe Acrobat Reader, and printed directly from the program.
You may insert pagebreak after each question, by checking Page break after the following questions and type in question numbers or question ranges separated by commas. All pages will have page numbers.
If you've created any background information in the panel system, this information for name and addresses can be inserted, so the survey easily can be send with the post to many respondents.
It is also possible to insert a ready-printed-information guide for answering the survey, and a unique respondent-number. There will be printed one copy for each panel respondent of the selected panel.
If there are leaps in the survey, then a automatic guiding text will be printed below the question with a leap.
Example: "Go to question X".
See a step-to-step guide for sending out with a paper survey
Implementation via instruction makes it possible to create anonymous logins (login/password) for groups of people.
A file is created (with a link to the survey, login/password and possible instruction) that can be printed out and handed out to the future respondents (fx this is usually used for courses)
Step 1: Type instruction text
The standard text may be modified, just don't delete [login] and [password] fields!
The text can include a guide to answering the survey and/or other information to the respondent (e.g. deadline for answering the survey).
Step 2: Specify page settings, number of respondents and group-id
Choose Page break after each respondent if you want each set of instructions on a A4 page.
Type Number of respondents and a Group ID (e.g. course- or groupnumber).
Then select Fileformat in the drop down list. The survey is saved in PDF or RTF(Word) format
Step 3: Download the PDF-file
REMEMBER to click Finish for usernames and logins to be saved in the system!
Go to the Overview page. Download the PDF-file by clicking the link *.pdf
After typing login and password click Start survey button and the survey will open in a new window. If the respondent is interrupted answering the survey, you can resume the reply by entering the url-address and typing login and password once again.
Instruction text
----------
Dear participant,
Take part in an evaluation of your course. Type in https://www.defgo.com/eng/ in your Internet browser and enter your login and password. Remember to protect your password.
Your login is: [login]
Your password is: [password]
Best regards
----------
![]()
Use the same survey multiple times, by generating more instructions with different group ID numbers.
Use the report filter function to output reports for every group.
The survey is answered via Telephone interview (CATI) with respondents from an existing panel.
You can create an interview guide text and make the survey available for interviewers.
Before implementing the survey via Telephone interview (CATI), you need to create a CATI panel. Go to the Overview and click Menu and select Add panel. Then choose Telephone interview (CATI).
- After the CATI panel has been created, choose the panel from the drop-down list.
- Click Next, to type in an interview guide for the interviewer.
- Click Next to show a description with number of respondens in the CATI panel.
- After the panel has been attached the survey, the survey is visible on the account of the interviewer. (Interviewers do not have access to other functions in defgo).
- Click on survey to be used in the interview. In the pop-up-menu select Open CATI.
- In the next dialog box select Load a new respondent (default).
The dialog box Load new respondent is not closed in order to let the interviewer load new
respondents to the survey from the CATI panel.
Click the link Show interview guide to show the text typed in Implementation settings) Example:
Hi XX,
You've been chosen to participate in a survey that we are conducting at the moment.
Your answers will give us valuable information. The interview will only take about 5 minutes.
Would you like to participate? - When the survey is implemented via Telephone interview, a startpage is inserted in the beginning of the survey.
Including name and telephone number retrieved from the CATI panel.
Contacted,
date and time,
Call later,
notes,
Available, interview started,
Not available,
No such number/fax
and Refuse, can be selected.
If any other background variables exists in the panel, they are shown after the above informations. - If the interview can't be completed at the current time, click Finish. A new respondent is retrieved by clicking OK in the Load new respondent dialog box.
This function requires the user have purchased defgo telephone interview module (administrator, and 5 interviewer accounts). Contact defgo support for more information.
Send the survey to a Digital Post (e-Boks) panel
As explained here you can send out your survey via user panel with respondents receiving your survey.
First you have to create a Digital Post (e-Boks) panel
Click here to read our step-to-step guide for sending out via Digital post (e-Boks)
A survey as a PDF file is generated, which can be filled out offline electronically, and imported to the survey afterwards.
Step 1: Send out survey as PDF form
After you've created your survey, go to Overview and click on your survey and select Send out.
Choose Offline survey as PDF in the window Choose mode of conduct
Step 2: Download survey as PDF
Go to Overview, click on your survey and select Open. PDF formularen is downloaded and can be answered offline in any given time and place.
Step 3: Import answers
After collecting answers, the PDF forms are imported to the survey via the import function. Click on your survey and select Answers.
In the window Administration of the survey answers, select Import answers.
Click Choose file and select all answers on your computer ready for import. Click Upload and Next.
In the window Information, you can check the field Notify by e-mail when it is ready.
Click Finish and you'll see all answers in Overview as usual.
Choose file to upload in one of the following formats: SAV, TXT, TSV, SCSV, CSV or DAT.
Note: The file should not contain columns with answers status and variable names.
They can be switched off in Settings for Export answers. To import answers of question type "Form" with option Repeat answer alternatives use Horizontal export setting.
GUIDE FOR SURVEY IMPLEMENTATION VIA PANEL, PAPER SURVEY, DIGITAL POST (E-BOKS) AND TASK
Step 1: Choose respondents
There are many advantages by implementing a survey sending out to a panel. A panel can be a customer database in relation to a customer analysis - see the section Add panel for more information.
- Unique user-id: If the survey is sent out via panel, every respondent is assigned a unique user-id. Thus keeping control with people actually answering the survey. With a unique user-id you can ensure only one reply per user-id.
- Resuming reply: Another advantage by sending out the survey via panel is allowing respondents to resume their replies from the last question they were about to answer. This function is not working if you assign respondents your own unique user-ids.
- Automatic reminder: To increase percentage of answers in a survey, send out a reminder during impementation of the survey. If the survey is being implemented via panel, the reminder ensures that only respondents who not yet answered will receive the reminder.
- Advanced reminder Send to respondents based on their answer.
- Send to edited/new respondents (based on email changes in the panel)
It is also possible to add new respondents to a panel while the survey being implemented,
or even edit information of existing panelmembers.
The survey can be sent out again to new/edited respondents. See step 2 in this guide
Send out to selected respondents in a panel based on background information in the panel without sending the survey to the entire panel.
Follow procedure for step 1-3. Then select Send to one or multiple respondents based on filter (background information from panel). - Send to one or multiple respondents (of your own choice): Useful when it is necessary to re-send the survey to one or multiple respondents.
![]() Remember to create a panel at Add panel in the
Menu to use this mode of conduct.
Remember to create a panel at Add panel in the
Menu to use this mode of conduct.
You may also add a file of email invitations. The invitations are not being sent, but saved in the project folder. Backgrounddata is then added to the survey.
When the survey is to be sent out, choose panel and check the field: Add a file with all e-mail invitations – the e-mails are not sent (can be done by external system), but background data is added to survey.
Click Next and choose between templates for textcontent when you send out your invitation. You can also insert backgrounddata via code such as [department] and [position].
Step 2: Send reminder, send to edited respondents or to selected respondents
Send to all respondents is selected as default.
Send to one or multiple respondents based onfilter
Choose Send to one or more respondents based on filter (background data from panel). Click Next.
Select filter criterias based on background data from the panel. It is possible to set up multiple criterias. Only respondents fulfilling all criterias are extracted and will receive the survey. Click Next.
Then finish the survey implementation wizard and you'll receive a status email with information for sent emails, respondent unique user-IDs and email addresses.
Send to respondents based on their answers (advanced reminder)
If you select this function, choose between Send to all respondents in the selected filter or Send to all respondents except for those in the selected filter. Then, choose the filter from each question and answer option.
On the right side of the wizard, a selected filter preview will present your changes.
Send to edited/new respondents (based on email changes in the panel)
You can resend the survey to edited/new respondents, if you make changes in the panel, and wish to re-send the survey to these respondents.
The number of edited/new respondents, you send out to is visible in the last step of the implementation process.
Send to one or multiple respondents (of your own choice)
If you need to re-send a survey to a selected respondent, then select Send to one or more respondents (based on your own choice).
Select email-addresses from the list (you can use ’Ctrl’-key to select multiple addresses). Click Next. The email is sent to selected recipients, and other panel member will not receive an email.
Step 3: Email to respondents
- Choose your email template or rewrite/create a new email template for usage in the future.
- Insert name of sender and codes such as [name] for respondent name and link to the survey [surveylink] etc.
- Insert codes [unSubscribeSurvey] to unsubscribe the survey or panel [unSubscribePanel].
Click Next and finish the send out section.
Choose between Plain text and HTML. Choose HTML to insert images, fonts and fontsizes.
It is a good idea to keep the status email with the summary of user-IDs, to control recipients of the survey. This is also useful to filter user-ID.
Step 1: Choose ready-printed information:
You can retrieve informations from a panel, and/or select a ready-printed unique respondent number. The number is printed on top of each page next to the survey title.
- Informations retrieved from panel: Check the field to insert informations from a panel.
- Ready printed unique respondentnumber: Here is printed the respondent number.
- Startnumber: Type startnumber here
- Ready printed group-id: You can add a group-id. Type group-id here.
Standard startnumber is ’1’, but you can decide which respondentnumber the survey will start with.
![]() If this survey also will be implemented via panel, then set a startnumber higher than the number of panel participiants
(panel id-numbers automatically starts from ’1’).
If this survey also will be implemented via panel, then set a startnumber higher than the number of panel participiants
(panel id-numbers automatically starts from ’1’).
Step 2: Select ready printed informations:
When you insert information from a panel, choose a panel from the drop-down menu. The backgroundinformation saved in the panel system, can be used to insert name and address as header information.
For example: If you've typed these informations in the panel system, each field (separated by semicolon) has a number in the system:
| 1 | 2 | 3 | 4 | 5 |
|---|---|---|---|---|
| alan.smithee@company.com | Alan Smithee | Director | City square 1 | 1760 |
| fred.bloggs@company.com | Fred Bloggs | Key Account Manager | Main Street 2 | 2500 |
| July | Tom Smithee | Key Manager | Main Street 2 | 2500 |
Set the field numbers in the window in parenthesiss. You can insert a description of the survey.
For simple leaps in the paper survey, are printed a guiding text to the respondent under the questions with leaps. Example: Go to question X. Avanced leaps in surveys can provide problems in paper surveys.
Step 3: Specify pagesettings and printformat
- Pagebreak: You can select ready printed information (e.g. name and address or guide) to be printed on a separate page.
- Pagebreak after questions: As default pagebreaks are inserted after each question, hut if you want multiple questions on the same page, type the question numbers for which the page break should be inserted.
- Number of surveys: Enter here the number of copies needed generated in PDF file . If you've inserted information from a panel, the number of surveys will match the number of panel members.
- Fileformat: Choose fileformat in the drop down list. The survey will be saved in the project folder in the chosen format: PDF, PDF (Unicode) or RTF (Word).
- Fontsize: In the dropdown-box you can set the fontsize to little, normal or large. Which corresponds to 12, 14 or 16.
When you've finished typing informations for pagesettings and click Next, the PDF-filen is automatic generated.
Download the PDF-file by clicking the link survey ####.pdf. The program ‘Adobe Acrobat Reader’ starts and the survey opens as a PDF-file. The PDF-file can be printed directly from the program or saved to be printed later.
The paper survey will have title, ready printed id-number and ready printed panelinformation.
Step 1: Add Digital Post (e-Boks) template
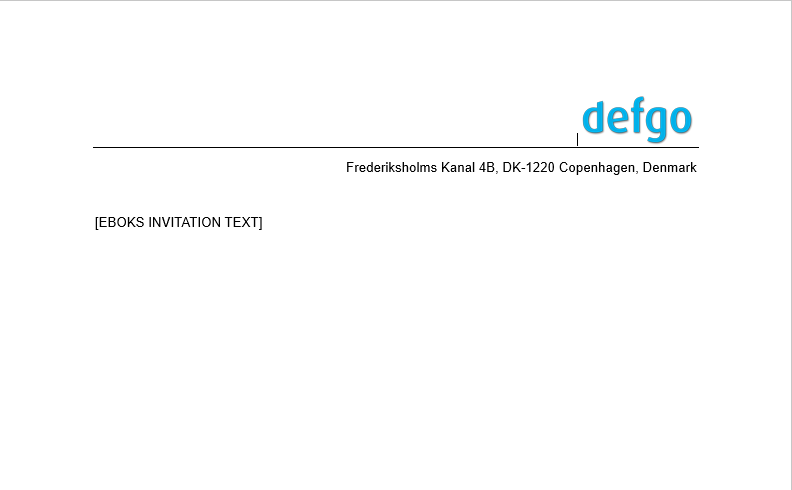
Before sending out the survey, define a lettertemplate in word-file-format. The file should contain an area with the exact text:
[EBOKS INVITATION TEXT]
in which the user defined mail text is included.
Download the example file:
Notice logoes can be inserted as simple bitmap-images.
The file is saved in .docx format before it is saved in your project folder, via Menu and Add file.
Add Digital Post (e-Boks) panel
Go to the overviewpage and click Menu and select Add panel.
Choose Digital Post (e-Boks) and click Next.

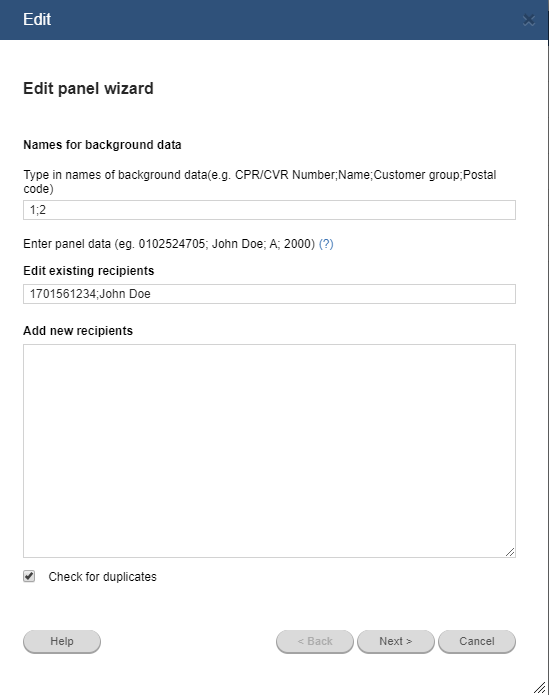
Type data for each panel participiant an remember to type in personal ID-number (CPR) in first column. Check the box Check for duplicates.
Click Next and select filter
Name your panel and click Finish.
Send to Digital Post (e-Boks) panel
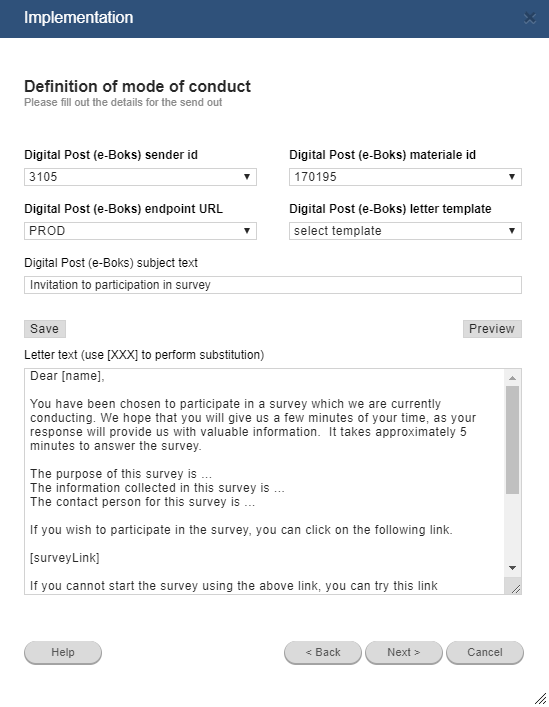
Cliick you survey and choose Implementation. Then select mode of conduct via Digital Post (e-Boks).
Click Next
Select start- and enddato for the survey and click Next.
Then choose e-Boks panel and Survey.
Important ! The supplier e-Boks requires larger shipments to be sent as mass-shipments (selected by default). These shipments will typically be delivered to end users at night. if the shipment has been made before 17.00.

Click Next and edit your invitation text.
Remember you should add the e-Boks word template to your project folder.
Id-numbers of senders and other material can be adapted ad-hoc.
If you send to the demo-setuppet "demo-" is added to the Digital Post (e-Boks) endpoint URL:
https://demo-api.e-boks.com/oio/rest/srv.svc/2/
In the Digital Post (e-Boks) letter template you can choose among all uploaded word-documents (.docx) located on your defgo-account.
At the end of the wizard you'll receive a message for sending out the survey.
If you want a summary of sending out the survey, click the survey and select Implementation.
Choose See Digital Post (e-Boks) status for sending out survey and click Next.
In mass shipments the updated status from e-Boks can be delayed, and typically visible the next day. Click Refresh status to update status for mass shipments).
Using e-Boks
Attach on or multiple e-Boks ids for your user. Click the usermenu, and select Users.
Click your username and select Settings, and then click Next to find Digital Post (e-Boks) settings:
Insert Digital Post (e-Boks) material id, and insert multiple IDs, separated by comma.
Remember you can plan sending out your survey via the e-boks panel. Read more about the function here.
If you want to set dates for sending out surveys in the future, you can use the function Add schedule.
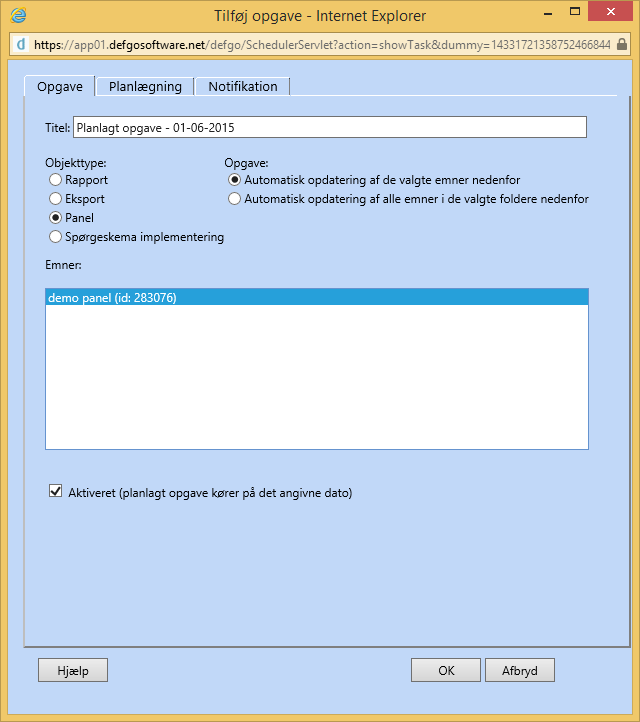
Open your Projects folder where your survey is placed. Click on Menu, select Add schedule.
Under the tab Task you can choose between Survey implementation - via e-mail panel, which should be created earlier, or Survey implementation via et Digital Post (e-Boks) panel.
The function Schedule is also useful for automatic updates of reports, exports and panels.
Schedule sending out via e-mail panel and via Digital Post (e-Boks)
Click Menu, select Add schedule.
Then select Survey implementation - via e-mail panel.
These are the options:
- Send to respondents who have not yet answered the survey
- Send to respondents based on their answers
- Send to corrected/new respondents
You may add your email template for any selected option, if you send out via e-mail panel.

Save e-mail template via Implementation.

The task can include all your surveys in a selected folder, or a selected survey. Choose between:
- Auto update the selected item(s) below
- Auto update all items in the selected folder(s) below

Click Next and create your schedule.
Schedule
Set the sendout date for your survey based on daily,-weekly or monthly basis.
Notification
At the tab Notification you can type the text for sending out, sender e-mail and e-mail for the notification recipient.
Go to Extended settings by clicking on Next in Settings wizard.
Check the box Allow user-ID generation.
A respondent who clicks on a link without respondent number get a login so he/she can resume the responses.
When the respondent clicks on Start survey, the survey opens in a new window, and the following message appears in a dialog box:
It is possible to interrupt your answer and continue later. Cancel by clicking on the cross at the top right corner of the browser and resume the reply by accessing http://www.defgo.com/eng/ - and enter the login and password below.
Your login is: 1267328, 1111474681
Your password is: ZXCLKSH
Save this personal information (click on the Print button) if you intend to cancel the answer along the way and continue later.
The respondent can save personal information by printing the content of the window. If the answer is to be interrupted, it can be resumed later by accessing the address: www.defgo.com/surveys/ and enter the login and password.
Functions for editing the survey
Go to Extended settings by clicking your survey and select Settings and click next from the Layout Wizard.
Check the field Show answers after completion and Show all freetext answers after survey completion.
With this function respondents can open their answers in word or print out the answers after survey completion.
It is possible to include "year" and "last year" in questions, answer options and reports. [year] is the current calendar year and [lastyear] the previous calendar year.
Example:
Create a question which includes [year] and [lastyear]. Add answer options with [year] and [lastyear].
[year] and [last year] is replaced with numbers when the survey opens: :
The same applies for reports: [year] and [last year] will be replaced with current and previous calender year when the survey opens.
FUNCTIONS FOR TESTING AND FILLING OUT THE SURVEY
Data is collected and used for e.g. reports.
You can also complete the survey as a respondent by using id.
Click your survey and select Fill out with respondent-id.
This function is used for typing answers, e.g. from paper surveys, and you can insert ID-number for each answer.
The dialog box will not close automatically, which makes it easier to type in a new respondent ID.
Go to Extended settings by clicking your survey and select Settings and click next from the Layout Wizard.
Three options are presented from the dropwdown list:
- No template (default): The survey layout is not based on a template.
- Survey Template (changeable): Create a template of your own layout that can be edited.
- Form Template (non changeable: Choose one of defgos premade templates which can't be changed.
FUNCTIONS FOR ANSWERING THE SURVEY
Go to Extended settings by clicking your survey and select Settings and click next from the Layout Wizard.
Check the field Allow user ID generation.
Respondents clicking a link without respondent-number will receive a login, in order to resume their reply of the survey.
When the respondent press Start survey the survey is opened in a new window, and this message is shown in a dialog box:
It is possible to stop filling out the survey, and continue later.
If you want to resume your survey then visit http://www.defgo.com/eng/ - and enter the login and password stated below.
Your login is: 1267328,1111474681
Your password is: ZXCLKSH
Save these personal information if you plan to stop answering and continue later.
The respondent can save the personal information by printing or copy/paste.
Click your survey and select Answers and select Anonymize answers.
Choose the backgrounddata your want anonymized and name the anonymized survey.
This function creates a copy of the survey and a panel including answers:
- The Panel order is randomized (so it is not possible to know who number 1 in the panel / export is);
- Selected columns from the panel includes anonymized data.

When you click Finish, a copy of the survey with panel is created. The new anonymized looks like this:
Backgrounddata will be anonymized in answer export.

The anonymity function can limit the function cross tabulation of answerdata.
Complete anonymity means that a survey can't include fields for name, e-mail etc., and that the respondents receives information about freetext answers being read.
The anonymity function is not available for all defgo accounts. Contact defgo support, if you want this function.
Go to Type question labels by clicking your survey and select Settings and click next from the Layout Wizard and click next from Extended settings.
If the survey is to be used as a template, you can add question labels.
Surveys created from the same template are easier to merge with help of unique question labels.
Answers
Answers include these functions:
- Delete answers individually/delete all answers
- Export answers
- Import answers
- Merge
- Anonymize answers
- Text analysis
Click your survey in the project folder and select Answers in the wizard.
ANSWERS MANAGEMENT
Click your survey from your project folder and select Fill out with respondent-id. Then type respondent-id corresponding to the unique ready printed respondent number in the paper survey.
When you press "Enter", the Next button is selected.
It is also possible to shift back in the answered survey by clicking the Back button.
Use the TAB key to shift between the fields, by choosing the Next or Back button and then press "Enter".
You can also write an ID-number on paper surveys and the respondent-id, if you haven't create ready printet respondentnumbers on surveys. You can kan resume or edit an answer by typing the same ID.
Notice that the dialog box doesn't close automatically. It will make it easier to type in a new respondent ID after filling out a survey.
![]() After you typed the respondent-id the survey opens
with small letters next to each answer option. By typing the letter ’a’ (not ’Alt’-a)
the corresponding option is selected in the survey (like clicking with the mouse).
After you typed the respondent-id the survey opens
with small letters next to each answer option. By typing the letter ’a’ (not ’Alt’-a)
the corresponding option is selected in the survey (like clicking with the mouse).
It is possible to type in user ID, group ID or periodID following this form: user_id;group_id;period_id.
E.g. like: user1;group;period3
After the survey is answered, the answers can be checked in an export file.
When you type answers to Matrix questions, type the letter + number for the scale

For the questions the scale "Very much likely -> Don't know" corresponds to the numbers 1-6.
| Very happy smiley | Happy smiley | Neutral smiley | Unhappy smiley | Very unhappy smiley | Don't know |
|---|---|---|---|---|---|
| 1 | 2 | 3 | 4 | 5 | 6 |
You can also use a combination of the arrow key (shifts between scale categories) and the tab key (shifts between rows).
Click on your survey and select Answer.
If you want to delete answers individually, select Delete answers individually (from summary), or select Delete all answers to delete all answers at once.
You can delete answers by filtering from these settings
- Delete all answers filtered by user ID
- Delete all answers filtered by internal ID
- Delete all answers filtered by user question
Make you choice and click Next.
Select the answers to be deleted. Use the ’Ctrl’-key to select more than one. Click Next and Finish to complete the deletion.
When you have selected Delete all answers you can regret your choice by clicking Cancel. Click on Finish to delete all the answers.
This function is useful for deleting an answer, while the survey is being implemented. In this case, if you delete an answer, then the survey link will return to be actived, and the respondent can take the survey once again.
EXPORT ANSWERS
Settings for these export types.
- ASCII fixed with (triple-s)
- ASCII, custom separated (delimited)
- Excel
- SAS
- SPSS
Click on your survey from the project folder, click Answers. Choose format for the exported data, click Next, choose custom settings depending on export type, click Next and click Settings.
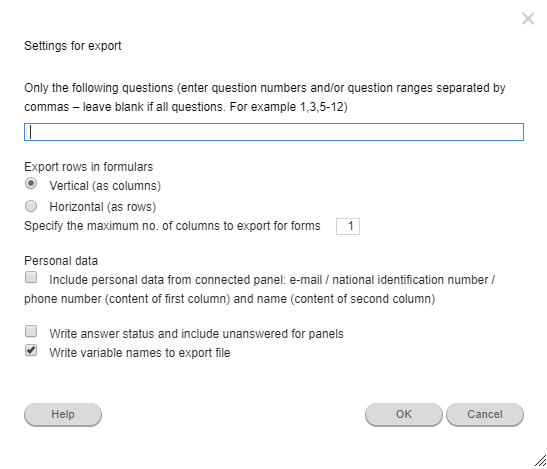
Filter by question
You can filter your export after question. Select Settings and define question numbers or question row separated by comma.
You can write answer status and include unanswered for panels. Write variable names to export file.
Personal data
You can include personal data from connected panel:
email/ national identification number/ phone number (content of first column) and name (content of second column)
Write answer status and include unanswered for panels
Add unique variable names to export file (optimized for defgo import)
Click your survey in the project folder and select Answers.
Select Exports answers and click Next.
Then select the Format for the exported data.
You can export data in 9 different formats:
- Summary of answers (answered/not answered)
- ASCII fixed with (triple-s)
- ASCII, custom separated (delimited)
- defgo panel
- Excel
- SAS
- SPSS
- Survey (exports answers to another survey)
- Web service (auto export)
- Web service (export on demand)
Check the field Press here if you want to use a filter to filter the export for Current, Current and historical, Only historical and Valid within the period.
Exports are created as background-jobs. When you export answers the title with the exportfile will visible in the overview page. Right next to the exportfile a yellow clock icon will indicate waiting time, until the report is ready. When the icon disappears, the export is ready to be opened by clicking on it.
The export will have the same name as the survey, date and time, and click to open the export.
You can update the export. Click the export to be updated and select update in the pop-up menu. All answers that have been added efter the creation of the export will be visible.
Click your survey and select Answers.
Click Export answers and Next.
Select Summary of answers (answered/not answered) in the function Format for the exported data.
Click Next to generate a HTML-file, readable in the browser. You can check the field Notify by email when it is ready, to receive an email when the exportfile is ready.
You can change the email address.
Click Finish.
Click your survey and select Answers.
Click Export answers and Next.
You have these options for exporting to ASCII:
- Eksport to ASCII fixed width (triple-s)
- Eksport til ASCII comma separated file (delimited)
Select Eksport to ASCII fixed width (triple-s) in the function Format for the exported data.
2 files are generated - a description file and a data file.
The description file is a XML file in the standardformat triple-s. In the description file you can also se which columns to include questions and the precise question texts.
The Datafile can be read into e.g. Microsoft Excel
Check the field Notify by email when it is ready
Click Finish to start the export.
Select Eksport til ASCII comma separated file (delimited) in the function Format for the eksported data.
Click Settings to choose Vertical (as columns) or Horizontal (as rows) in your export.
Then specify the Max number of columns to export for forms.
Settings
You can filter your export after question. Click Settings and define question numbers or question row separated by comma.
You can write answer status and include unanswered for panels. Write variable names to export file.
Personal data
You can include personal data from connected panel:
email/ national identification number/ phone number (content of first column) and name (content of second column)
Write answer status and include unanswered for panels
Add unique variable names to export file (optimized for defgo import)
defgo panel export is used for exporting answers including background information (e.g. email, name, gender, age, postalcode) from an existing survey.
Click your survey and select Answers.
Click Export answers and Next.
Then select defgo panel and click Next.
Select the questions for which answer data should be exported to the panel. The defined questions will be moved by using the arrow buttons, Add and Delete.
Email should be standing first followed by name and other background data.
Subscription to a panel can be implemented via a link to a survey on the company website. A survey including with 4-5 questions involving background data can be created, and data can subsequently be exported to the panel.
In the window Export Data you can select the folder to place your export file.
Name the title of your export. You can check the field Notify by email when it is ready, to receive an email when the exportfile is ready. Click Finish and defgo will generate a file to import in the defgo panel.
The file can be opened in a text editor as a comma separated file. The first line (The questions from the survey) can be deleted, and data can be edited and copied directly into a new or existing defgo panel.

Eksport to Excel, creates a .xls-file which opens directly in ’Excel’. You can define the number of characters in freetext answers.
Click your survey and choose Answers.
Click Export answers and Next.
Then select Excel in the function Format for the exported and click Next.
Check the field Notify by email when it is ready, to receive an email when the exportfile is ready.
You can change the email address.
Click Finish to start the export.
Click the report file and click Open.
Settings
You can filter your export after question. Select Settings and define question numbers or question row separated by comma.
You can write answer status and include unanswered for panels. Write variable names to export file.
Personal data
You can include personal data from connected panel:
email/ national identification number/ phone number (content of first column) and name (content of second column)
Write answer status and include unanswered for panels
Add unique variable names to export file (optimized for defgo import)
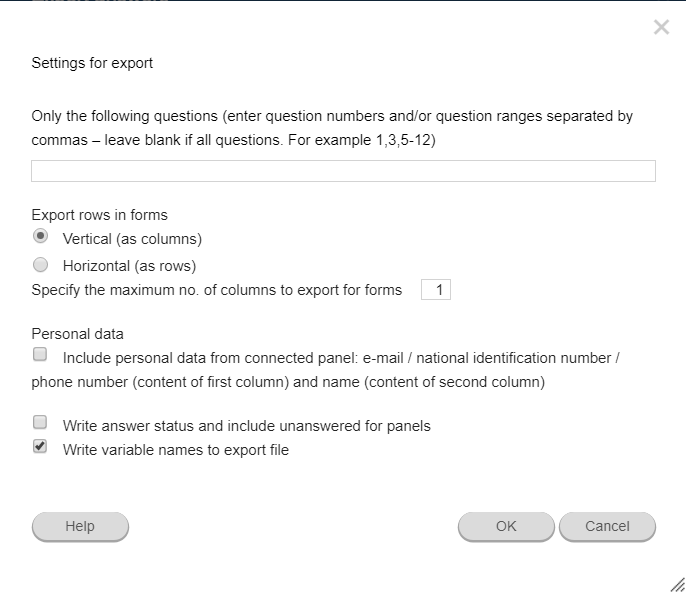
To SAS (for Windows) are create two files. A descriptionfile (programfile), including texts for answer options, and a datafile including question texts and raw data.
Click your survey and select Answers.
Click Export answers and Next.
Then choose SAS in the function Format for the exported data and click Next.
You can check the field Notify by email when it is ready, to receive an email when the exportfiles are ready. Click Finish and the export files will be generated.
The description file includes the values for answer options. The datafile includes the answers.
The question text is visible by right clicking column Q# and selecting Properties.
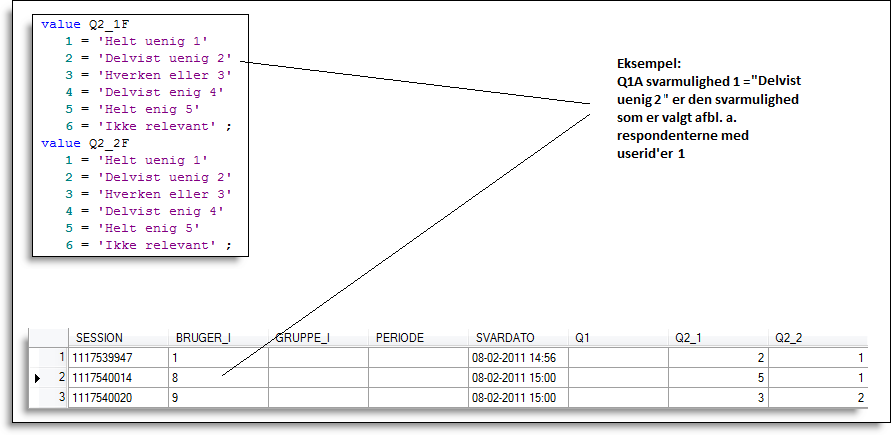
With the data program SPSS, you can quickly and easily transfer data to dataprocessing.
Click your survey and select Answers.
Click Export answers and Next.
Then select SPSS in the function Format for the exported data and click Next.
You can check the field Notify by email when it is ready, to receive an email when the exportfile is ready. Click Finishand the export file will be generated.
For SPSS (for Windows) defgo creates a file in the format .sav, that you open in SPSS. The file includes texts from the survey and data, ready for processing.
The first steps are the same for exporting to a survey:
Click your survey and select Answers.
Click Export answers and Next.
Then select Survey and click Next.
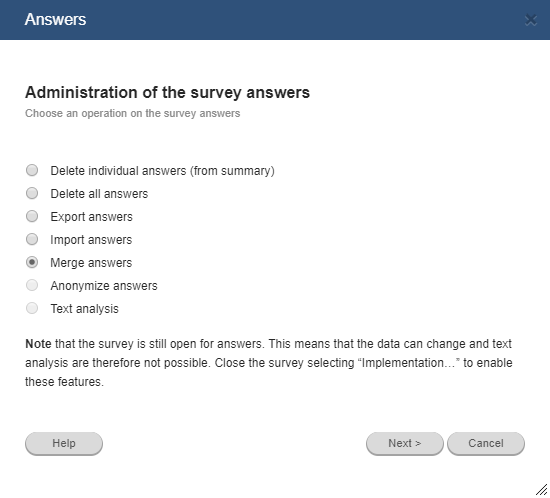
You can check Choose new target survey or Choose one of the previous target surveys, click OK.
In the field select the correct form and click OK.

Choose source- and targetquestion. For each source- and targetquestion the new row in the form is created.
In any case there are two or more source questions to a target question, they can be merge in a row in the form. Check the field Merge every answer to a single row in the form.
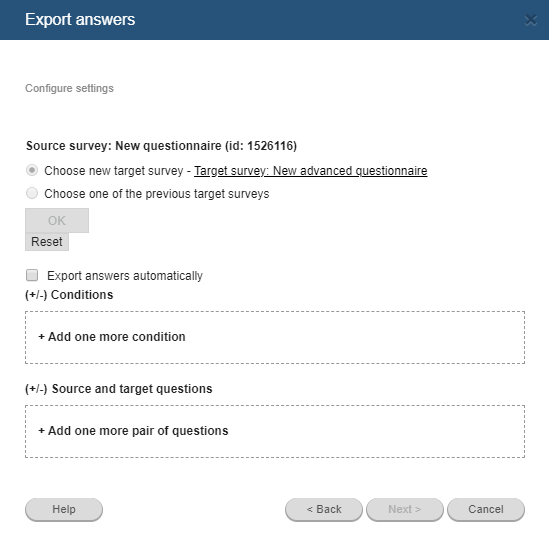
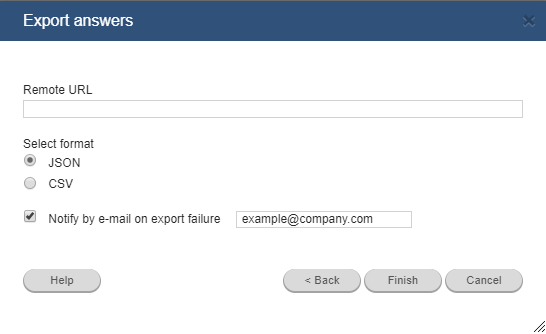
You can export answers via the client server and receive "real-time" data via a link. With this link you'll receive instructions to receive the answers in an export.
Here is an example link:
https://app.defgo.com/defgo/ExportAnswers?&surveyId=1447360&exportFormat=CSV&checksum=J37WTV&dataSelectorColumn=userId&dataSelector=*
SurveyId = Survey ID from which the answer are being exported
ExportFormat – The format the answers are being exported in (either "CSV", or "JSON").
Checksum – Security parameter for the survey
dataSelectorColumn – Defines the column for which the filter should apply (should contain one of following "userId", "email", "CPR_CVR")
dataSelector – Defines which answers should be exported based on filter value for the filtered column (if no filter activated, use "*")
The Client (user) can locate the "Checksum" parameter by clicking the survey, select Answers, choose Export answers and then select Web service (export on query).
The "Checksum" parameter is shown as an API-key to export on queries and in this case is: ZA3MKR3

To view settings for answer export, click on your survey and select Answers, and Export answers and then export format. Click on Next and Settings.
Filter answers
- By questions
- Rows or columns, and maximum no of columns
- Personal data from connected panel
- Include unanswered surveys for panels
Exclude personal informations in answer export
If you created a panel while creating your survey, you can exclude the first two columns from the panel, e-mail, personal-id, phone-number (first column kolonne) and name (second column), for your export of answers.
This function is activated by default. To include the first two columns, de-enable the function by clicking the check-box.
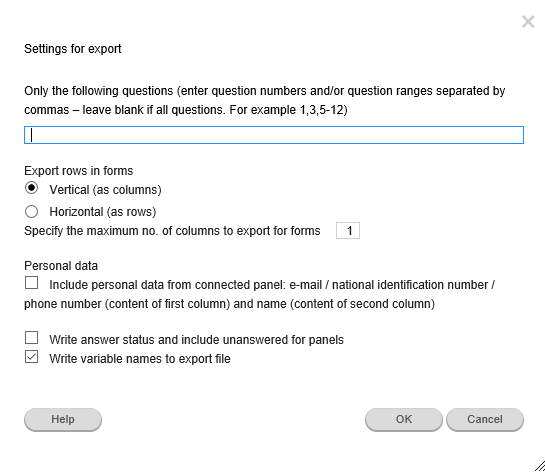
IMPORT AND MERGE ANSWERS
Click your survey and select Answers.
Click Import answers and Next.
You can import answers from these formats: SAV, TXT, TSV, SCSV, CSV or DAT.
The file should not contain status for answers and variable names. These functions can be changed in Settings for Answer export. To import answers of Form questions with the function Repeat answer alternatives, use Horizontal export setting.
Choose between these delimiters in your import file:
- Tabulator
- Semicolon
- Comma
- Other
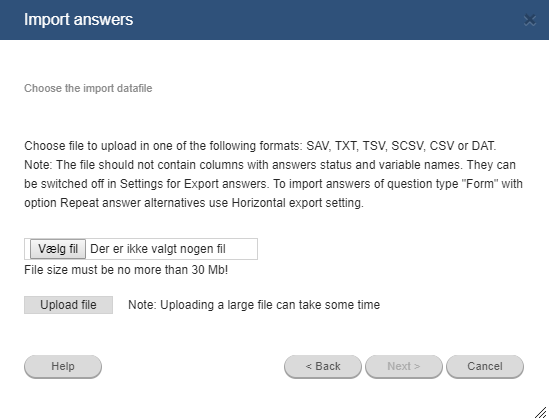
The setting The file contains headers is activated by default.
File size must be no more than 30MB
Click Next and number of answers from your file will be visible. Click Finish if the data are correct.
Click your survey and select Answers.
Click Merge answers and Next.
Choose two or multiple surveys to be merged. Press ’Ctrl’-key to select multiple surveys.
Select the current survey and the survey will be merged with it self. This means creating a copy of the survey with answers. This functions is used for survey backup before datacleaning.
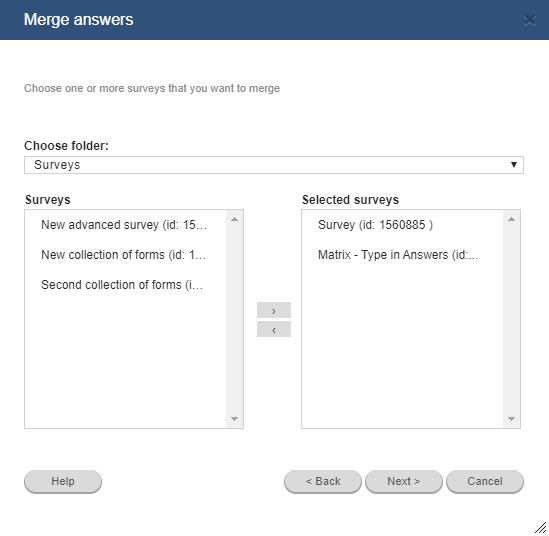
Select surveys and questions to merge and click Next, to choose how to merge the surveys.
- The survey(s) are identical and merge into a new identical survey -
Used to merge surveys where each question, answer option and order is identical.
If the surveys are not identical, you'll receive this message:
"The chosen surveys do not have the same number of questions and can not be merged.".
You can select survey name or survey ID as group name in the merged survey - The survey(s) are different and must be merged into a new survey containing all the questions from each survey. - Used to merge two different surveys implemented with identical panels (the respondent has the same user-id in both surveys).
- The survey(s) are different and must be merged by question names - Questions in both surveys must have identical question names and answer options in the same order. See also the section Type question labels.
Select element or question to be merged.
- All questions - All questions are merged.
- All questions except background data - If the survey is implemented Via panel paneldata is not included in the report.
- Only the following questions (enter question numbers and/or question ranges separated by commas - leave blank if all questions. For example 1,3,5-12) - Select the individual questions to be merged.
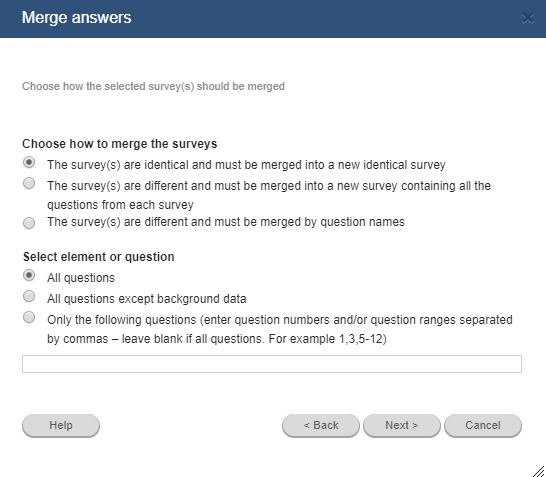
Merge surveys with attached panels with the function Merge connected panels into one panel with new ID-numbers of respondents – funktionen.
- - surveys are merged into a new survey, containing all answers
- - all paneler attached to the survey implementation will be merged into one new panel.
- - surveys must be identical
- - panels used for implementing the survey must have identical structure
- - the number of background names must be identical, and should have the same type of answers (Only one answer Freetext).
The created survey will be implemented via a new attached panel.
Surveys merged should fulfil these criterias:
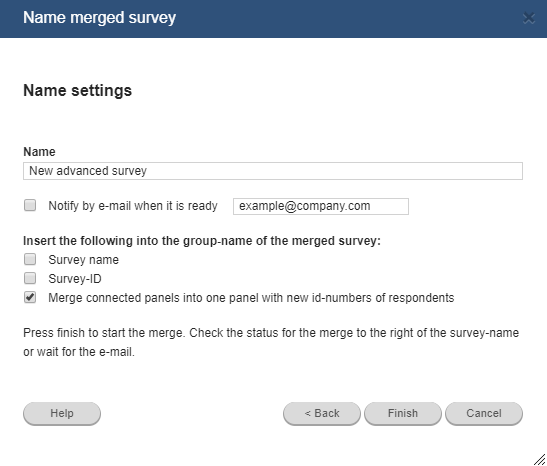
If you've name questions in two or more surveys, the surveys can be merge by question names.
Questions from both surveys need question labels. The answer options must be identical and in order. See also the section Type question labels.
Select The surveys are different and must be merged by question names. Choose between All questions and All questions except backgrounddata. Click Next.
If you didn't create question names to match between the two surveys, or if the answer options don't match in order, you'll receive this message:
The questions in merged surveys must have the same questions and answer options in the same order.
If you've created question names correct you'll receive this message:
The chosen surveys are merged by question name.
Click next to continue the merge.

If one or more surveys are being implemented Via panel you can choose All questions except backgrounddata, to avoid paneldata being included in the report.
When merging identical surveys, you can choose to merge selected questions.
ChooseOnly the following questions (enter question numbers and/or question ranges separated by commas - leave blank if all questions. For example 1,3,5-12)
When you merge questions or question ranges it is easier to list question ranges by hyphen.
Click Next, and name the merged survey. Click Finish.
Create text analysis
Text analysis converts an open question to a closed question, in order to analyse answer statistics.
Textanalysis procedure:
- Read a reasonable portion of the answers, before dividing answers in categories/groups.
- Extract answers to Analysis with a code map
- Add questions to be coded
- Attach ("code") freetextanswers to defined questions
You can't create a codemap before the survey has ended, but a few days before, you may create a codemap suggestion.
Go to the Overview page, click your survey and click Answers.
Then select the menu item Textanalysis.
The Textanalysis Wizard opens, and you can choose Add new coded question, or Choose existing coded question.
Now you can create answer alternatives containing categories of free text answers you created with your codemap.
You can also create answer options with Only one answer or Multiple answers, because freetext answers may include multiple answers.
Always create an answer option named "Other" to collect answers not groupable according to the codemap.
Then click Next, where respondents freetextanswers, respondentno., sourcequestion and targetquestion are visible in a new wizard.
Now you can attach answers to defined questions via the Code function.
Mark the freetextanswer and select Code  ,
and select the closed answer the freetext answer can be attached to.
,
and select the closed answer the freetext answer can be attached to.
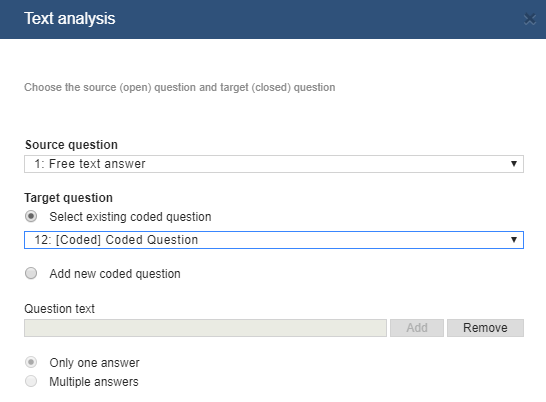
You can code multiple questions by selecting questions in the left column and use the search or filter function. Coded / Uncoded in the dropdown menu to find answers uncoded.
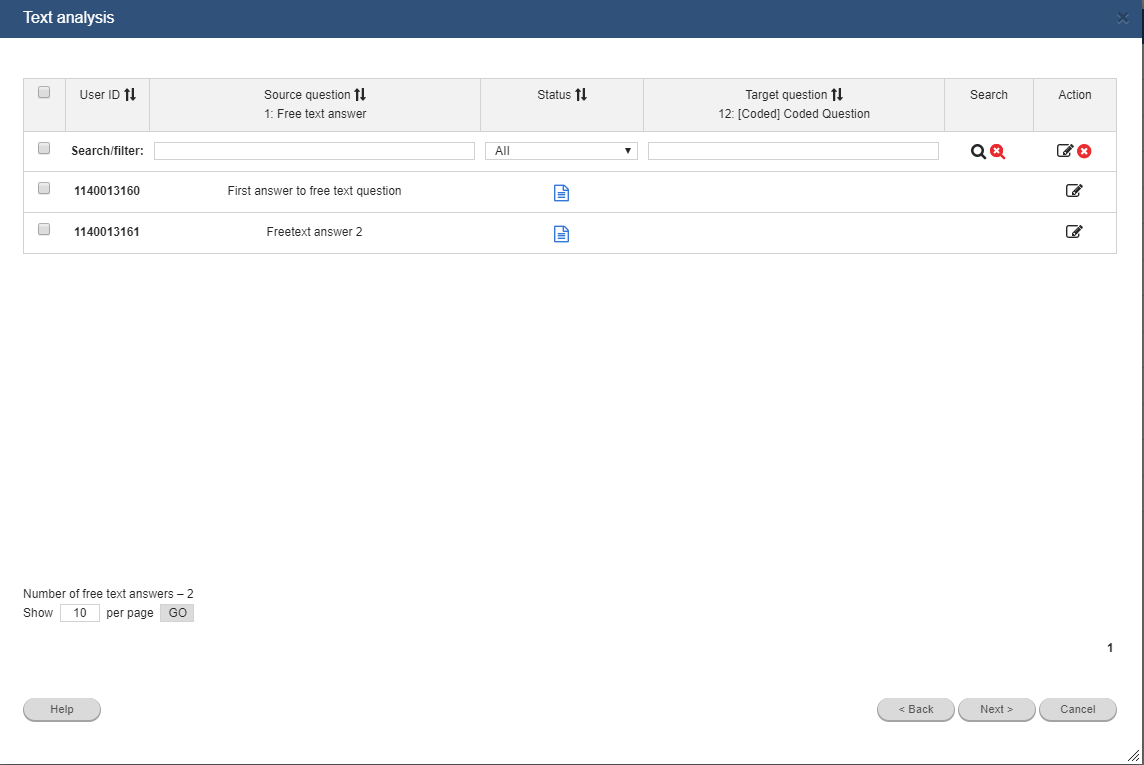
Create Reports
When the survey is completed the data collected can be extracted to reports in defgo. You may also dig in deeper with your data to test hypotheses and analyse relations between data.
You may also create a report during survey implementation, without any influence on respondent answers.
Click the icon number of answers ![]() to the right in the row your survey is places.
Or click your survey and choose Add quick report to quickly form an overview of answers.
to the right in the row your survey is places.
Or click your survey and choose Add quick report to quickly form an overview of answers.
Reports can be outputted in Excel, in Word, in PDF, in PowerPoint, in HTML-format and in HTML-Dashboard format. When you start the Analysis module, create advanced reports (optional with special settings) in all of the formats mentioned. Besides of saving reports on your computer, also chose to save reports online in defgo og publish them via a link or in an email or in a website.
To create a report in defgo, you need a survey with collected data.
Reports are created as background-jobs. When you click Add analysis report the report will be visible in the overview page. Right next to the report a yellow clock icon will indicate waiting time, until the report is ready. When the icon disappears, the report is ready to be opened by clicking on it.
- Click Analyse in the topmenu at the Overviewpage or click on your survey and select Add analysis report.
- In the open window, select a folder and in this folder choose the survey for your analysis report. Click OK. The analysis wizard opens.
These are the main tabs:
- Content: Create and edit objects to be added to the report (tables and charts).
- Settings: Specify settings for calculations. E.g. choose which data units should be presented (absolute or relative), or whether you want to calculate mean og standard deviance etc. You may also set report language and whether to include freetext answers.
- Filter: Edit settings for question filtering in the report. A filter can be created for a unique user ID , date, answer of a certain question etc.
- Page layout: Set conditions for the report layout: colour, fonts and fontsize, margens, page direction, etc.
- Output: Choose report output format (Excel, Word, PDF, PowerPoint, HTML eller HTML Dashboard).

After you've added an analysis report, you'll be presented with the tab Content activated.
The content of your report is created beforehand as default.
In the top you can add elements by clicking the + icon.
- Tables for all lets you add tables for each question in the survey to the list of elements. Along with an introduktionstekst with backgrounddata. You may remove the introductiontext if needed.
- Graphs for all adds tables and graphs for each question to the list of elements.
- Bar will create a bar chart based on your selected question.
- Table will create a table based on your selected question.
- Add one question will add a single element to the list. Click the Element and choose the question for which there should be created an element at the Data tab. As default the element is added as Bar. Click the element and choose Type to change to another type of element.
- Pie will create a circle diagram based on your selected question.
- Intro text is used for adding information about the survey in the report. The text created by the system by default can be changed. Use the following short codes:
[respondentsTotal] - the total number of respondents, participating in the survey;
[responseRateTotal] – response percent for the respondents;
[surveyStartDate] and [surveyEndDate] – date for survey start and ending;
[filter] – filter, used for creating the report;
[respondentsFilter] - number of answers fulfilling the filter criterias;
[reportCreationTime] – time of report creation.
- Text element lets you add your own text in the report. This can be an introduction text or an explanation of the report or graphs. Click Text to open a text editor window
- Click on Picture to add a picture in the report. In the tab Picture settings you can edit settings for the picture, to be shown in the report.
To add the picture saved on your computer, copy the Image URL and insert in Image URL. To add an image uploaded to your folder, select the image from the drop-down menu.
After you've clicked Add analysis report, a new wizard opens with the tab Content being activated.
You can use Drag and drop to drag elements up and down to change the order.
To edit multiple elements simultaneously, use the editing menu at the top of the wizard, below the elements menu.
Choose all elements on the list. 
Edit selected elements. 
Copy selected elements. 
Remove selected elements. 
Preview selected elements. 
Remove all elements. 
To edit elements individually, click an element and use the functions: change type, select data and Filters.
Edit, copy, preview and remove with the buttons right next to each element.
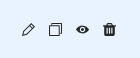

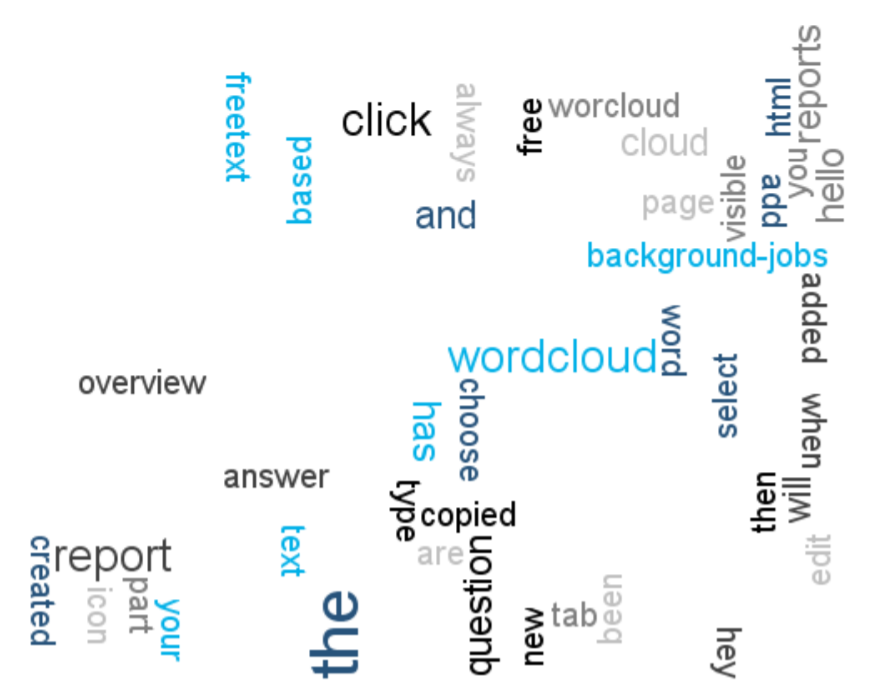
After you've added an analysisreport, select the tab Filter. Here you can create and edit filters for the report.
In defgo you can create reports based on 3 types of filters.
- Global filter
- Autofilter
- Local filter
The global filter is used for the entire report. Which means all of the report elements (e.g. graph or table) will be created based on this filter.
Autofilter can create reports in which data will be sorted according to questions included in the auto-filter. Read more.
The local filters are created for a specific object, and only applies for this object.
To use a global filter, click the tab Filter.
In the left navigation menu Select filters, select which data to be filtered:
- Filter Questions and panel
- Filter with Autofilter
- Filter on Time
- Filter on User ID
- Filter on Session ID
- Filter on Group ID
- Filter on Period ID
Configure filter settings at each tab in the left navigation menu - they will be saved and used in the report. When all the filter settings have been created, click OK and the filters will be visible at the Total Filter preview.
You can delete all the filters by clicking Delete all.
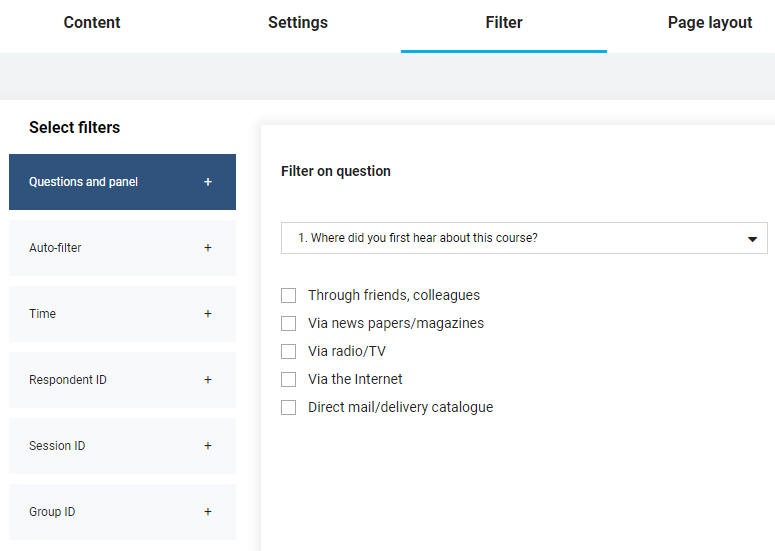
After you've created an analysisreport, select the tab Filter and choose Autofilter for the analysisreport.
With this function you can choose all answer combinations for one question, and for example create 200 reports in one click.
You can also create 1 report per respondent, or 1 report per answer option and combination.
If 1 report per answer option and combination is selected, you can choose one of the following options: For all combinations containing answers (no empty reports) to clean the report for missing answers.
- «create reports for all combinations of questions and answer options » allows to create full set of reports, even if some of the them will remain empty (i.e. survey doesn’t contain answers that meets the criteria)
- «create reports for all combinations containing answers (no empty reports) » allows to create a set of reports, which at least include one answer
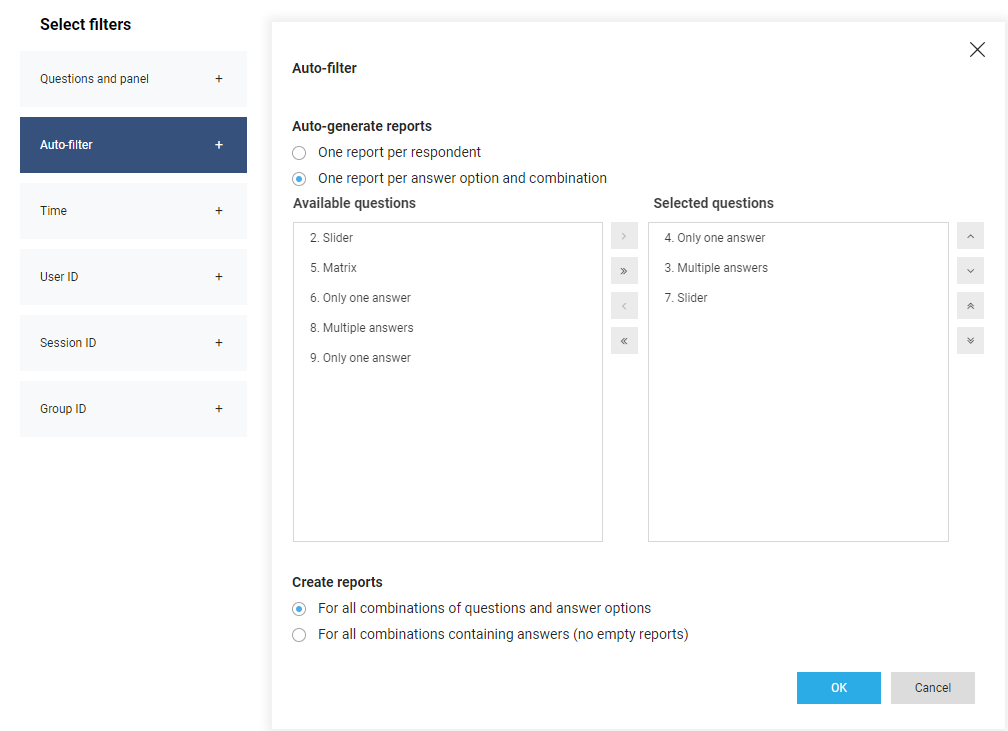
Click Add analysis report and select the tab Filter and then Questions and panel.
You can create a filter based on question and answer options, but also background data by clicking Filter on question.
Select your question and check answer options or choose background data from a panel in the same dropdown menu. Background data will be listed at the end after the filtered question(s).
The report will only include answers from the question(s) and answer options / background data you filtered.
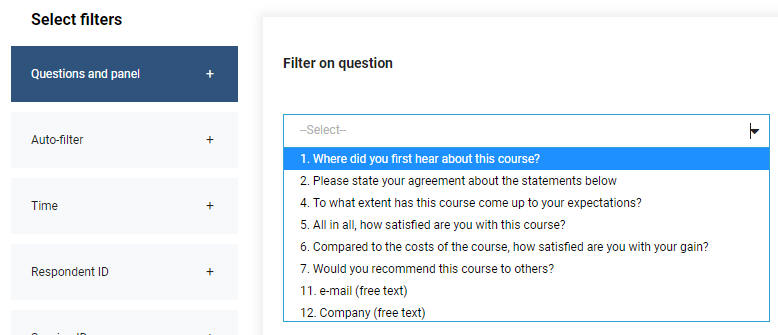
DATA VIEW
Click Add analysis report and the report wizard opens. The tab Content is activated by default.
The content of your report is created beforehand as default.
In the top you can add elements by clicking the + icon.
For each element you can add Cross tabulation. Click Edit for your element and select the tab Cross tabulation.
Check the field Cross tabulate question and add the questions for cross tabulation in your report. Click OK when you've finished.
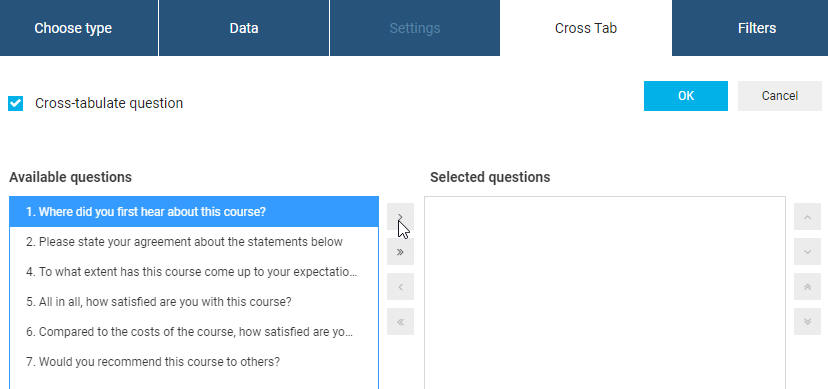
Click Add analysis report , click the tab Settings and select the tab Calculation.
Mean, Index, Standard Deviance and total – are statistics to be included in the report. For Percantage and Standard Deviance, you can set decimals.
Mean – weighted average is calculated from the formula:
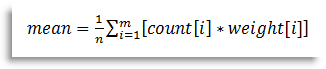
n – the total number of respondents answering the question:
- m – the total number of answer options
- count[i] – number of respondents who answered the correct answer option
- weight[i] – weight of the current answer option
Example.
Let's create a new survey including a Matrix Question:
We will set up three different weights and calculate Mean for each answer option.
We go to Settings for Matrix question:
As shown in the picture, we set 3 conditions for each question:
- Start value – weight of the first value on the scale
- Increase – the weight will increase for each step.
- Direction – to which direction the weight for each step will increase.
For the first answer option we will keep the settings without any changes (1.1.). For the second answer option, we've changed the settings as shown in the image (1.2).
Now we can see how the calculation is changing based on different settings for the Matrix question. We save our changes and create a survey.

1.1.
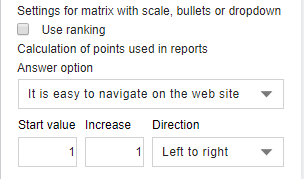
1.2.
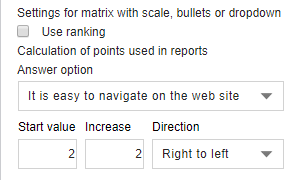
With answers the report will look like this:

Let us calculate the mean for each of the answer options. At first we look at the first answer option.
We calculate mean for each of the answers. In the setting for the question of this answer option is indicated a start value and a growth corresponding to 1. Because the direction is set from left to right, the weight of the answers will look like this:
| Scale value | Very happy smiley | Happy smiley | Neutral smiley | Unhappy smiley | Very unhappy smiley | Don't know |
|---|---|---|---|---|---|---|
| Number of answers | 1 | 1 | 0 | 2 | 0 | 1 |
| Weight | 1 | 2 | 3 | 4 | 5 | - |
As the table show the weight of the answers to the first value of the scale ("Completely Disagree") corresponds to the original value. Which means one for each subsequent scalevalue increases with an interval (1). The increase passes from left to right, according to the setting provided in the "direction"-field. Let us double the number of answers for their weight and sum up the numbers:
Sum = (1*1 + 1*2 + 0*3 + 1*4) = 11
Let us calculate the number of respondents who answered the question. By calculating the mean, we do not consider respondents answering Don't know. Now we have, Basis = 5-1 = 4
And we calculate mean:
The mean is= 11/4 = 2,75
Now we look at the other answer option. The answers are:
| Scale value | Very happy smiley | Happy smiley | Neutral smiley | Unhappy smiley | Very unhappy smiley | Don't know |
|---|---|---|---|---|---|---|
| Number of answers | 0 | 1 | 2 | 0 | 1 | 1 |
| Weight | 10 | 8 | 6 | 4 | 2 | - |
Let us double the number of answers on their weight and sum up the numbers:
Then let us calculate the number of respondents having answered the question. By calculating the mean, we do not consider respondents answering Don't know. Then we have, Basis = 5-1 = 4
And we calculate the mean:
Mean = 22/4 = 5.50
By calculating the mean for ”non-matrix” questions, the calculation will provide the same formula, but the settings will always be: Start value = 1
Growth = 1
Direction from left to right.
Notice that you may also include mean from another survey. Check the field Include mean from other survey.
Click Add analysis report , click the tab Settings and select the tab Calculation.
Mean, Index, Standard Deviance and total – are statistics to be included in the report.
Totals – is the number of respondents answering a specific question. For the answer, the choice of one or another answer option is counted, as well as the transition to the next question. In the picture below you can see an example where the number of respondents who answered the question is 3:

It happens that the respondent can't answer the question during survey implementation. This may happen if you don't have access to answer the question, e.g. if the survey includes leaps. This respondent will not be included in the number of respondents answering the question he/she leaped over.
Click Add analysis report, click the tab Settings and check the field Percentage.
You also have settings for:
- Decimal
- Include unanswered - To view information about respondents not having answered the question. If you leave the field un-checked, the report will include a row with the number of unanswered surveys.
Click Add analysis report, click the tab Settings and click the tab Display Text and check the field Include open answers.
Include open answers shows answers from freetext fields and panel background data.
The report will include data on the number of respondents answering the survey, and their answers on open questions.
With this function the report can also show informations on respondents answering an freetext answer, such as name or position.
Use the dropdown menu Add placed under Include open answers to select which information to add. You can add a unique user-ID or session ID, or panel information used in the survey, and respondent information will be visible in the report.
Click Add an analysisreport, click the tab Settings and click Report language
Make sure you've added a report language in Language versions
Notice that you can also use the main language as report language.
When you use Language versions you can also add a New language and Report language. The difference between them is, that Report language is a language you only use when creating reports. Respondents will not see a translation to this language when answering the survey. New language is language/translation to a language used for creating reports and answering the survey.
Click Add analysis report, click the tab Settings and click Report language to set the system language for the analysis report.
System language makes it possible to choose the language used in the system, e.g. Total and Unanswered.
Make sure that you've added a report language under Language versions .
Also notice that you can use main language as report language.
When you use Language versions you can also add a New language and Report language. The difference between them is, that Report language is a language you only use when creating reports. Respondents will not see a translation to this language when answering the survey. New language is language/translation to a language used for creating reports and answering the survey.
REPORT PAGE LAYOUT
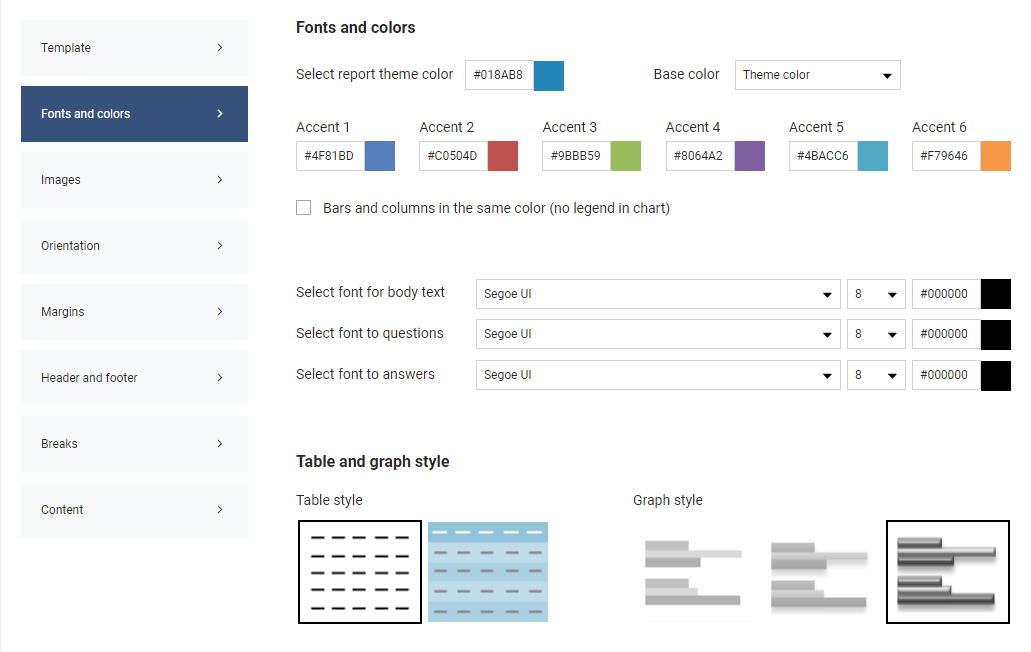
Click Add analysisreport, click the tab Page Layout and click the tab Content.
Check the fields Front page and/or Status text to inserts statustexts in the analysis report.
The Front page text is the first page of the report including its name and implementation date.
The report status text is the last page of the report with generel information on:
- Company name
- Time of Implementation for the report
- Number of answers
- Number of invited respondents per email
- The answer percentage for the survey
Add your logo as a file to your project folder.
Click Add analysisreport, click the tab Page Layout and click the tab Images.
Select logo from url or from your project folder.
The logo will be positioned in the top right corner of the report.
Select frontpage image from url or from your project folder.
Click Add analysisreport, click the tab Page Layout and click the tab Breaks.
Define grouping of elements (tables and graphs) in the report.
- One element per page - each element will be placed on a new page
- Compact arrangement of elements - elements are placed one after one, and the number of elements on a page is determined by its size
- Group by the question - tabeller and graphs for each question will be placed on a separate page.
Example of a report with One element per page.
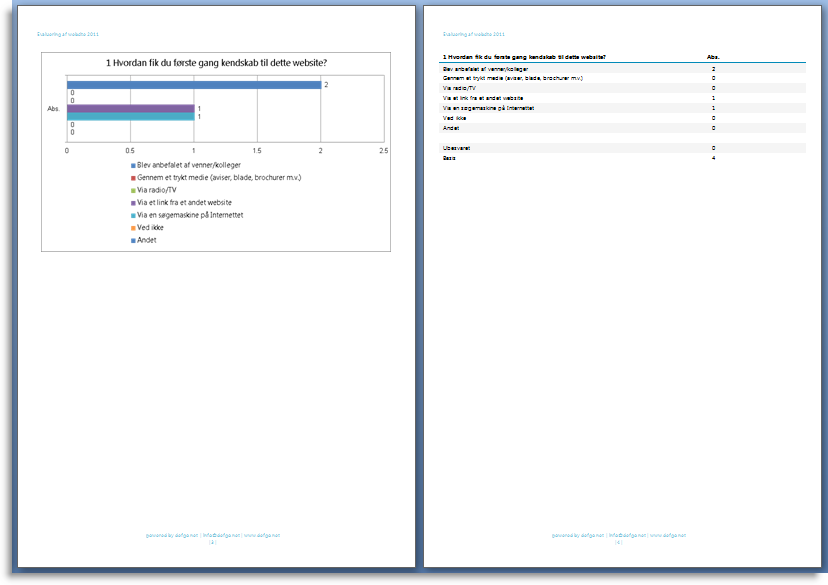
Example of a report withCompact arrangement of elements.
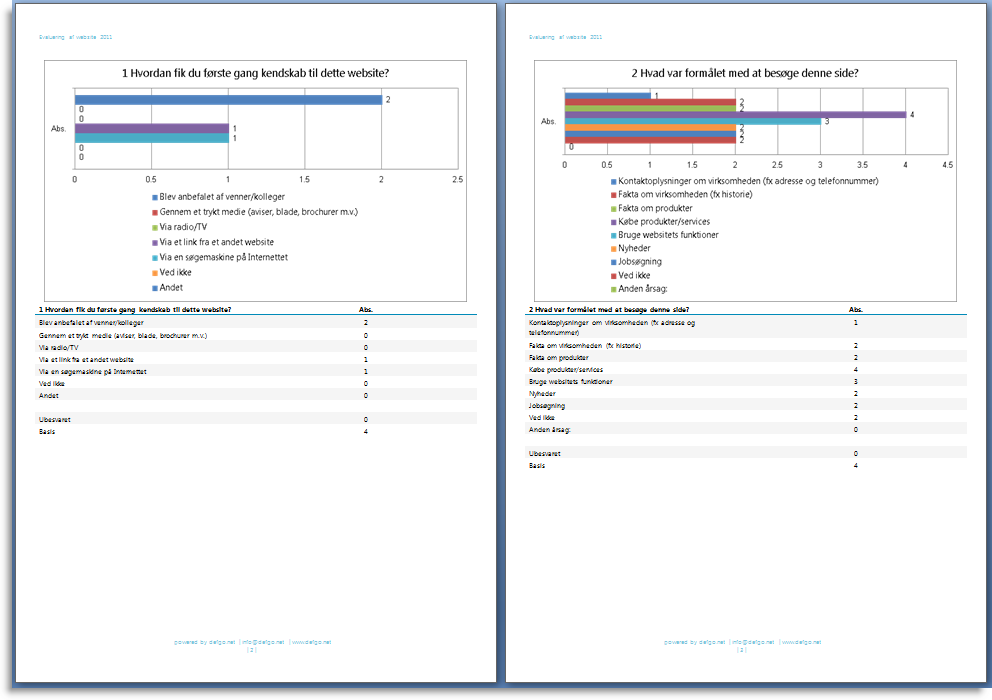
Example of a report with Group by the question.

Click Add analysisreport, click the tab Page Layout and click the tab Template.
Report template
You can create your own templates and save them in the system with all the required settings. After you've created the analysis report, select the tab Output and check the field Template.
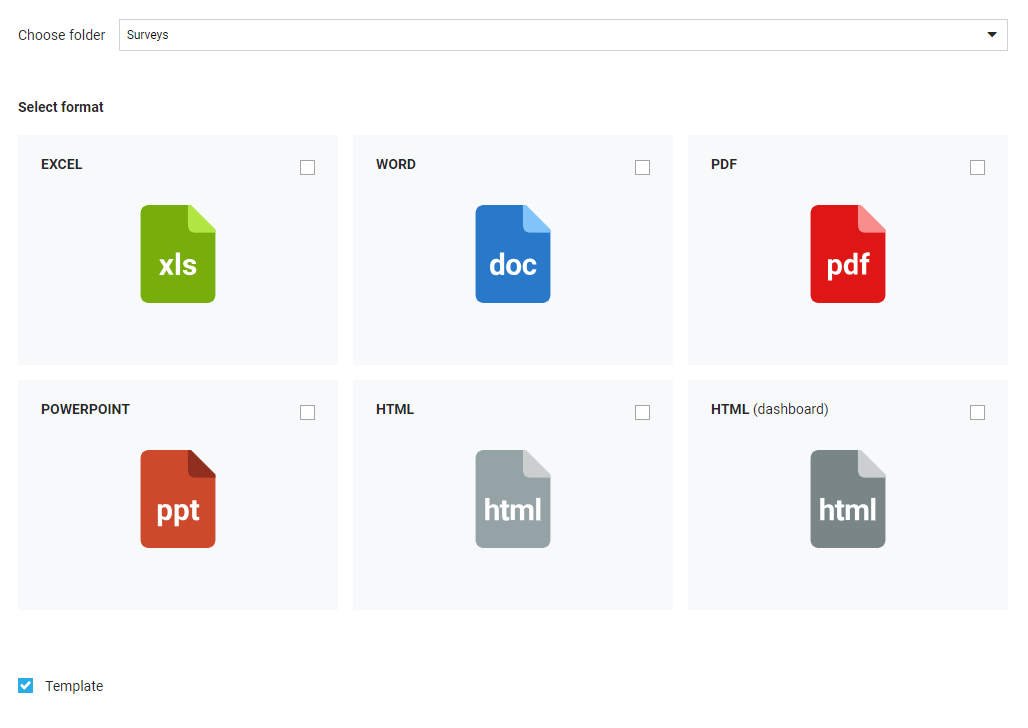
- Afterwards, go to the Page layout tab select, click Template the file from the dropwdown list and click Apply
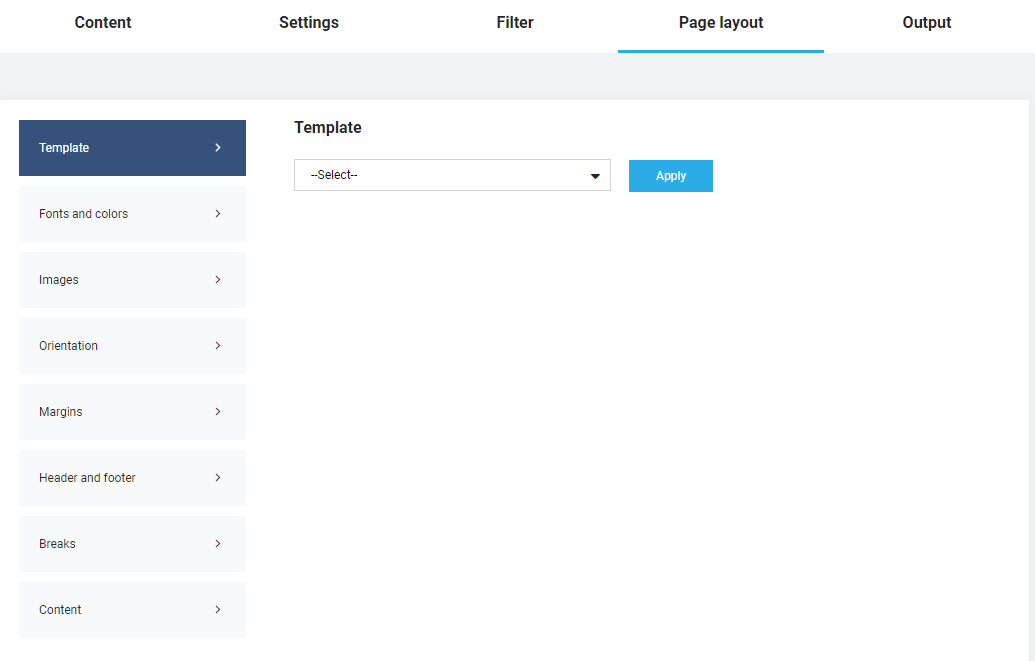
- The page layout will be updated with the template settings.
It is possible to create a report template in Word
Create the Word document and type the required settings, such as font size, headline size and normal text, colours, margens, page direction, header and footer etc.
Upload the wordfile to your project folder at the Overview via Menu and Add file. Load the word template in the report via the tab Page layout.
You can upload settings from files in * doc and * docx.
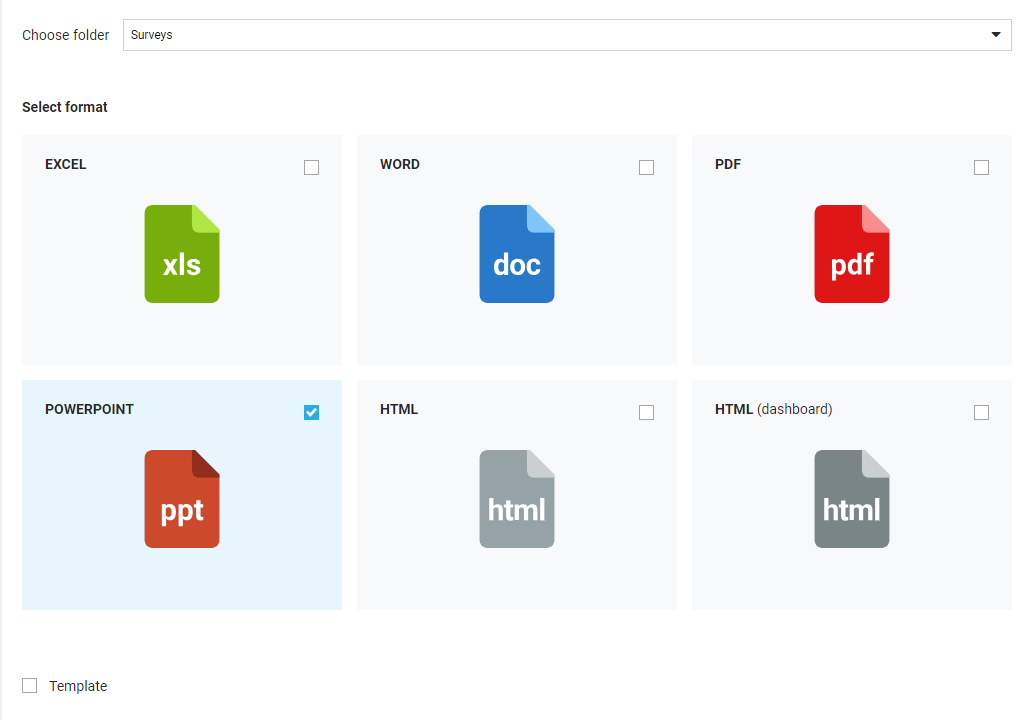
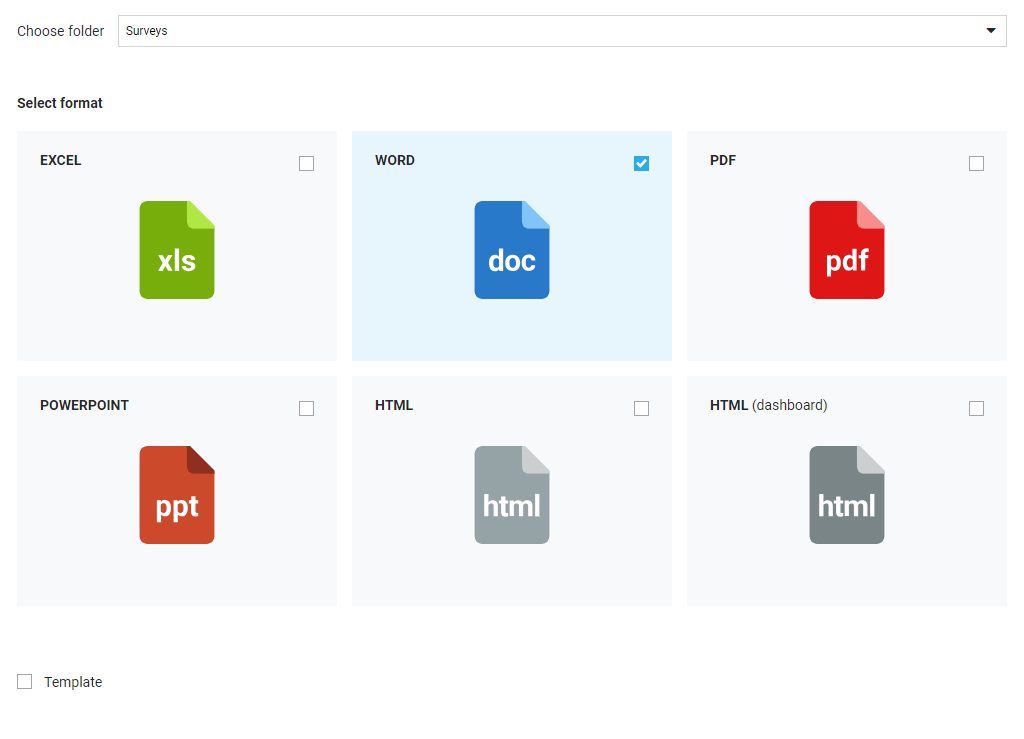
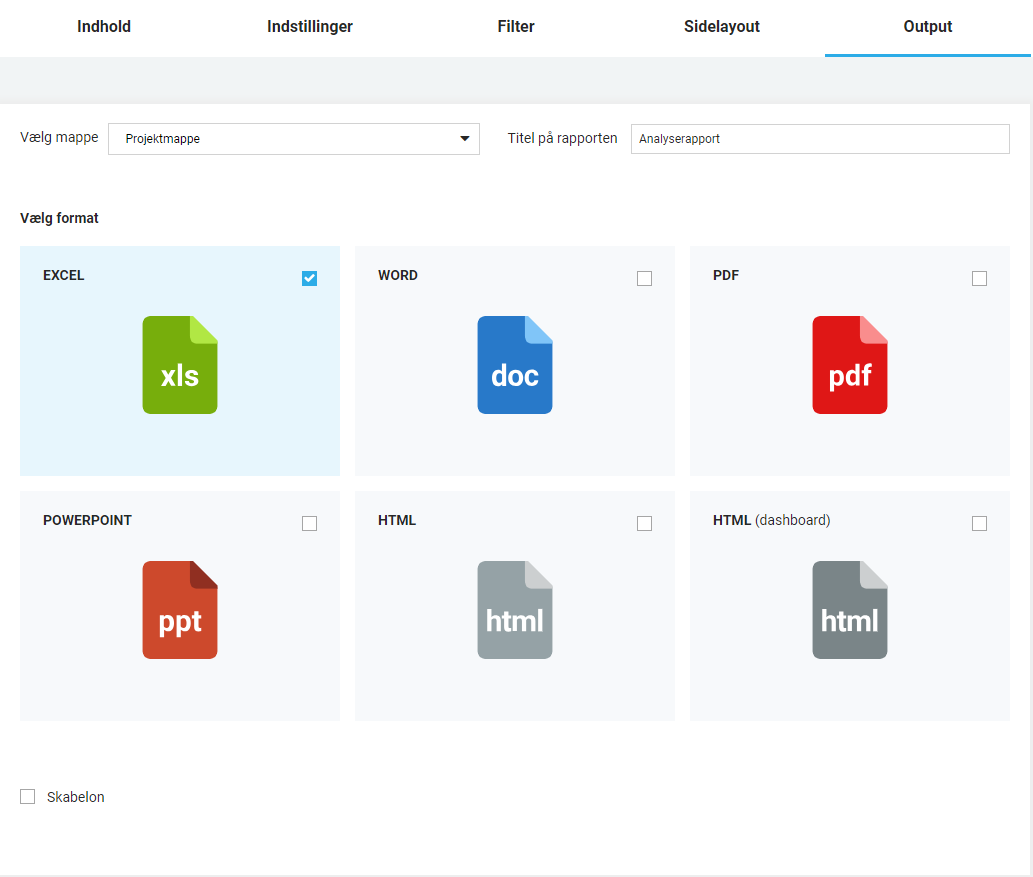
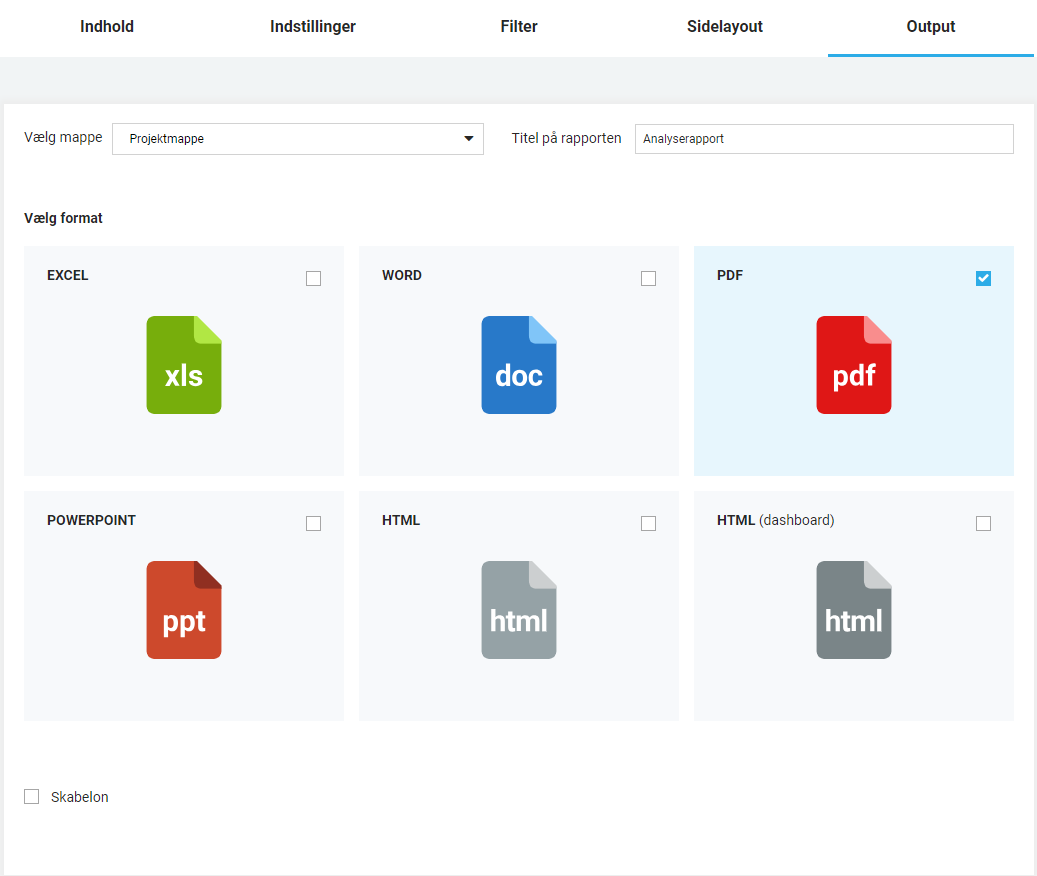
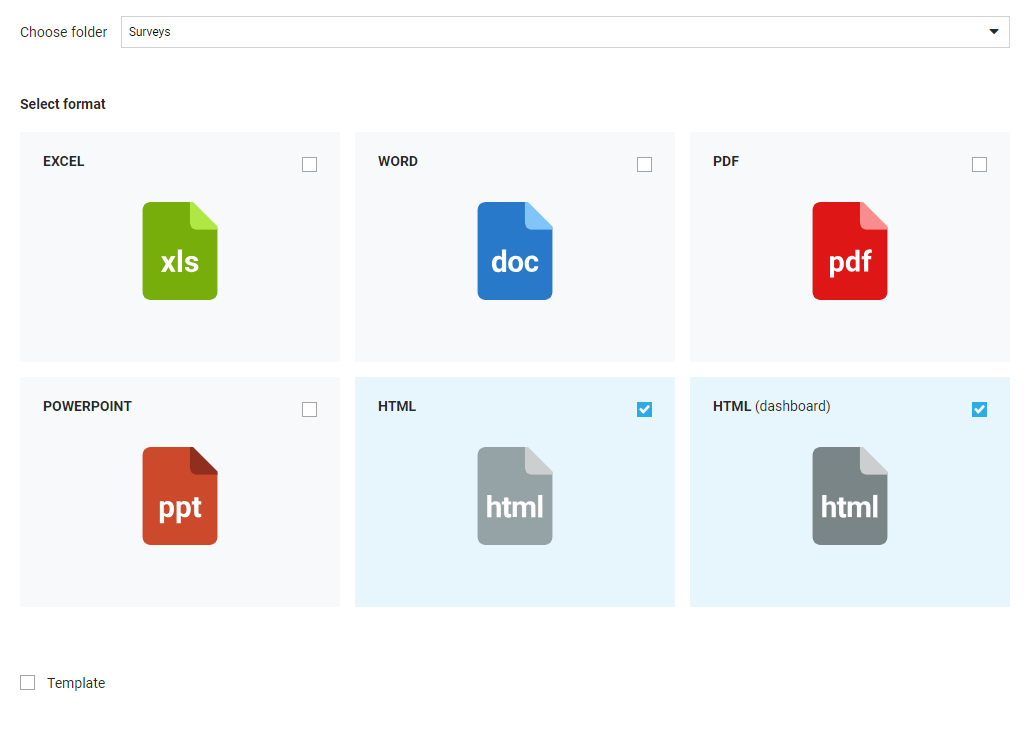
REPORT FUNCTIONS
When you've saved your report in defgo the report title, format icon, ID and date is visible in your project folder.
Click the report title to select functions.
Go to Overview page and click your report.
Click on Share, type in start- and enddate for report availability. Optionally choose password.
Now you can share the link to the report, Copy it or Send via email. When you've clicked OK you'll receive an URL link to the report under the column Shared at the Overview page.
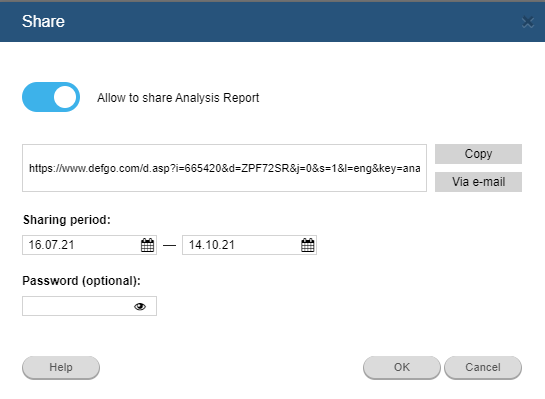
Click the Analysis report from the overview page and select Share.
Share the report via email and open the defgo report link on your phone.
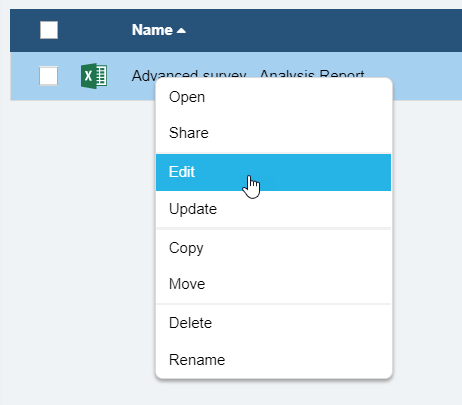
iOS
Click on your Analysis report from the overview and select Share.
Share the report via email and open the defgo report link on your phone.
If you have an iOS operating system, please click on this icon i navigationsværktøjslinien.
Then click Add to homescreen
Name it "defgo" and click Add.
Now you have access to defgo as a web app, and access to data anytime!
Android
If you have an Android operating system, please click on the menu icon ⋮ in the navigation toolbar.
Then click Add to home screen.
Name it "defgo" and click Add - In Firefox / Samsung naming the reportlink is not possible.
Click Add schedule in Menu at the Overview page, to create a new schedule.
Automatically update reports.
The Add schedule function includes three tabs: Task, Schedule and Notification.
Task
Select documentformat and task in the tab Task.
The visible reports are retrieved from the project folder you've opened. So first, open project folder and then click Add schedule in the Menu. You can choose up to 10 reports from 5 folders simulteaneously.
You can either choose to update selected reports from the list automatically, or update all reports in the selected folder, or folders.
As default setting, the task is activated to Auto update the selected item(s) below.
If you would like to run alle tasks from a folder, check the field Auto update all items in the selected folder(s) below and click the folder for your tasks and click OK.
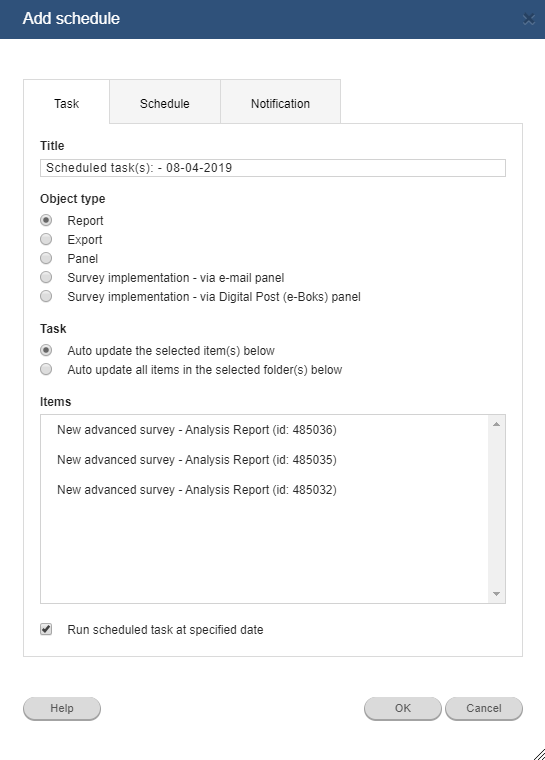
Schedule
At the tab Schedule you can set the update procedure.
As default setting "today" is selected as start date. End date is automatically set one month forward.
You can create multiple tasks for multiple times the same day, and then generate reports gradually as you add new panel participants.
Then select how often the report/reports should be updates in the dropdown menu Schedule task. You can only choose to update the reports hourly every half hour (e.g. 12.30), daily (e.g. every three days), weekly (e.g. every third week on tuesday) or monthly.
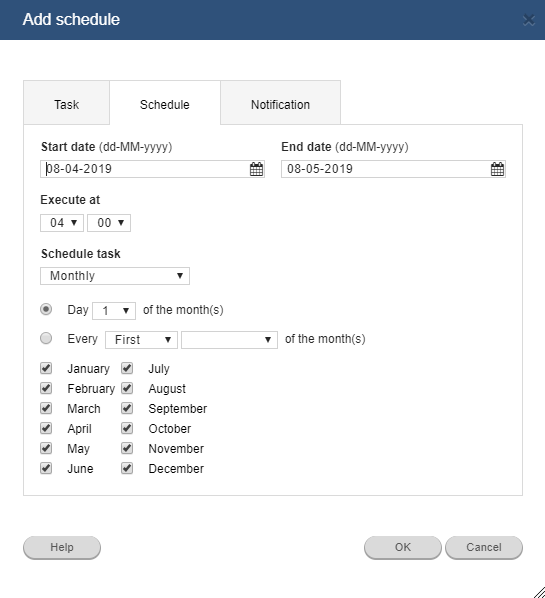
Notification
At the tab Notification you can define mail text and recipients of the notification, when the reports are updated.
Here you can edit Email subject text, Email address of sender, Email reply address, Mail text format and Mailtext.
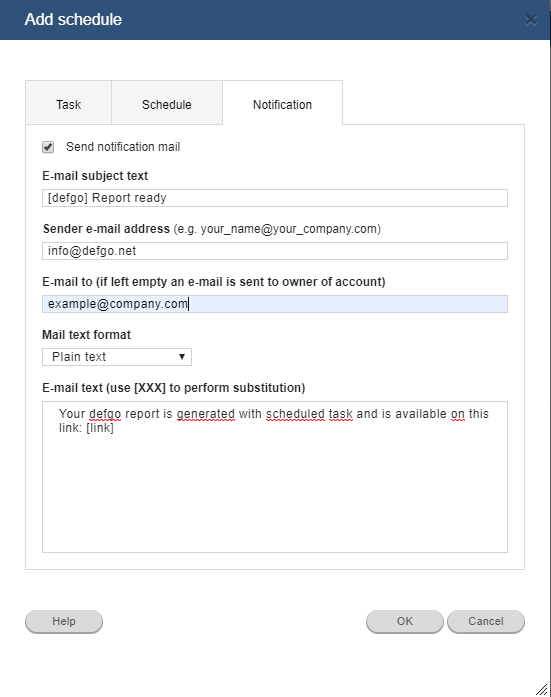
CREATE PANEL
There are many advantages when you send out the survey via panel.
- All panel recipients are automatically assigned an unique ID number, to manage all the survey recipients, and their answers (depending on anonymity).
- Automatically send out reminder to participants who didn't answer during a period of time.
- Panel recipients can stop their reply during survey implementation, and resume answering from the same question in the survey, before interruption.
Go to Overview page, select Menu and click Add panel.
After you selected Email panel, Phone interview (CATI) panel, or Digital post (e-Boks) panel, you can add respondents by typing backgrounddata in the field Add new recipients.
Read more about how to insert your recipients Type backgrounddata in a panel
TYPE AND INSERT BACKGROUNDDATA
Go to the Overview page and click Menu and select Add panel.
Select Email panel. Dont check the field The panel should be uploaded from a text file. Click Next.
Enter names for backgrounddata in the field Names for background data and add new recipients in the field Add new recipients.
After completion of the wizard click Next, name your panel and click Finish.
Backgrounddata can be informations on address, age, gender, customertype, department etc. Define names for backgrounddata which will be included in the analysis report.
Each information of data will be assigned a system field number. If you've typed these informations in the panelsystem, each field (separated by semi colon) is assigned a number:
| 1 | 2 | 3 | 4 | 5 | 6 |
|---|---|---|---|---|---|
| alan.smithee@company.com; | Alan Smithee; | Company A/S; | City Square 1; | 1760; | Copenhagen K |
| fred.bloggs@company.com; | Fred Bloggs; | Company A/S; | Hovedgaden 2; | 2500; | Valby |
| john.doe@company.com; | John Doe; | Company A/S; | Street 2; | 2500; | Valby |
Backgrounddata can be included visible/invisible (to the respondent) or as pre-filled information, available for respondents to edit. (See the section Definition of answer options – Form).
Surveys can be sent with invisible backgroundata. This means that a respondent can attach informations, for which the respondent is not presented, but subsequently has access to in the reports.
It is also possible to insert backgrounddata in a survey. If you write the name of backgrounddata in squared parenthesis [Information here], the system will insert the corresponding data in the survey.
The following words can not be used as variable names: surveyLink, login , password , year and lastYear
Remember to put Emails in first column always!
To insert backgroundinformation in surveys, you need the form- and backgroundmodule. The backgrounddata for e-mail and name is available in reports without these modules.
Go to Overview page and click Menu and select Add panel.
Backgrounddata can be included visible/invisible (to the respondent) or as pre-filled information, available for respondents to edit. (See the section Definition of answer options – Form).
Surveys can be sent with invisible backgroundata. This means that a respondent can attach informations, for which the respondent is not presented, but subsequently has access to in the reports.
It is also possible to insert backgrounddata in a survey. If you write the name of backgrounddata in squared parenthesis [Information here], , the system will insert the corresponding data in the survey.
The following words can not be used as variable names: surveyLink, login , password , year and lastYear
The name should be written identical in the survey and in the panel.

When you add a new panel, you can only use numbers as variable name, if the numbers are in correct order.
Which means that the number 1 can be used as name for variable number 1 and the number 2 can be used as variable number 2, etc. But the number 2 can not be used as name for variable 1 or variable number 3.
| Correct: | Wrong: |
|---|---|
| 1;2;3;4;5 | 1;3;7;2;5 |
| e-mail;2;Company A/S | e-mail;Company A/S;2 |
| 1;Email;3;Name | Email;1;Name |
Go to Overview page and click Menu and select Add panel.
You can import data to the panel in two ways.
- Upload panel from textfile.
- Create panel by typing or copying date into the wizard.

Save document as a CSV file.
Select Email-panel. Choose The panel should be uploaded from a text file. Click Next.
Click Browse and select the file. Click Upload file. Click Next.
Upload from textfile is faster, an can be recommended for large panels.
When the file is uploaded this message appears: The file is uploaded and saved. Click Next, name your panel and click Finish.
If you regret or uploaded the wrong files, you can upload a new file to overwrite the existing file.
Go to the Overview page and click Menu and select Add panel.
Select Email panel. Dont check the field The panel should be uploaded from a text file. Click Next.
Enter names for backgrounddata in the field Names for background data and add new recipients in the field Add new recipients.
Names for background data are shown as headlines in reports and in questions lists in reports.
Click Next to validate paneldata, to control the number of background variables and check for duplicates in email-addresses if you check the field Check for duplicates.
After completion of the wizard click Next, name your panel and click Finish.
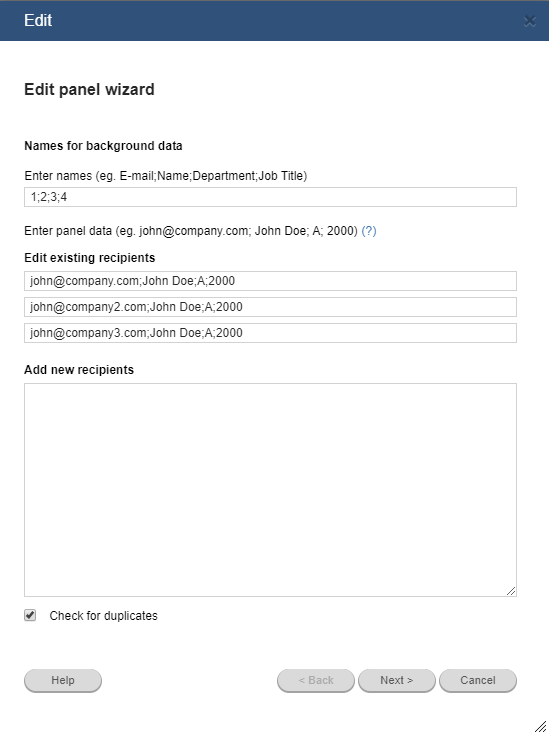
PANELADMINISTRATION
Go to the Overview page and click on your panel. Select Edit and click Next to edit question types.
Each background variable in the panel is assigned a unique ID number. The name of each ID-row is retrieved from the names of background variables.
In this wizard you can choose question type for each background variable in the panel.
You can choose between three types of questions:
Only one answer, Freetext and Question for rounds.
The default setting for background variables is Only one answer. If the number of values (answer options) for a background variable is more than 200, you should select the question type Freetext.
For most users it is unnecessary to change the default setting for question type. Freetext should be selected, if paneldata are to be merged later, and Only one answer should be selected, if reports filtered by panel are to be created later.
Excel rapporter have different appearances depending on type of questions selected for the panel background variables.
Send out the survey via e-mail or CATI panel. Select Answer->Export->Excel.
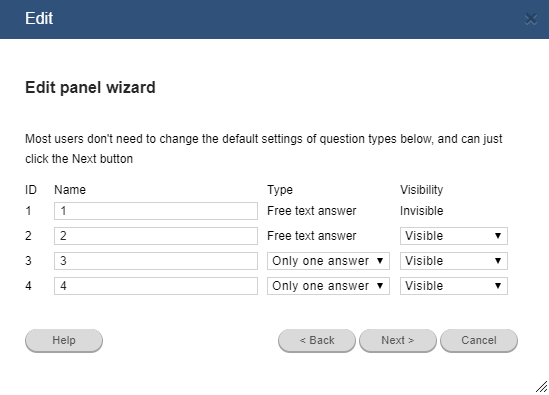
Go to Overview page and click your created panel. Select Edit and then click Next to edit Question types.
When you create a panel notice the way you define background variables. The choice is importance in how panel backgrounddata is used when the survey has ended, and data processing begins.
The first two variables are always defined as freetext (email & name). The subsequent variables have three options: Freetext, Only one answer and Texts for questions with rounds.
Freetext
If you define your background variables as freetext, the panel dataset must be coded beforehand, before you can process the data statistically (e.g. filter on selected background variables). This can be achieved by exporting data to e.g. SPSS and code the data. Subsequently you can either continue working in SPSS, or import the dataset into defgo to further data processing.
Only one answer
If you define background variables as Only one answer, the answer options are assigned a numerical value, and the data can be processed directly in defgo.
Texts to survey with rounds
If you implement a survey including the function Rounds – with rounds attached to one panel, you insert a variable in survey and panel named ROUND. This variable controls the amount of rounds the survey panel will run and which text to be inserted on the position of the variable in each round of the survey.
When you create a panel and define your background variable as texts to survey via rounds, the variable is written in a parenthesis, with round subjects separated by comma; e.g.:
| Name | Round | |
| john.doe@johndoeinc.com | John Doe | Tuborg, Carlsberg Light |
Because the variable is defined as text, the dataset in the panel is coded, before being analysed and processed statistically. This is the same approach as to Freetext.
Merge surveys sent out to different panels
To merge two or multiple identical surveys sent out to different panels. Define the background variables as Freetext an follow the procedure described at Freetext.
If you defined the panel background variables as Only one answer, in order to process data statistically in defgo, then only merge data sets if the panel background variables are identical and in identical order.
Go to the Overview page and click your panel. Select Send message and then click Next to send messages or newsletters to your panel recipients.
Previously sent messages can be used as template, but if you didn't send any messages, type your message by clicking next Next.
- E-mail subject text
- Type email for sender and reply.
- Type message with plain text or HTML-code.
Do not delete the squared parenthesis, which will delete panel information. Background information can't be inserted in the email teksten (only name).
The Wizard will show how many respondents you send out to. When you click Finish the system sends an email to each panel recipient. The window automatically closes afsted sending has started.
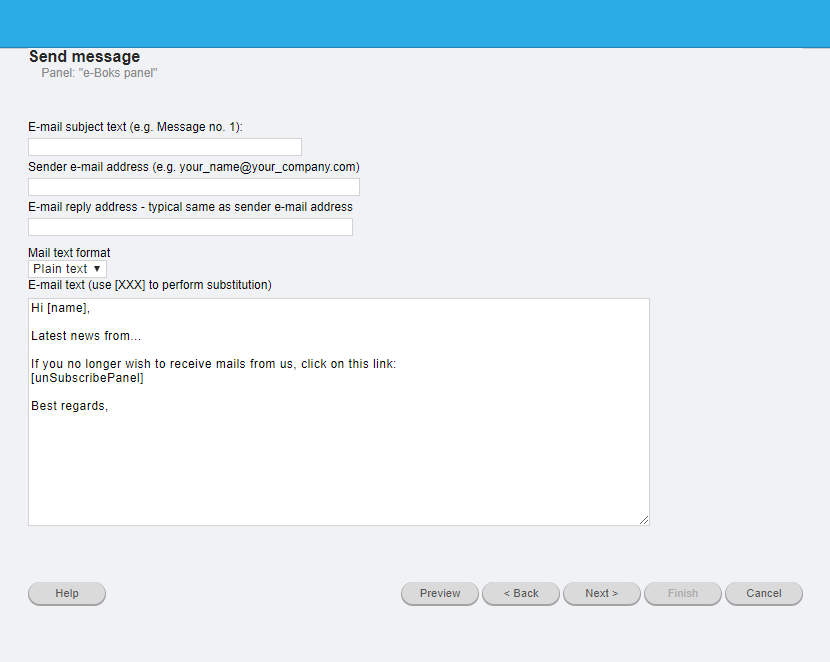
Go to the Overview page and click your panel. Select Properties and then click Next to manage panel subscription- and cancellations directly from a website.
You can use defgo standard URLs to subscription- and cancellation or define your own.
By clicking the link HTML-code, HTML-code for the subscriptionform is shown.
The code can be copied into a website.


The Rounds function is used for evaluating different types of products or things. E.g. different types of chewing gum.
Surveys for each type of chewing gum is sent to the respondent with few minutes interval.
This example show that the respondent ¹1 must answer questions for chewing gum ¹111, while respondent ¹2 must answer questions for chewing gum ¹444 in the first round.
After the respondents spend some time answering the questions, round 2 can be initiated.
The respondent ¹1 now must answer a question for chewing gum ¹222 and the respondent ¹2 must answer a question for chewing gum ¹555. In the example a round of one set with three chewing gum types is separated by comma.
In the last round the respondent ¹1 must a question for chewing gum ¹333 and the respondent ¹2 must answer a question for ¹111.
Implement the survey via rounds
Create a survey with questions, including the subjects for Rounds.
When you compose your survey insert the text [ROUND] in your question. defgo will automatically include the variable text/name in the panel for the current round and in the question in the place of the variable.
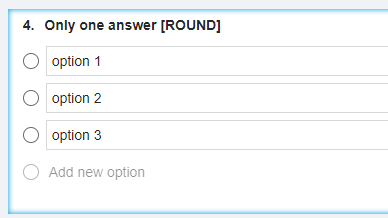
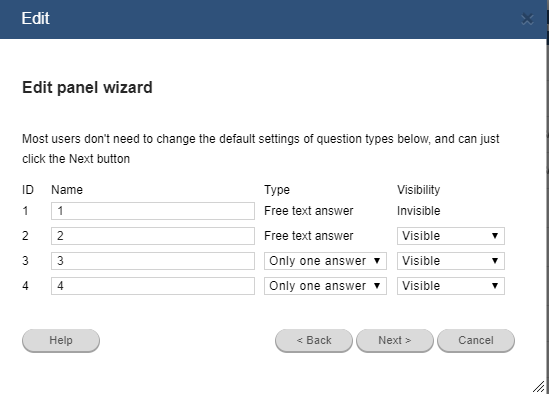
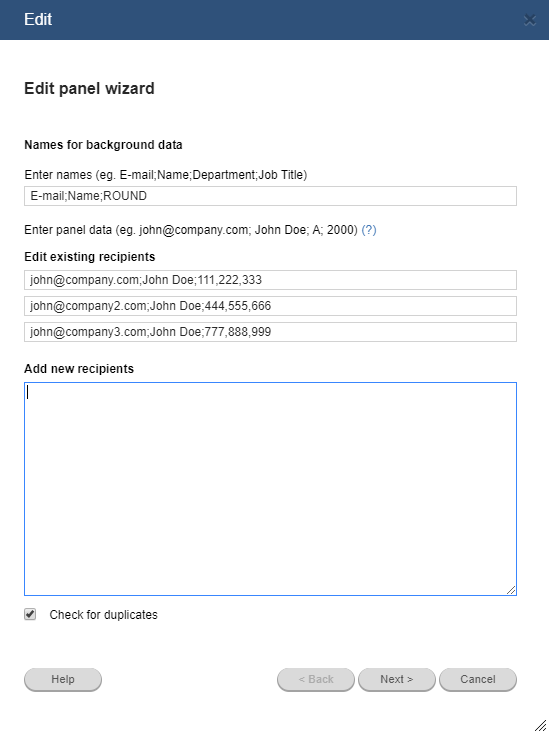
Continue implementing your survey via panel.
Send out to all respondents and click “Next”. Depending on how many round variable exists in your panel, choose between x implementation period.
When the respondents completed all rounds, add a an analysisreport.
Create telephone interview (CATI) panel
Go to Overview page, click on Menu and select Add panel.
Select Telephone interview (CATI) panel and click on Next.
Give names to background data in the field Names for background data and enter background data into the field Add new recipients.
CATI panel data consist of respondents telephone number, name and other background data. Background data can be named. (see Define names for background data for e-mail-panel for further information).
Telephone number, name and other backgroubd data for all recipients should be separated by semicolon. The list can be copied from a text or Excel file. (see Import background data to e-mail-panel).
The names given for background data are displayed in the list of questions while creating a report.
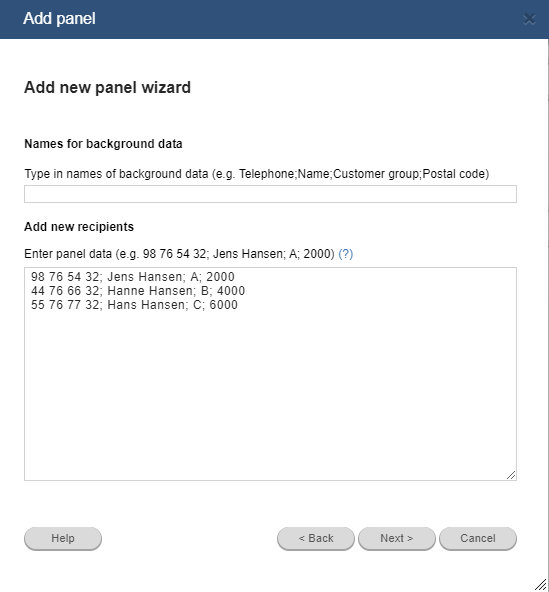
Go to Overview page, click on Menu and select Add panel.
Select Telephone interview (CATI) panel and click on Next.
Enter background data and click on Next.
Here it is possible to edit the panel, e.g. respondents can be added or the existing data can be edited.
When you finished editing clik on Next.
Name the panel and give a short description (optional). Click on Finish.
See Send out via telephoneinterview (CATI) for further information about implementation of survey via telephone interview.
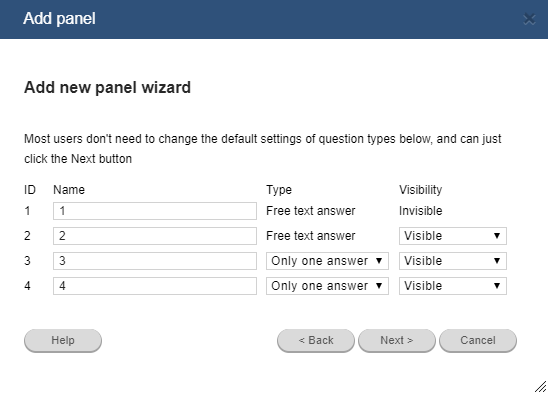
With the function Show panel the CATI administrator can receive a status of the survey while it is in progress.
Click on survey and select Open CATI in the pop-up menu.
Choose Show panel and click on OK.
Answer status, phone numbers and other categories will be shown:
- New
- Interview started (+ refused)
- Contact later
- Not available
- No such number
Brugeradministration
Med dette modul kan der oprettes nye brugere for den gruppe, som administratoren er blevet tildelt. Administrator kan redigere oplysninger samt ændre password for disse brugere. Desuden har administrator adgang til samtlige brugeres spørgeskemaer. En administrator kan desuden lave spørgeskema-skabeloner, som bliver tilgængelige for alle de øvrige brugere i gruppen.
Almindelige brugere kan ændre deres oplysninger og password (dog ikke brugernavn).
Når defgo er startet op, og du har logget ind på din konto som administrator, klikker du på Brugere fra brugermenuen.
Vælges dette punkt kan administratoren via Tilføj ny bruger oprette en ny bruger.
Det kræver administratorrettigheder for at benytte denne funktion!
Herefter starter en wizard som guider dig igennem hele oprettelsesprocessen.
Create user
Go to the Overview page, click on the icon in the top right hand corner, and select Users. Then click on Add user in top menu.
Enter personal information for a new user.
A dialog box opens where Personal Information – name, e-mail, login name and password – must be completed.
Click on Next and enter Company information.
Company information is not mandatory. The user administrator's company information (if filled in for this) is basically inserted in the fields.

Click on Next to enter Locale settings.
The administrator's company information is basically inserted in the fields - language, date, time and number formats, current time zone. It is optional if you enter company information, click on Next.
Now you can select license type, user type, group, modules , logo, default mail and report templates, language for a new user.
The license type is displayed in the top field.
In this window you can also decide on whether you want user information to be sent to the new user. If this option is selected, an e-mail is sent to the address specified in the user name and password information for the new account.
You can also decide on whether display dashbord page at stratup and show introduction video after login.
Click on Finish and a new user will be ctreated.
Go to the Overview page, click on the icon in the top right hand corner, and select Users. Then click on Add multiple users.
On the tabs Personal information, Company information, Locale setting, Other you can create a string for each user filling out the fields and clicking on Save. Fill out the fields:
Name*; E-mail*; Login name*; Password*; License*; Type*.
Or you can enter all data in the common field on the tab Upload user information.Enter the data separated with semicolon in one line for each user:
Name*, Title, E-mail*, Telephone, Username*, Password*, Licence*, Type*, Company name, Street, Postal code, City, Telephone, Fax, Country, Website, CVR number.
Example:
Jens Jensen;Manager; jens@virksomhed.dk;+45 1111 1111;jens; pswd;expert;user;Company A/S;Address; DK-0000;Copenhagen K;+45 888 21 888;+45 888 21889;Denmark;www.hjemmeside.dk;123321
You can also create a CSV file to upload where you have the required account information and where you can generate these text strings without filling out the fields for each user.
Open Excel and create the columns:
- A: Name
- C: E-mail
- E: Login name
- F: Password
- G: License
- H: Type
- Q: Cvr number (field is not mandatory and you can only insert a space in this column).
Save the file in the CSV format, go the the tab Upload user information, upload your file cklicking on Choose file, finding the file on your disk and then clicking Upload file.
*means: mandatory field. Non-mandatory fields can be skipped - but the separator ";" must be included. It is allowed to have blank characters in front of field values - however, do not add blank characters before password, as they will otherwise become part of the password.
Go to the Overview page, click on the icon in the top right hand corner, and select Users. Then click on Add new group.
A user type is made for users who need to upload data to Interresearch (using Add File) or to them who need to download files that Interresearch adds to their account.
A File user can perform any action with the uploaded file.
Main menu:

Dashboard is not available and hidden:
Important: If an administrator adds a survey or other object to the File user account, the user has access to it.
MANAGE USERACCOUNT
Click on the icon in the upper right corner![]() , choose Profile. You can change Properties,
Password and Username, manage access to defgo via client certificate (Digital signature) og via two-factor authentification.
, choose Profile. You can change Properties,
Password and Username, manage access to defgo via client certificate (Digital signature) og via two-factor authentification.
Click on the icon in the upper right corner, choose Users and click on the user which account you need to change
In drop down menu you can select and change Password, User name, Properties. You can also Move, Delete or Lock a user, create an access to defgo via Digital signatur or via two-factor authentification, and add user personal start page.
Go to Extended settings by clicking on Next from Layout Wizard.
Choose Survey template from drop down list No tempalte is setteled by default.
The user administrator can add new templates to the template collection, which applies to all users created by the administrator.
The user administrator can simultaneously create a survey and has full rights to retrieve and edit it using existing templates or surveys on the user accounts.
Under Projects, the administrator has a folder for each of the users he / she has created - a folder where the name starts with a ~ (tilde) followed by user name.
Click on the icon in the upper right corner, choose Users and click on the user you need to create access via Digital Signature for and select Digital signatur
Click on Attach digital signature.
Choose the certificate which should be used from the list.Click on OK.
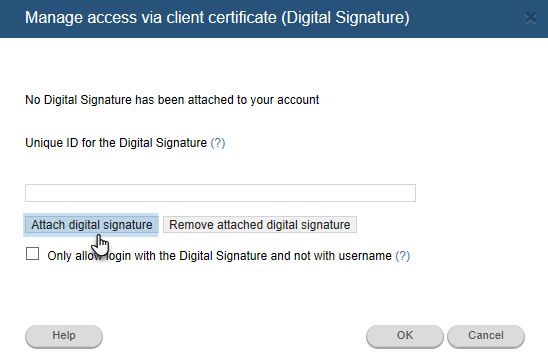
Enter your pasword into the field and click on OK.
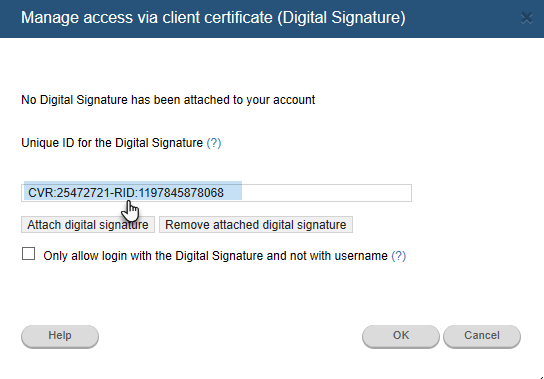
The unique ID of digital signature is automatically copied into the field. You can decide on whether the user should sigh in only via Digital Signature and without user name and password. So check the box Only allow login with the Digital Signature… and click on OK.
An administrator can attach a digital signature to a user. Find an unique ID for a digital signature on the following website:: https://app.defgo.com:8443/certificate/
The unique ID is a so-called SubjectSerialNumber. For personal certificates it consists of the person's PID, and for an employee certificate it consists of the company's CVR number followed by a RID.
Enter or copy the users unique ID into the field and click on OK.
The attached digital signature can be deleted by clicking on Remove attached digital signature..
This guide assumes that the user has already created either an employee or personal digital signature on his computer.
This function that you will only be able to sign in with Digital Signature increases significantly the security of access to your account, but requires you had the digital signature created on your computer before you can sign in to defgo, i.e. you do not have access to your defgo account from any computer.
If you need to sign in to the account from another computer, you can export your digital signature to this computer. Other users cannot sign in to the account with user name and password if this function is selected, but the function can be selected and deselected.
Click on the icon in the upper right corner, choose Users and click on the user you need to edit and select Lock
You can choose between two options Locked or Not locked.
This function is only available for a group administrator.

Click on the icon in the upper right corner, choose Users and click on the user you need to edit and select Move.
The group administrator is allowed to move users around between their own subgroups - users standing under him in the hierarchical tree.
He can't manage users in higher groups who stand over him in the hierarchical tree.
This function is only available for a group administrator.
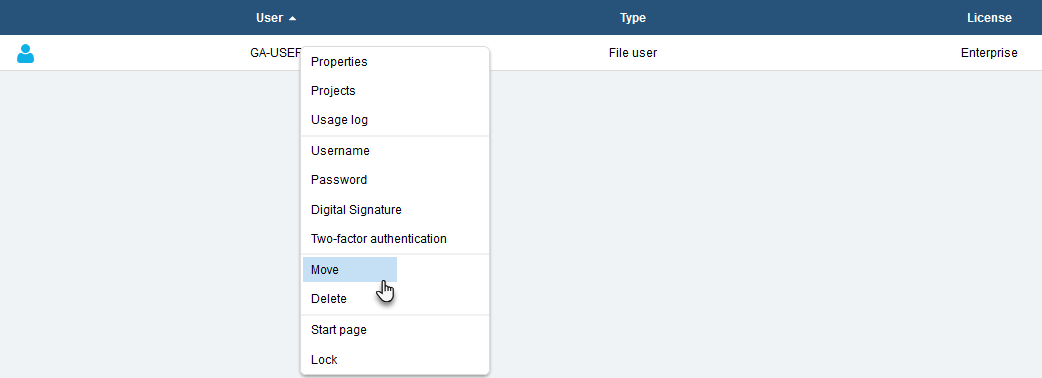
Click on the icon in the upper right corner, choose Users and click on the user you need and select Usage log.
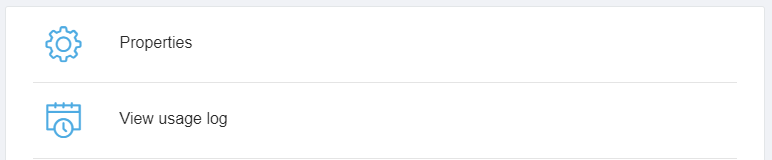
You get an overview of the user's actions in defgo.
Opening Usage log you can see:
- the login, which was used to sign in
- if the user used digital signature or didn't use
- created surveys and their ID
You can filter data in usage log with necessary parameters.

In usage log you can see four drop-down lists.
Actions allows you to filter data by actions with a particular object (e.g., survey actions only).
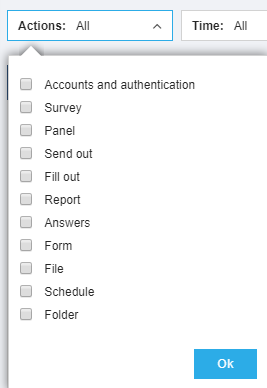
Time allows you to select the time interval for the displayed data.
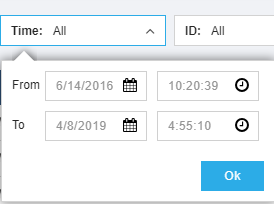
ID allows you to filter data by a particular ID (e.g., survey ID, panel ID, etc.).
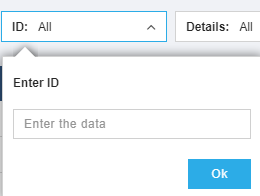
Details allows you to enter some specific data names (e.g., survey name, form name, panel name, usrer name og etc.).

You can add email(s) for receiving a confirmation code at login.
Click Set up 2-step login in the user menu.
Check the field Switch on 2-step login for this account.
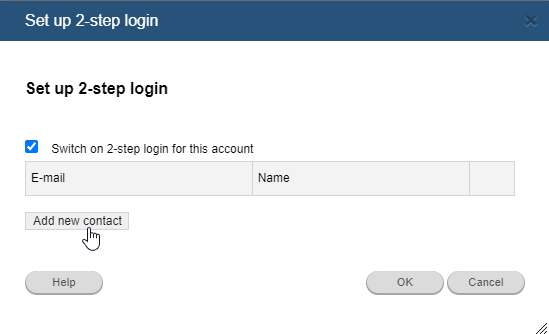
Add one or multiple contacts to receive a confirmationcode.
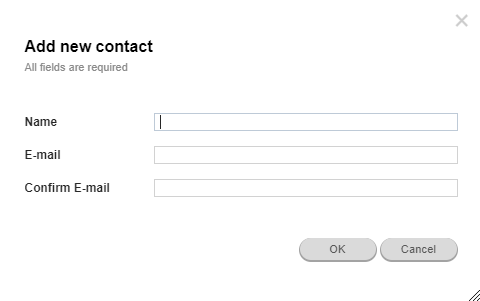
When you log in to your account, it is required to enter your confirmation code sent to the added email address.
If you've received multiple codes it is possible to choose between different codes on the defgo login page to confirm login.
WPA process
Workplace assessment
defgo provides a complete and integrated WPA system that easily and quickly enables you to carry out mapping among your employees, analyse the results and create relevant action plans. Everything is done online and it is easy to get started.
The whole WPA process can be conducted either centrally or decentrally. The working environment group gets an overview over the process by means of shared access to statistics over all action plans.
The defgo WPA solution is well-documented and thoroughly tested. It is used by both public and private companies.
Whether you work strategically with your working environment, or you just need to conduct a WPA because it is a legal requirement, the defgo WPA tool is a great help.
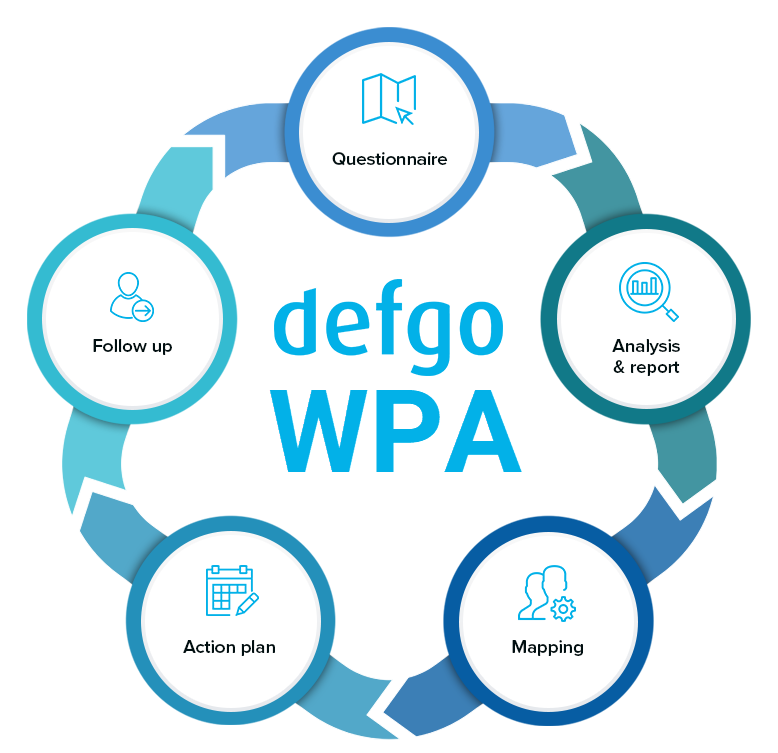
Create Action plan (WPA)
In defgo it is possible to create action plans for either Working environment or Well-being improvements.
The problems are identified using a WPA survey and a subsequent data analysis conducted by the working environment group.
The description of what needs to be done about the certain problem is made as an action plan that outlines who does what and when.
When the problems are described in defgo with schedules, budgets and responsible persons, follow-up reports can be created. Follow-up reports can be issued by the local working environment representative or by a senior manager in the organisation.
In this way, working environment problems will be escalated to the right decision-making and competence level.
defgo WPA tool is very flexible and can be always adapted to the working environment structure of the organisation and follow-up process.The tool provides, among other things, the possibility to make results and progress of the action plans visible in an easy way, drawing statistics across organizations in relation to the various action areas.
Get started:
- Create a survey based on WPA template
- Send out the survey
- Fill out the form of action plan
- Prioritize and follow up
Se Quickguide if your account is already set up for editing of action plans.
Create report for action plan (WPA)

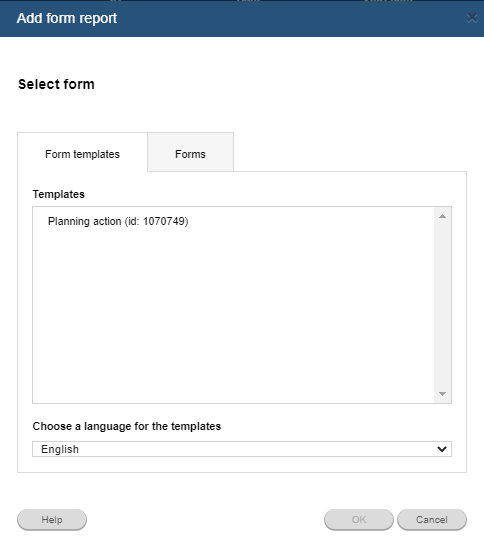
Create dashboard for action plans (WPA)
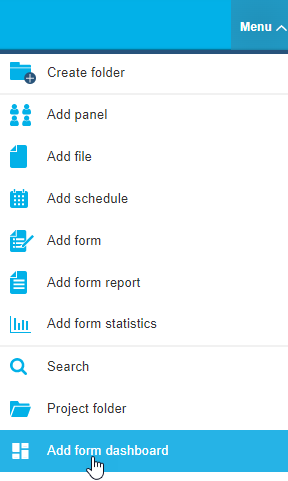
You can edit the dashboard title by clicking on it in the top menu.

By default the dashboard presents data for all form templates. You can choose a specific form for the dashboard from the drop-down list.
The list is divided into two sections: form templates and forms.
These are the top menu icons and their functions, click on the link, where it's possible, to read more.


 Manual
 Finish
Click on the icon  to open or close form dashboard settings.
Default settings for the dashboard are following:
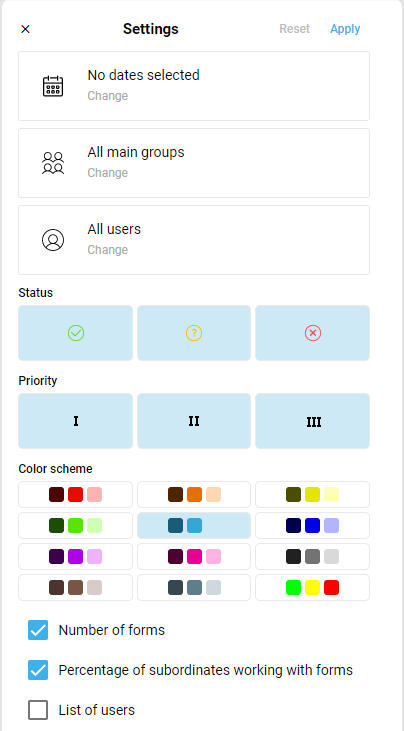
Date
Click on Change in the first field with the calendar icon to filter the forms by time.
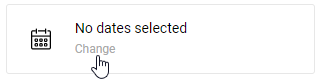
You can choose a specific date.
Click on Change, select the desired date in the calendar and click on Apply.
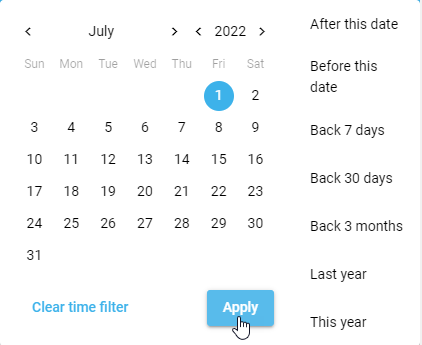
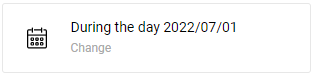
Then click on the new red icon which appears at the top and shows, that there are changes to apply.
You can filter the forms by a specific period.
Select a start and an end date in the calendar.
You can set the period After or Before the established date.
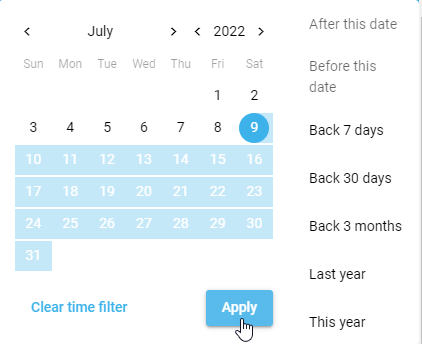
You can select a time period from options: Back 7 days, Back 30 days, Back 3 months, Last year, This year.
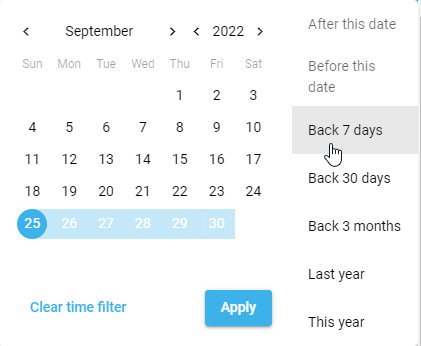
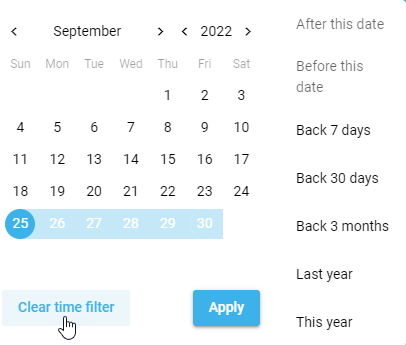
Groups
Click on Change in the second field to filter forms by one or more groups.
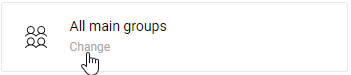
Select one or more groups from the drop-down list.
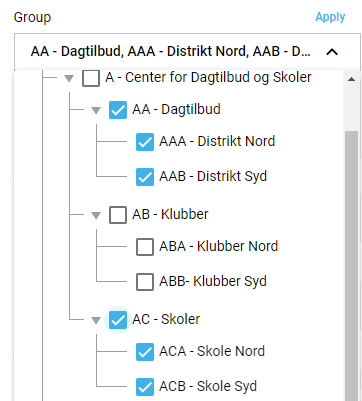
Click on Apply and then click on the update icon at the top.
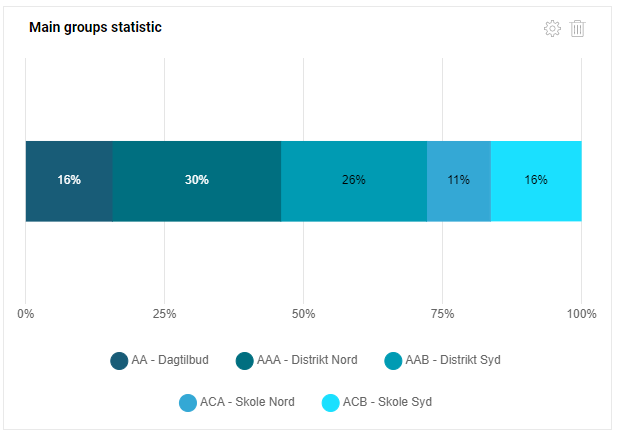
The next field with users changes automatically according to the selected groups.
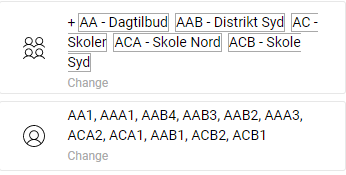
Users
Click on Change in the third field to filter the forms by one or more users.
Select one or more users from the drop-down list, click on Apply.
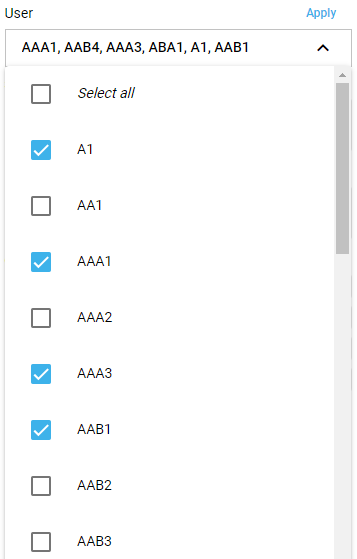
Click on the update icon at the top.
The field with groups updates automatically according to the selected users.
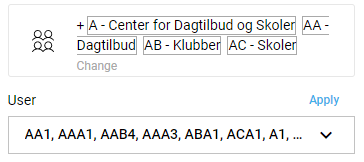
You can first specify the groups, then select the users from the prefilled list.
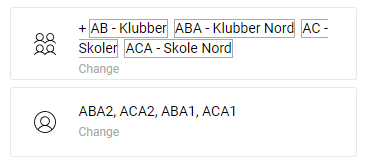
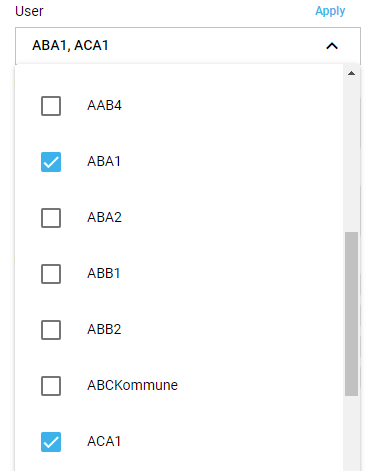
Status and priority
You can filter forms by Status (Resolved, Unresolved, Unresolved with overdue) and Priority (High, Middle, Low).
By default all types of status and priority are applied. Click on the status/priority types you don't need to deselect them and click on the update icon at the top.
For example, you can show on dashboard only Unresolved forms with High priority.
Color scheme
To change the color scheme click on one of the 12 schemes.
Forms and users
You can hide or show the number of forms and the percentage of subordinates working with forms using the corresponding check boxes.
You can hide or show the list of users. Read more in List of all users.


Tick the box List of users in settings to open the list of all users.
In the list you can see information about users and forms, and the user's last access date.
Click on the icon  to change user name, e-mail , see user group and send a message to the user.
To change name or e-mail click on Change, enter corrections and click on Apply.
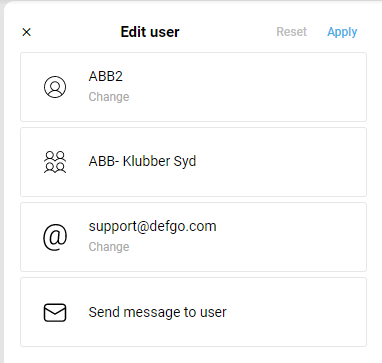
Clicking the icon  opens the message window. Fill in the subject line, enter the text and click Send.
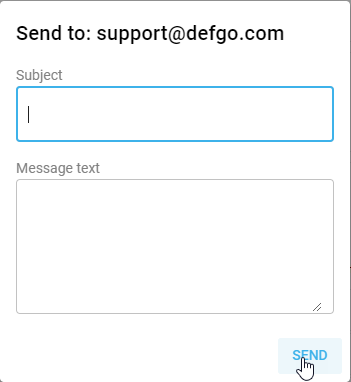
To add a new chart, click on the icon  in the top menu or click on Add new charton the dashboard.

Select a question from the drop-down list, define chart type, position on the page and choose beetwen absolute value or percentage.
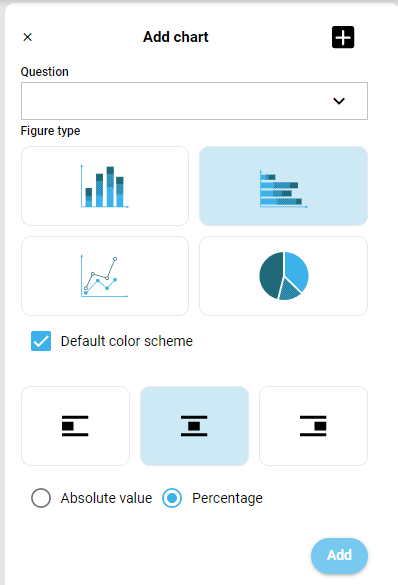
Keep the default color scheme or change it to one of the 12 available schemes.

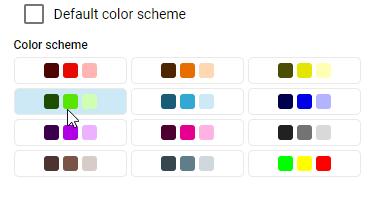
Click on Add. A new chart is presented on the dashboard:
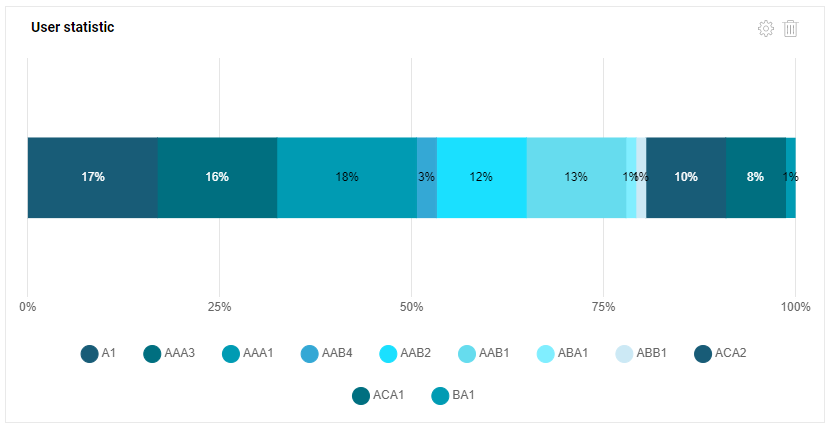
To edit the chart click on the icon  , to delete -
  .
.

Click on the icon  in the top menu to open Share settings.
Description field supports НTML formatting and allows to insert images and videos via links.
Enter the title, fill out the description in share settings and click on Apply.
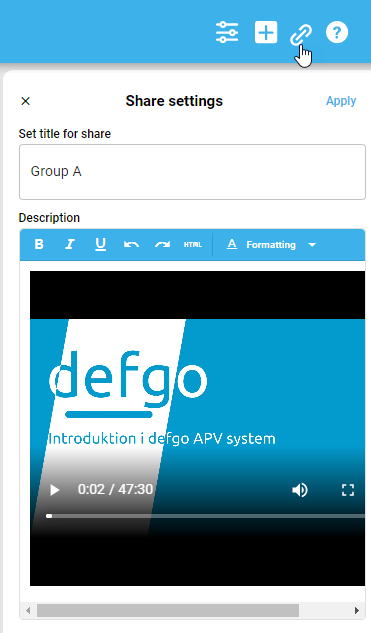
Go back to the overview page, click on the form dashboard, select Share, copy the link, click Ok and log out defgo.
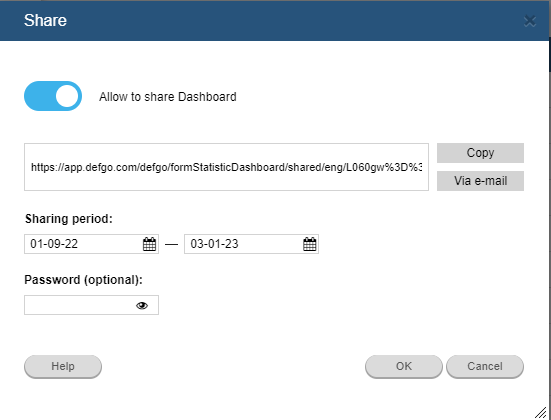
Open the link and you will see the shared dashboard with the given title and description.
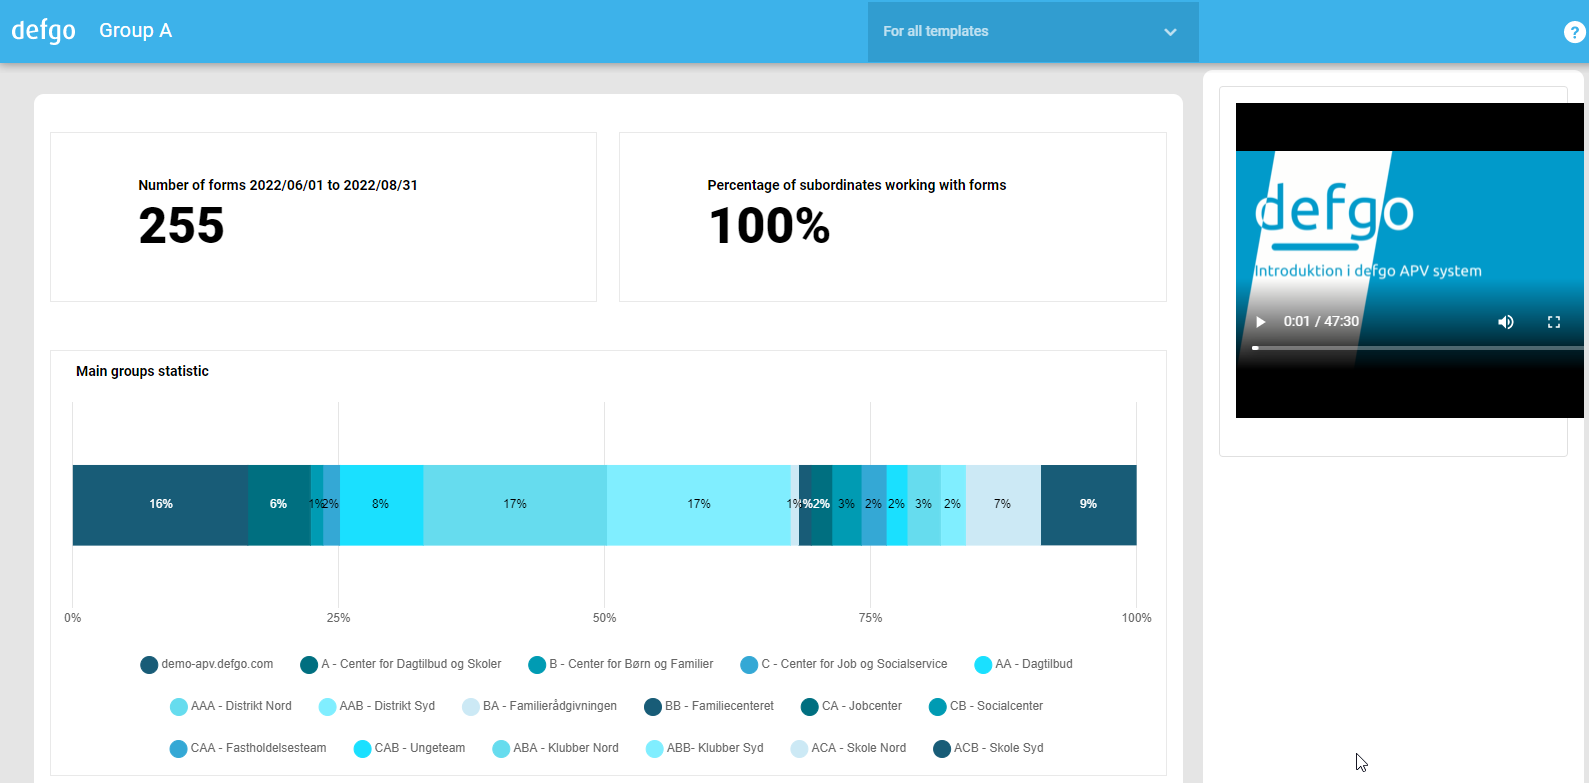

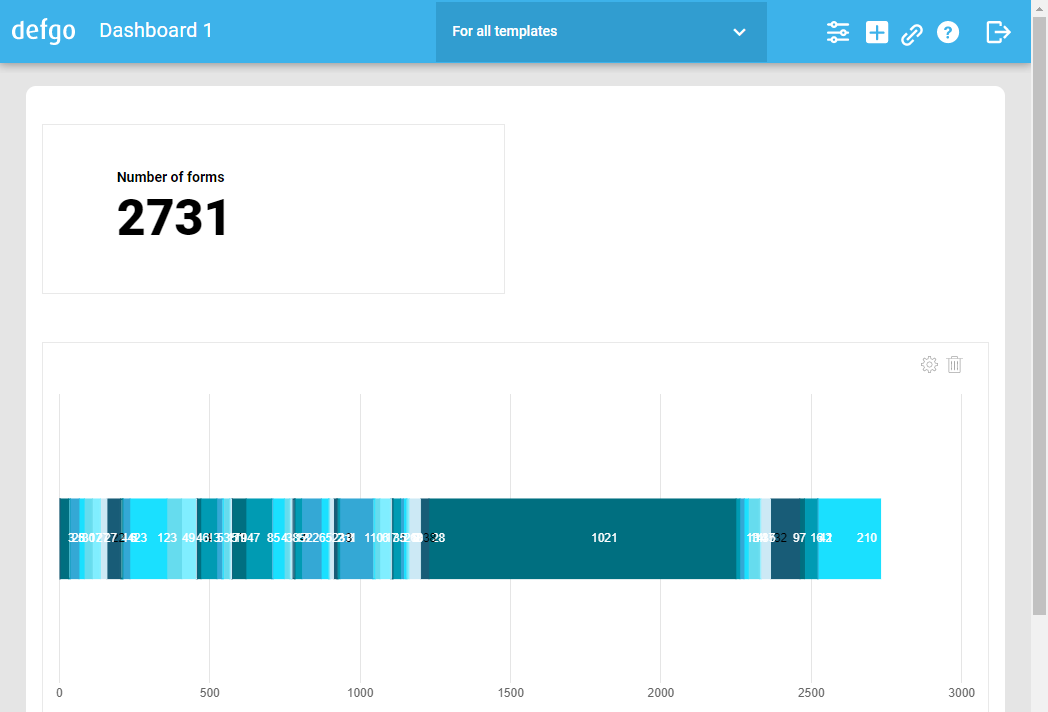
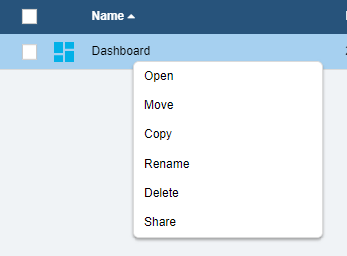
Support

Quickguide - Create defgo Survey
1.1 START DEFGO – MENU ITEM DASHBOARD
Go to the website www.defgo.com:
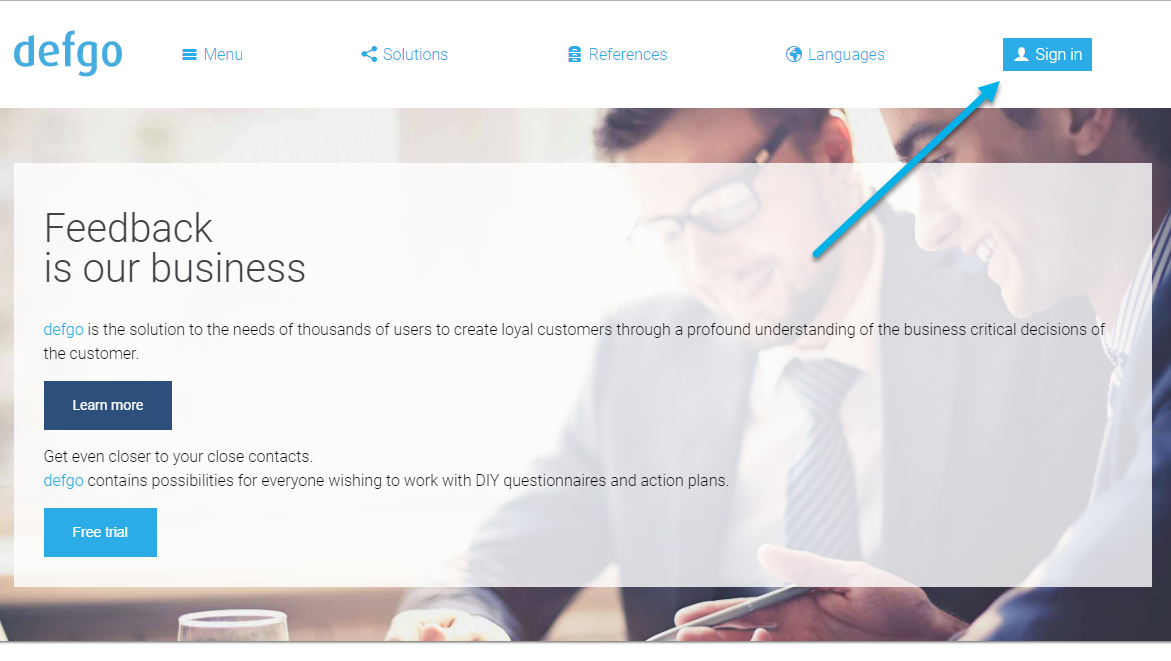
Click on Sign in. Enter your Username and Password.
When you are signed in, you will see defgo Dashboard. Here you will also find defgos Support contact information.
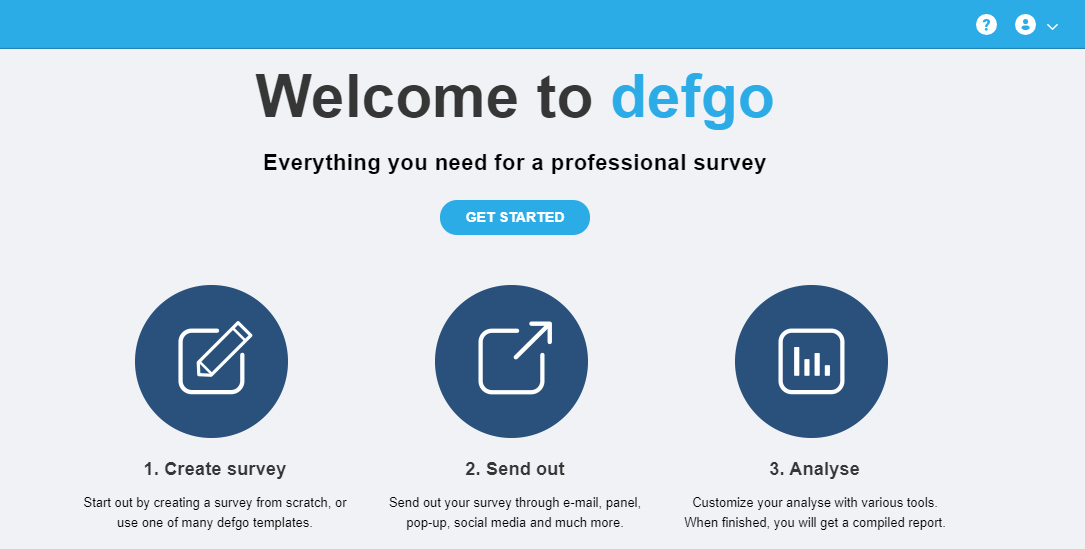
1.2 ACCOUNT ADMINISTRATION – MENU ITEM PROFILE
Wnen a new defgo account is ctreated you will be sent an username and password. The password should be immediately changed.
CHANGE PASSWORD
Click on the icon on the top right corner ![]() , select Profile from the menu and select Change password.
, select Profile from the menu and select Change password.

Password should consist of at least 8 characters and contain both letters and numbers.
If you are about to share your account with multiple users, remember that they must be informed, if you changed the password.
LOCKED ACCOUNT
It is important to remember the accounts password: for security reasons an account will be locked if the wrong password is entred three times. The account can only be unlocked by the support.
FORGOT PASSWORD
If you forget your password, the support can reset the password for your account.
The support must not give a new password to account over the phone, but it can be sent to the e-mail address with which your account is registred.
You can change the e-mail address associated with your account when you need by yourself:
Click on the icon on the top right corner ![]() , select Profile from the menu and select Properties.
, select Profile from the menu and select Properties.
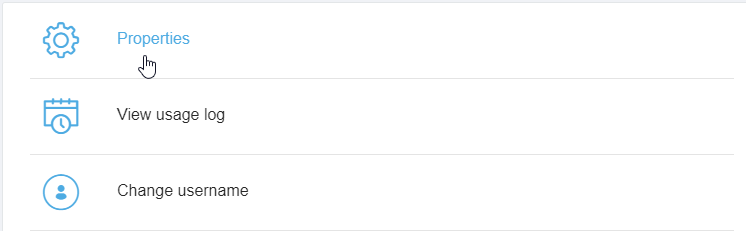
Properties dialog box opens and the e-mail address can be changed in the field E-mail:
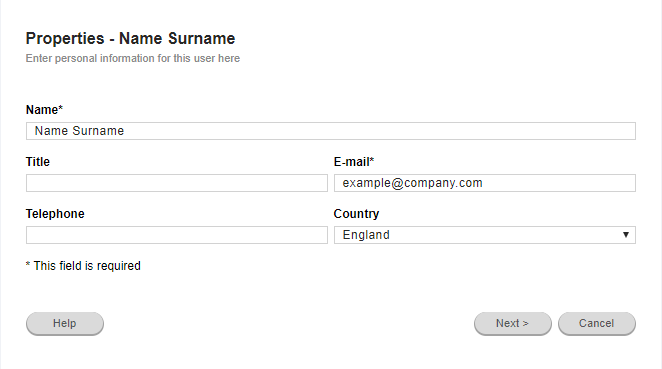
Click on Next and Finish.
At the defgo dashboard you have access to tools for creating a survey, reports, panels etc.
Click on the Project folder to open a survey:
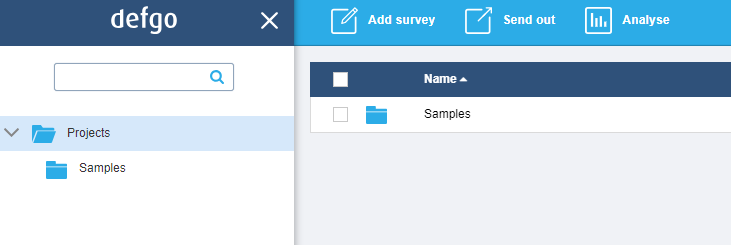
- Click the close icon to make more space for the dashboard:

- Or click the menu icon to open the left menu:

2.1 CREATE FOLDERS
The defgo dashboard is organized in folders, similar to the Windows structure. The folders have the same function: To keep order of files.
Create a folder:
Click the tool Create folder in the top menu.
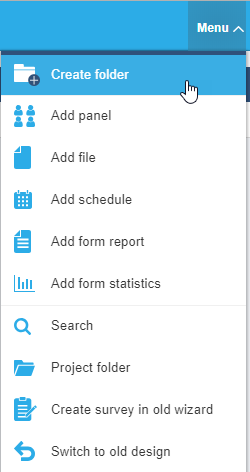
2.2 USE FOLDERS
Click to open a folder. An open folder is marked by a light blue background.
2.3 DELETE A FOLDER
To delete a folder, right click and select Delete.
3.1. CREATE SURVEY
To create a survey click the icon Add survey in the topmenu.
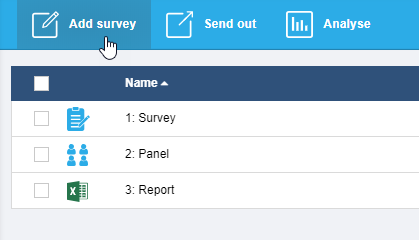
In the wizard choose between create a blank survey or a survey based on a template.
defgo templates includes: All defgo question types, Customer Satisfaction survey, Course evaluation, HR recruitmentsurvey etc.
The template is maintained and updated according to our customers needs.
The collection of templates can be extended with the users own template – read more about this in the section Advanced settings.
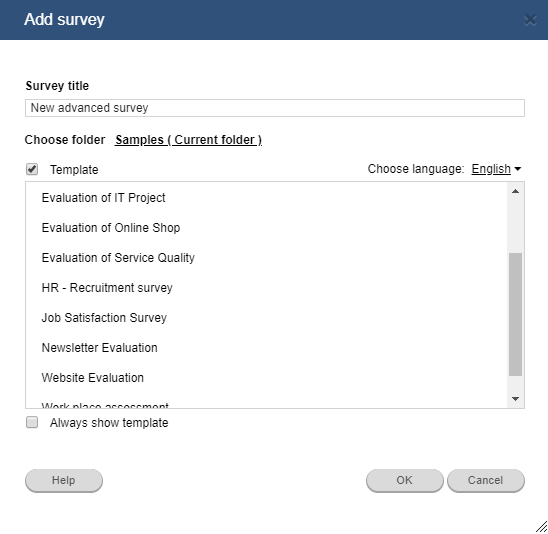
3.2. UPLOAD IMAGES
If your survey will contain images, upload image files to your folder before creating the survey. This also applies for a survey logo.
Open your folder and click Menu and select Add file.
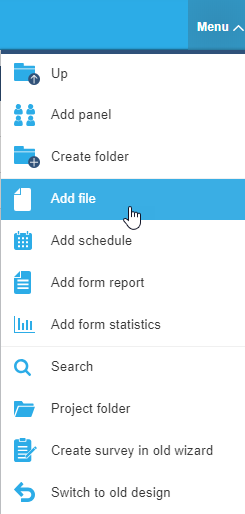
In the pop-up box, click browse to locate your file, and Save file in project folder.
3.3. CREATE QUESTIONS
In this guide, we assume that no template have been selected to create the survey.
Draw questions to the survey canvas.
To add a new Answer option click the text Add new option below existing Answer options.
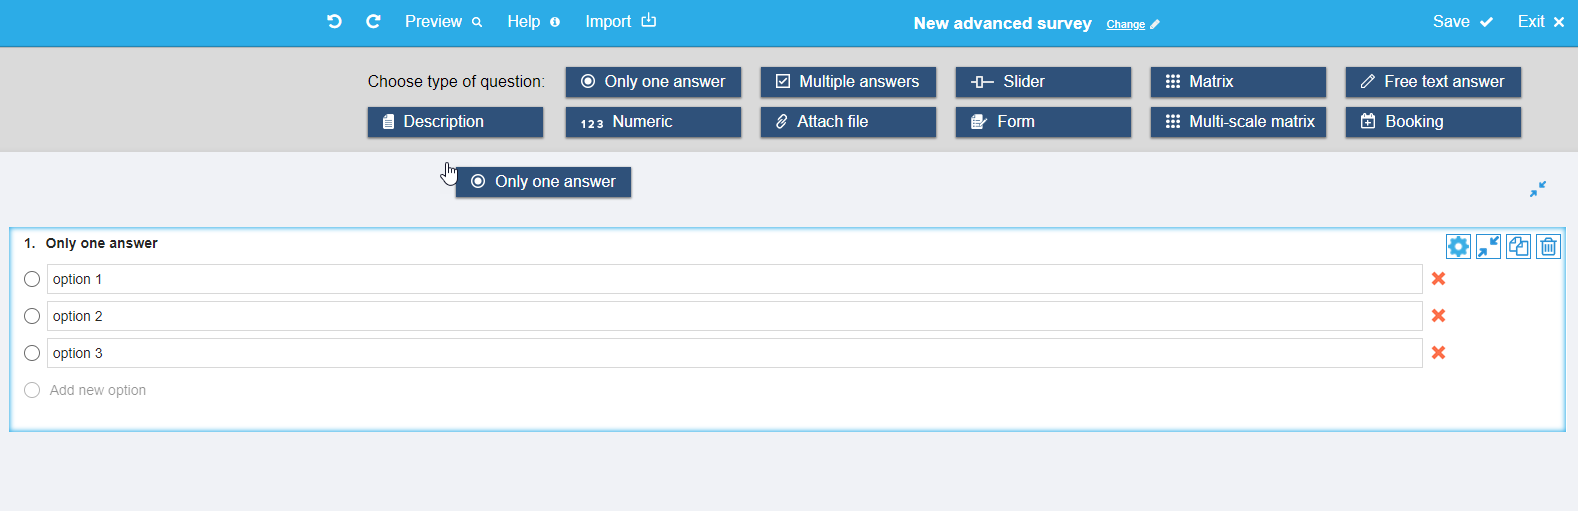
For each question change Settings in the rightside menu.
- To change questiontype for an already created question click Settings and then select a new questiontype from the dropdown list Change question type.
- In this way,also change layout to the question type Layout to the question. Choose between Radio buttons, List or Drop-down.
Notice: question can also be imported from other surveys: Click Load and retrieve the survey the question must be loaded from. Read more about survey import How can I import questions from another survey? og How do I import questions from a text editor?.
CREATE THE REST OF THE QUESTIONS:
Repeat this procedure for all questions in the survey. When you've finished creating questions click Save and then Exit.
In the settings wizarden you can change survey layout, pagebreak, buttons, insert logo and a lot more.
Click your survey and select Settings.
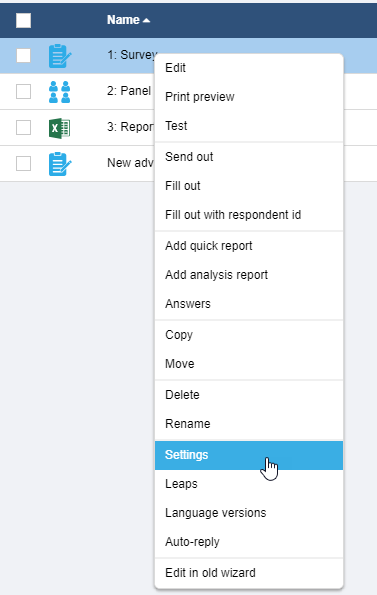
The settings wizard opens:
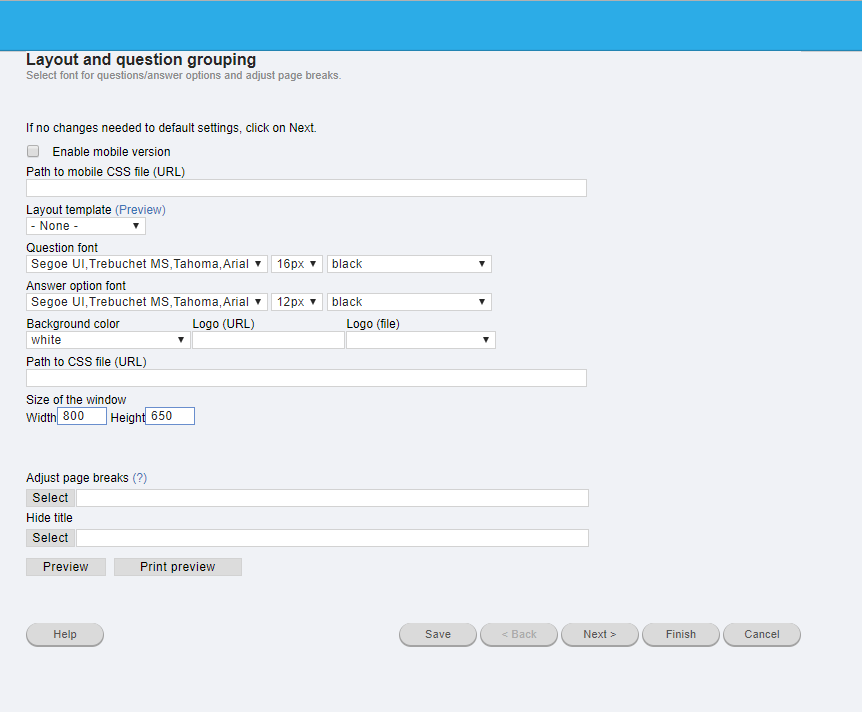
If the survey contains answers, a warning appears:
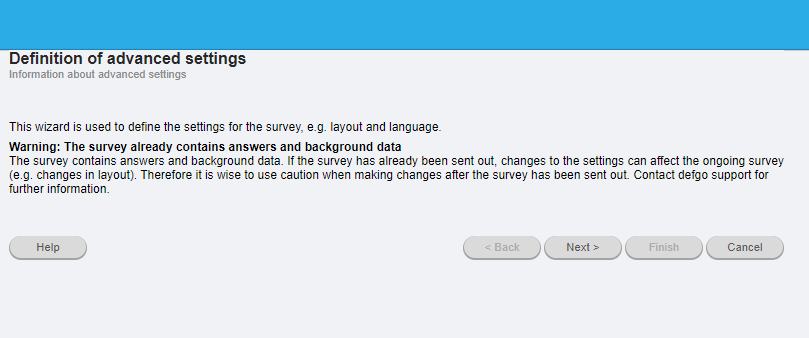
You can delete answers by clicking your survey and selecting Answers -> Delete all answers
NOTE: only do this, if these are answers which can be deleted!
Most settings changes will not cause problems even with survey containing answers.
4.1 CHANGE LOGO
To change a survey logo, first upload the image to defgo from your computer, before entering the Settings wizard.
In the Layout and questions grouping wizard, you can choose the image from the Logo (URL) dropdown-list :
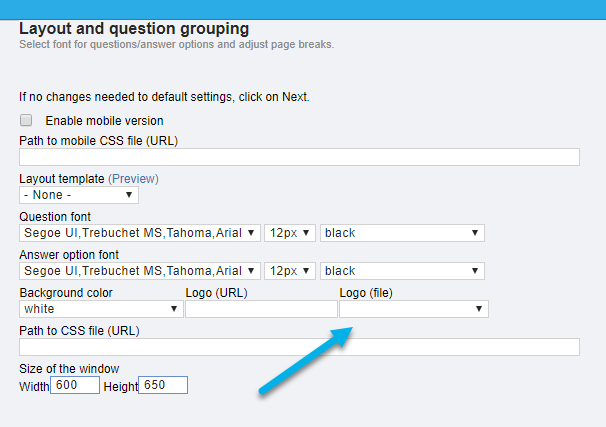
4.2 EDIT THE LAYOUT TEMPLATE:
Choose between 12 different templates in CSS format:
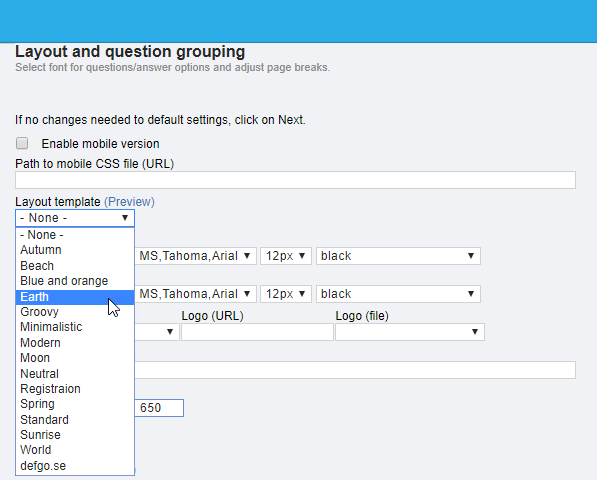
The Layout templates have different colours and shapes of buttons:
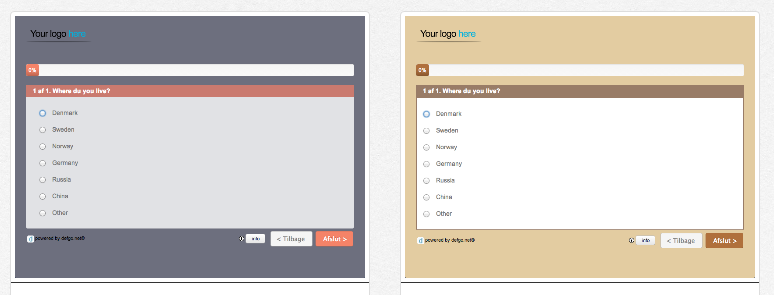
4.3 ADJUST PAGEBREAKS
In the Layout and questions grouping wizard, you can adjust page breaks. Click the button Select, and view a list of questions in the survey:
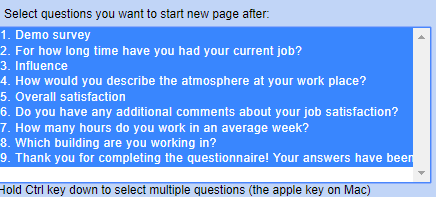
All questions are marked by default, which means that a pagebreak follows each question. Press the Ctrl-key to disable this function from each question.
4.4 ENABLE SHOW QUESTION NUMBER
In the Extended settings wizard, check the field Show question number.
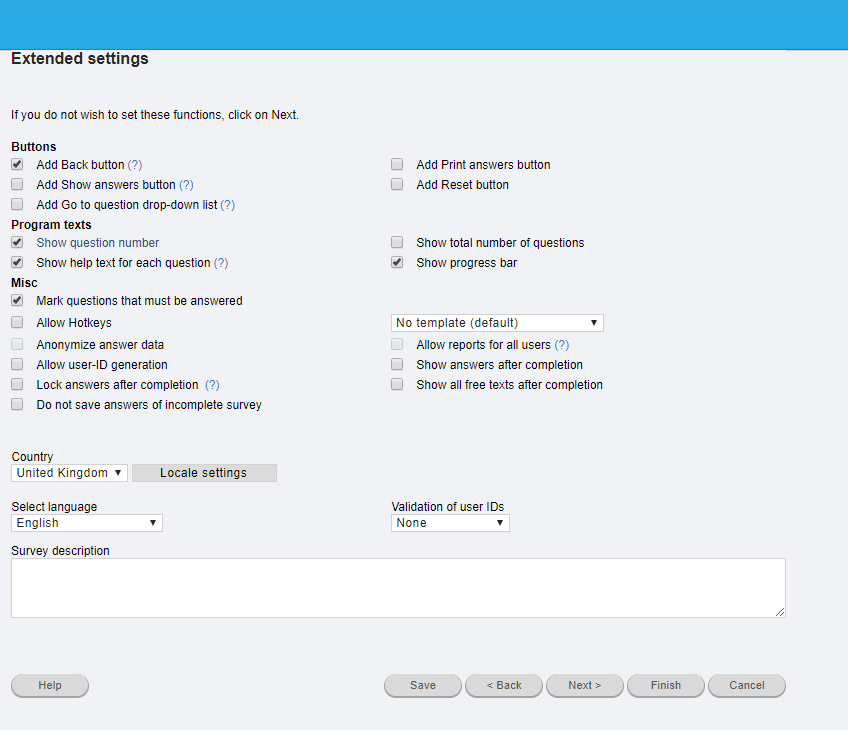
4.5 DISABLE HELPING TEXTS
The help texts are small explaining texts listed under question texts in the survey:

The help texts can be enabled or disabled for the whole survey. Check or uncheck the field Show help texts for each question.
4.6 ADD SHOW ANSWERS BUTTON
Each respondent can view and print answers if you check the field Add show answers button.
4.7 ANONYMISATION
Respondents can be anonymized, their personal data not visible to anyone if you send out with panel and respondent-id. Check the field Anonymize answerdata.
4.8 CREATE SURVEY TEMPLATE
Create a surveytemplate to re-use the next time you add a survey. Select Survey template from the dropdown list. The template is saved and available for the account you've signed in to. Not for any other users.
4.9 LEAPS
Click your survey in the project folder and select Leaps. Then select the question to be leaped from:
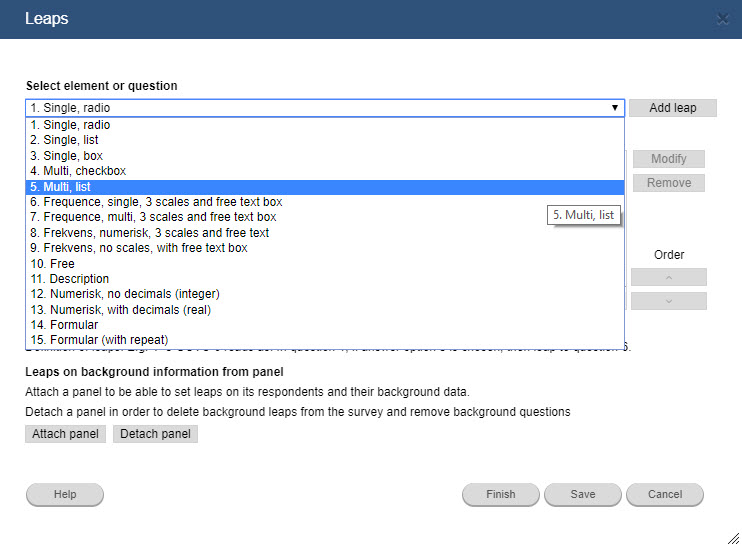
click Add leap to create a new leap.
Note: If you can't click the button Add leap (the button is not active), it signals you have answers in your survey. Delete answers and repeat the procedure (don't delete valuable answers from respondents!).
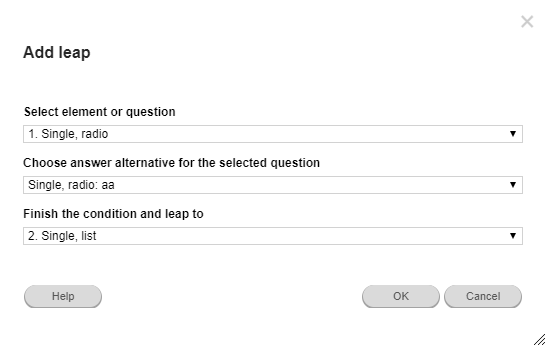
In the dialog box set the condition to activate the leap, and below the leap destination.
5.1 TEST
After you've created your questions, you can test the survey as a respondent.
Go to the overview, click on your survey, and select Test.
Then you view the questions as a respondent, but your answers will not be saved. Tests are important, especially questions including Leaps, to ensure a correct leapsetting.
5.2 E-MAIL WITHOUT RESPONDENT-ID
Send out via link in general e-mail, is useful for larger surveys where responden IDs doesn't come necessary. Maybe you have a list of e-mail addresses from your workplace or organisation.
Click your survey and select Send out.
Click Choose mode of conduct.
Select via link in general e-mail and click Next.
You may set survey start- and date, and then click Next.
In the next window you can copy your link and send out the survey to your respondents.

5.3 CREATE AN E-MAIL PANEL WITH E-MAILS AND NAMES
If you need to implement a survey to view respondent information, or supplement answers to respondent data, you must send out via panel.
A panel is build with respondent information – e-mail, name and other relevant information of your respondents. The panel will receive e-mail invitations to participate in your survey via defgo, and not your own e-mail client.
Create the panel:
-
Go to the Overview page and click Menu and select Add panel.
The wizard opens:
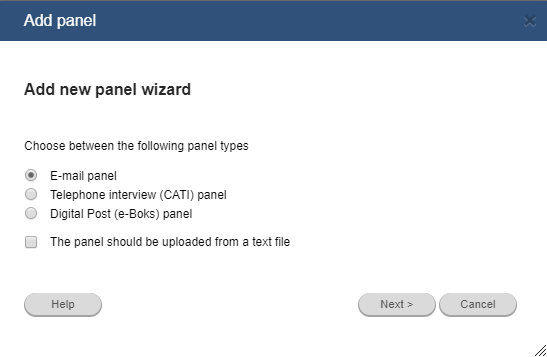
- Notice that you can upload a textfile by checking the field The panel should be uploaded from a text file. Click Next.
- Type in e-mail-addresses, names, separated by semicolon, and a line for each respondent.
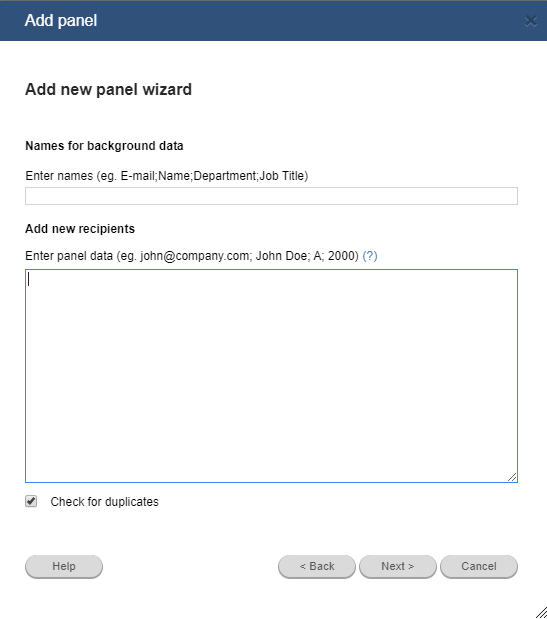
- Click Next.
- Name the panel and click Finish.
NOTE: Paneldata can by copy/pasted from Excel or a text file.
5.4 IMPLEMENTATION FOR E-MAIL-PANEL
Send out your survey to a panel:
- Click your survey.
- Select Send out and click Next.
- Select Via panel and click Next.
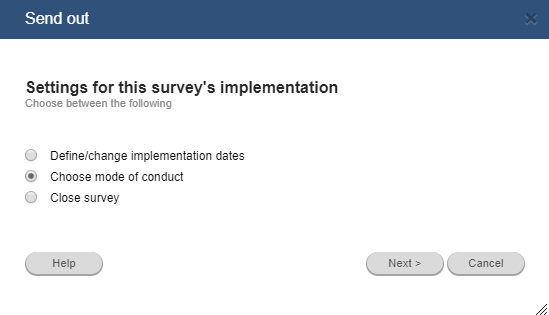
- You may set survey start- and enddate and click Next.
- Choose the correct panel (if you have multiple panels) and click Next.
- Edit the standard-e-mail (Note! do not remove the coded data in the squares).
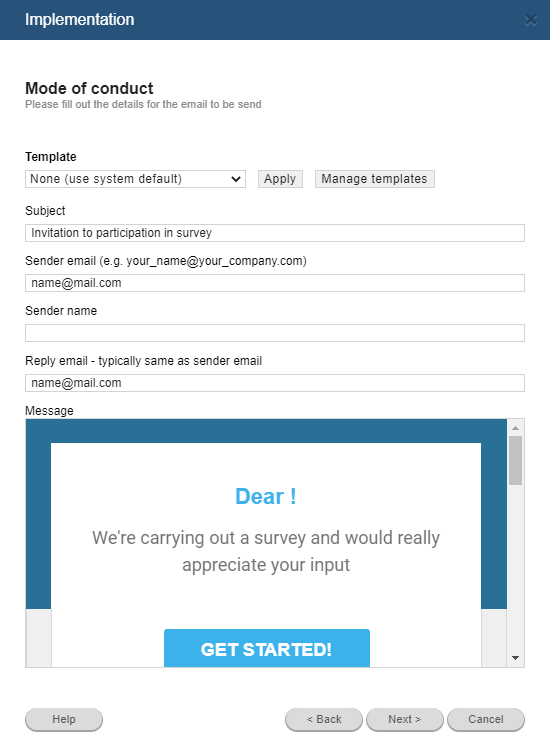
You can choose from Plain textt and Design. Enable Design to create a layout for the e-mail-text, insert images etc.
- Click Next and Finish.
6.1 OVERVIEW OF THE SURVEY PROGRESS
ANALYSIS REPORT
To follow the answer process closely, add an Analysis report, to gather answer information for different questions. This report can be updated subsequently to keep you updated with information about your survey.
Click your survey from your project folder and select Add analysis report.
In the defaut tab , Content, decide which questions to be included in the report. Which elements to be presented (e.g. table or graph) and the order or of elements.
At Settings control settings for calculation, matrix graph, text display and report language.
At the Filter tab, you can filter answers from a specific set of criterias.
At the Page layout tab, design the layout of the report, inser images/logos etc..
At the Output tab, select report fileformat, Excel, Word, PDF, Powerpoint, HTML or HTML Dashboard.
If you click Finish right away, the report output will be in an Excel format, including all questions with a graph and a table for each question.
The report can be updated in two ways: Manually or by an automatic update.
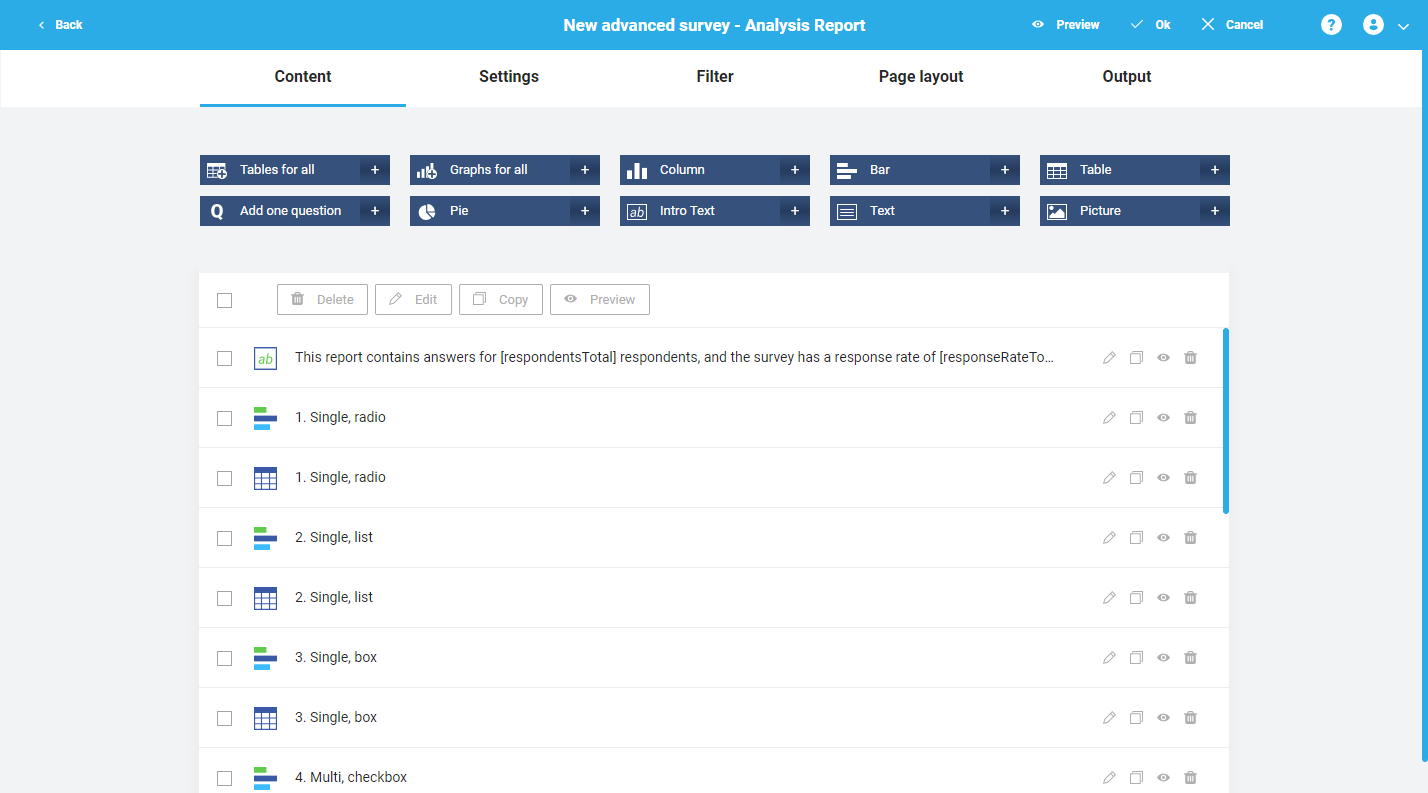
MANUEL REPORT UPDATE
Click your rapport and select Update.
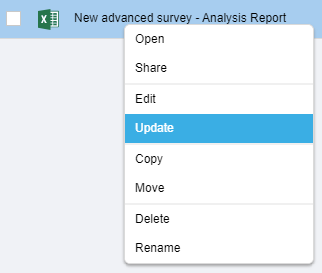
AUTOMATIC REPORT UPDATE
A report can be updated automatically, e.g. once a day. Click Menu and Add schedule.
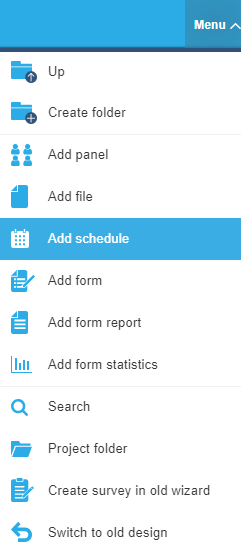
In the tab Task, select Report for object type, and the report item to be updated.
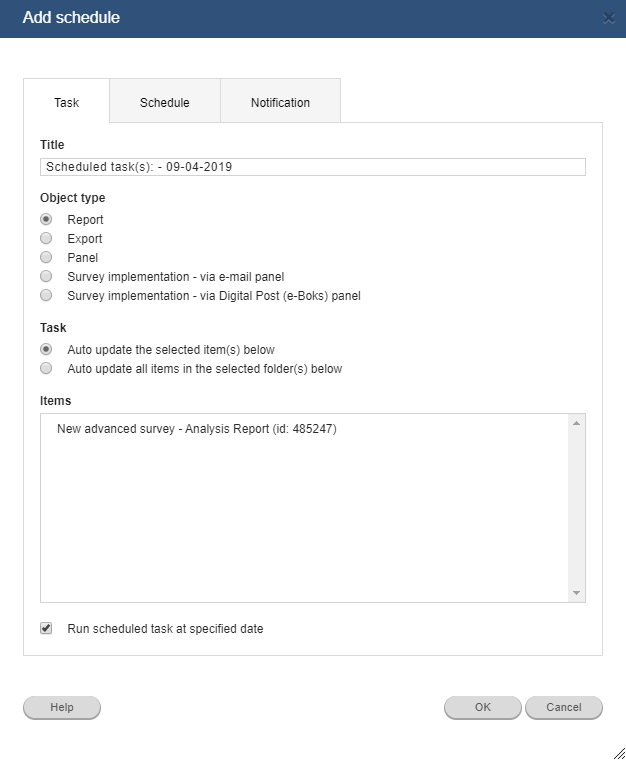
Then click the tab Schedule and set the frequency of the schedule task – daily, weekly or monthly.
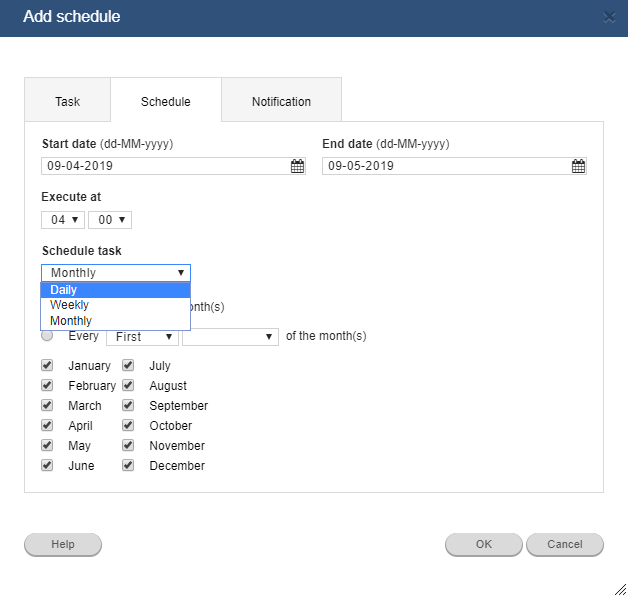
At the last tab Notification, check the field Send notification mail if you want an e-mail for every update and insert your own e-mail or the notifications will be sent to the account e-mail instead.
PUBLISH THE REPORT
Create a link to the report, and send this link to people with access to the report.
Click the link to access the actual report, with current state of answers – you don't have to sign in to your defgo account and open the report.
Click the report and select Share, to create a link.
The link can be forwarded as an ordinary e-mail or put in an intranet or website.
6.2 DATA CLEANING
Before creating a analysis report, clean your data for irrelevant answers or empty answers.
- Click your survey and select Answers.
- Select Delete individual answers (from summary) and click Next.
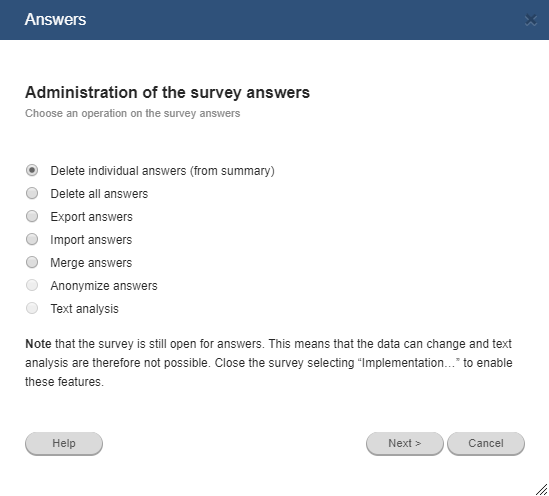
- Select Delete answers filtered by user ID.
- Select answers and click Next.
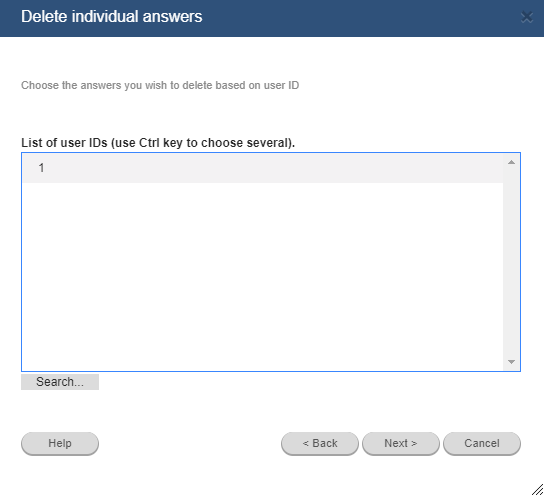
- Click Finish.
Note that you can see respondents not answering in the excel answer export.
Quickguide i udvidet panel-administration
Til administration af store paneler indeholder defgo en række funktioner:
- Rekruttering af respondenter via webside. Til dette formål er det muligt i programmet at generere en kode, som kan indsættes på en webside. Koden giver mulighed for at potentielle respondenter angiver deres navn og e-mailadresse, og disse informationer gemmes direkte i et panel.
- Lad respondenterne opdatere og rette deres panel-data direkte i panelet. Denne mulighed kan gives enten ved at der sendes en meddelelse direkte ud til alle paneldeltagere, eller det kan ske i forbindelse med e-mailinvitationer til en undersøgelse, hvor panelet anvendes.
- Bestem hvilke panel-felter, der skal være synlige – og dermed opdatér-bare for respondenterne.
- Søg i panelet på de forskellige felter eller en kombination af dem og slet eller gem søgeresultatet.
- Redigér den enkelte respondents informationer.
- Følg de enkelte respondenters aktivitet: hvilke undersøgelser de har været inviteret til, og hvilke de har besvaret. Hermed får undersøger et redskab til at vedligeholde panelet, så det indeholder aktive respondenter.
Det er muligt at lade respondenter melde sig til et panel direkte fra en webside. Respondenten får dogså mulighed for at framelde sig panelet fra samme kode (framelding fra panel kan også foregår via linket [unSubscribePanel] se s. XX).
Det foregår ved at du genererer en html-kode, som skal indsættes på den webside, hvorfra til- eller framelding skal foregår. Koden genereres sådan:
Klik på panelet og vælg Indstillinger fra panelets menu for at åbne dialogboksen.
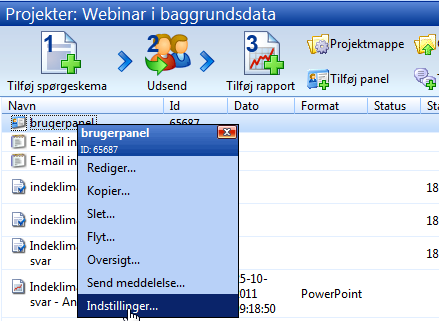
Indstillinger åbner følgende dialogboks:
I dialogboksen genereres html-koden til at lægge ind på websiden ved at klikke på linket HTML kode. I dialogboksens felter vises url-adresser på de standard-svar defgo giver til respondenter, som anvender til- eller framelding fra websiden. Html-koden ser sådan ud:

Koden sendes videre til en web-ansvarlig, som kan lægge den ind på websiden (For at kopiere koden til clipboard: marker koden og tryk c på tastaturet mens du holder Ctrl-tasten).
Det er muligt at slette den sidste sekvens i html-koden og hermed undgå, at Frameld-knappen kommer med ved at fjerne koden i den røde markering.
Ellers kan koden ikke redigeres – f.eks. i forsøg på at give respondenten mulighed for at indtaste flere oplysninger end blot navn og e-mailadresse.
Sådan ser koden ud på websiden:
For at indhente flere stamdata fra respondenten, kan man enten sende respondenten en invitation til et særligt spørgeskema til dette, eller man kan sende en meddelelse til respondenterne, hvor de får mulighed for at redigere i deres paneldata.
Flet-koden [EditPanel] kan bruges i to forskellige sammenhænge: Den kan anvendes i en meddelelse, der sendes ud til et panel; eller den kan anvendes i e-mail-invitationer, når et skema afvikles til et panel. I begge tilfælde vil koden give et link til respondenten, som giver respondenten mulighed for at rette i de oplysninger, der står om vedkommende i panelet.
3.1 Synlige og ikke-synlige felter
Du kan bestemme hvilke felter i panelet, respondenten får adgang til at rette. Der kan være felter, du ikke ønsker, at respondenten skal se eller rette i. Ved at indstille dem til at være Invisible, kan du forhindre dette. Standardindstillingen for felterne er Visible (som giver mulighed for redigering fra respondentens side).
Sådan ændrer du på et panel-felts synlighed:
Klik på panelet og vælg Rediger fra menuen.
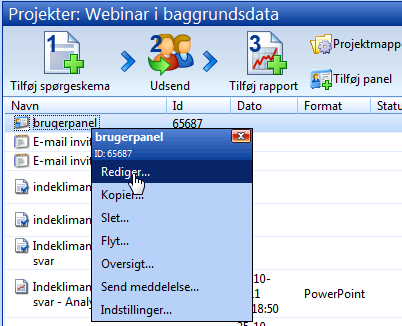
I redigeringsvinduet klikker du Næste for at komme til dette vindue.

Her kan du i en drop-down-boksen ud for hvert felt vælge om feltet skal være Visible (synligt) eller Invisible (usynligt) for respondenten. Er de synlige, kan de redigeres af respondenten – er de ikke synlige, er de ikke tilgængelige.
3.2 Erstat blanke felter med tomme
En yderligere betingelse for at respondenten kan rette i sine paneldata, når [EditPanel]-linket er modtaget, er, at alle felter findes i panelet. Hvis respondenten er oprettet ved at der til et panel med mange felter er rekrutteret respondenter via kode på en webside, har respondenterne kun de to første felter, e-mailadresse og navn. De øvrige felter i panelet er blanke for respondenten – de eksisterer ikke. Før respondenten får adgang til at indtaste resten af sine oplysninger til et panel, som vedkommende er rekrutteret til fra en webside, er det derfor nødvendigt at tilføje tomme fletværdier i panelet. Det gøres ved at klikke på panelet, vælge Rediger, og tilføje et antal af semikolonner, der svarer til det manglende antal felter:

I eksemplet her tilføjes fire semikolonner efter hver respondent, fordi felterne Firma, Afdeling, Aldersgruppe og Køn mangler. Nu kan linket [EditPanel] sendes ud via meddelelse til alle i panelet eller via en invitation til en spørgeskemaundersøgelse, og respondenten får adgang til alle felter:
3.3 Adgang til redigering med [EditPanel]
Flet-koden [EditPanel] kan indsættes i en e-mailinvitation til en undersøgelse. Respondenten får dermed adgang til at rette i de paneloplysninger, der er om vedkommende i det panel, der benyttes til afviklingen.
En anden måde at anvende linket, er at sende en meddelelse ud til alle respondenter i et panel. Sådan sender du meddelelsen ud:
Klik på panelet og vælg punktet Send meddelelse:
Når du har har trykket næste en gang får du et vindue til opsætning af emailen. Ved at indføje flet-feltet [EditPanel] kan du sørge for at de enkelte respondenter får mulighed for at rette deres oplysninger.
Når modtager klikker på edit-linket, får han/hun et redigerings-vindue, hvor panel-felterne kan udfyldes eller ændres. Linket kan benyttes flere gange – respondenten kan f.eks. gemme meddelelsen, og åbne den og dermed benytte linket, når panelinformationerne skal rettes.
Defgo paneler indeholder menupunktet Oversigt, som giver mulighed for administration af panelet.
Der er mulighed for at sortere og redigere paneldata samt at søge i panelet efter respondenter efter bestemte søgekriterier. Efter søgningen er der er mu-lighed for at gemme et udvalg i et nyt panel, eller at slette det fra panelet.
Der er også mulighed for at følge de enkelte paneldeltageres aktivitet, og bekvemt at fjerne paneldeltagere, som ikke er aktive nok.
Sådan åbnes funktionen Oversigt: Klik på panelet og vælg Oversigt fra menuen: Vinduet Oversigt åbnes:
4.1 Rediger og Slet respondenter
 Rediger- og
 Slet- ikonerne er placeret til venstre for hver respondent i panelet.
Klik på Rediger-knappen., for at redigere detaljerne for en respondent:
For at slette en respondent klikker du på Slet-ikonet
til højre for den pågældende respondent.
Du vil blive bedt om at bekræfte sletningen.
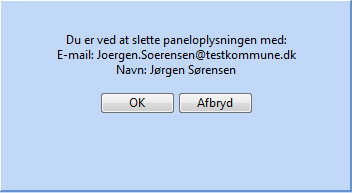
Respondenten kan selv rette direkte i sine panel-oplysninger, hvis du inviterer dem til at gøre det.
4.2 Sortering af data
Klik på en kolonneoverskrift for at sortere panelets indhold efter kolonnen.
Eksempel: Panelet her sorteres efter kolonnen “Leder”, når du har klikket på overskriften. Læg mærke til pilen, som viser hvilken kolonne, der er sorteret efter:
4.3 Søgning efter data
Søg efter respondenter med bestemte værdier ved at udfylde de relevante søge-ord i de blanke felter over kolonnerne
og herefter klikke på Søge-ikonet:
Slet-ikonet
 bruges til at rydde søgefelterne.
Eksempel: søg efter respondenter fra Indkomstgruppe 1 : Skriv “1” i Indkomstgruppe og klik på Søg. Søgningen giver resultatet ovenover.
4.4 Ændring af dataview.
Nederst i Oversigt kan du indstille hvor mange respondenter du vil se ad gangen. Hvis du f.eks. vil se 5 respondenter ad gangen, indtaster du tallet 5 i feltet Vis pr side, og klikker Vis. I dette tilfælde får du følgende resultat:
For at bladre fra side til side, bruger du bladre-knapperne under respondent-data:
Det er vigtigt i forbindelse med søgning, at du indstiller data-view på de poster i panelet, du vil søge på – vil du søge på alle poster i panelet, skal data-view være indstillet til at vise alle poster.
4.5 Gem eller slet udvalg.
Ved i Oversigt at bruge søgefelterne under kolonnernes overskrifter, kan du finde en ønsket delmængde af respondenter fra panelet. Et sådant udvalg kan gemmes i et nyt panel eller slettes fra det eksisterende, hvis de først markeres, og man herefter bruger knapperne Gem som og Slet valgte, som befinder sig i bunden af vinduet.
Når de ønskede respondenter er fundet, skal du markere de respondenter, du ønsker at gemme i eget panel eller som du vil slette. Herefter vælger du knapperne Gem valgte eller Slet valgte for henholdsvis at gemme udvalget eller slette det.
Ved Gem valgte gemmes de valgte respondenter i et nyt panel – og kommer altså ikke til at erstatte det oprindelige.
4.6 Statistik over respondenternes aktivitet
Når man anvender et større panel til mange forskellige undersøgelser, vil der være behov for en bekvem mulighed til at slette paneldeltagere, som ikke er aktive (ikke svarer på spørgeskemaerne). Denne funktion findes i Oversigt, når man klikker på knappen Statistik.
Hver gang et panel anvendes til afvikling via panel fra et nyt spørgeskema, vil der i Oversigt komme en kolonne ud for respondenterne, som viser om den enkelte paneldeltager har deltaget i undersøgelsen eller ej. Disse kolonner bliver først synlige, når man klikker på Statistik.
I eksemplet her viser et grønt felt i et skemas kolonne, at pågældende respondent har svaret på skemaet, mens den røde farve indikerer, at respondenten ikke har svaret. Kolonnen Inv. viser hvor mange invitationer respondenten har fået, og Ans. viser hvor mange svar der er afgivet.
Kolonnen % viser så, hvor mange procent af invitationerne respondenten har svaret. Ud fra denne oversigt er det nemt at markere de respondenter, som ikke har været aktive, og som man evt. har lyst til at fjerne fra panelet.
 PANEL-OPDATERING I DEFGO
- Quickguide i panel-opdatering i defgo
1. Generel information
I defgo systemet kan du opdatere et panel via en ekstern fil der indlæses med et fast tidsinterval, fx hver nat. Filen placeres typisk på en FTP server (eller http). I defgo defineres det hvor filen skal indlæses fra, og hvor ofte.
Filformatet skal være i ASCII format (text fil) eller en Excel fil.
1.1 Filplacering af datasourcefilen
Først opretter du et tomt panel med de ønskede kolonner til baggrundsvariable.
Derefter klikker du på panelet (venstre musetast), og vælger indstillinger.
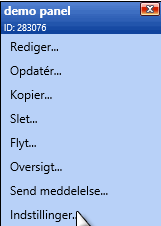
Under indstillinger defineres adressen på FTP serveren og filen der skal indlæses fra (hele stien angives). Under brugernavn og password tastes de specifikke FTP konto oplysninger ind. Dvs. defgo indlæser fra en fast fil hver gang der indlæses. Og opdateringen på FTP serveren skal således ske ved overskrivning af den eksisterende fil.
Det er vigtigt at den eksterne fil har præcist samme antal kolonner som panelet, ellers indlæses data ikke. Man kan teste indlæsningen via funktionen Opdatér – som vil indlæse data fra filen.
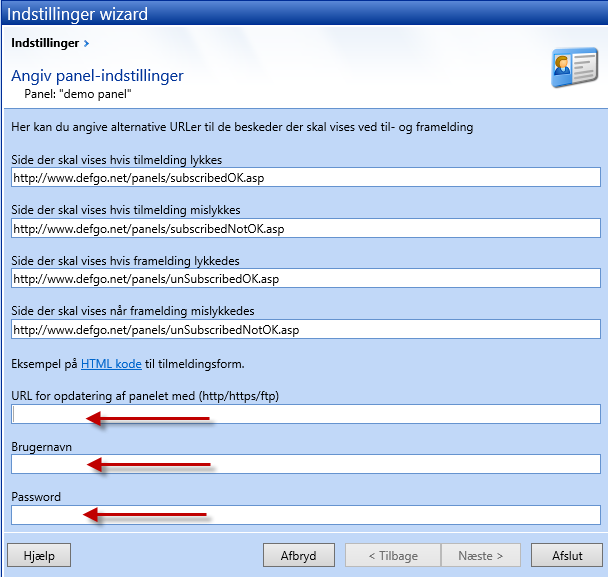
1.2 Schedulering
Ved at klikke på Tilføj opgave kan du definere hvor ofte data skal indlæses.
F.eks. er det muligt at planlægge en opgave for hver time.
Derefter vælger du Panel under fanebladet Opgave, og tidspunkt under fanebladet Planlægning. Hvis du vil have besked efter hver opdatering, skriver du din mail i fanebladet Notifikation.
Bemærk: Hvis filen ikke er ændret siden sidste indlæsning genindlæses den ikke.
Bemærk: Hvis der efterfølgende skal ske udsendelse til de nye paneldeltagere, skal du også schedulere en fast udsendelse ved at oprette en yderligere opgave hvor du vælger Spørgeskema implementering.